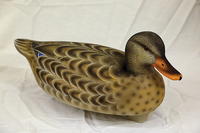
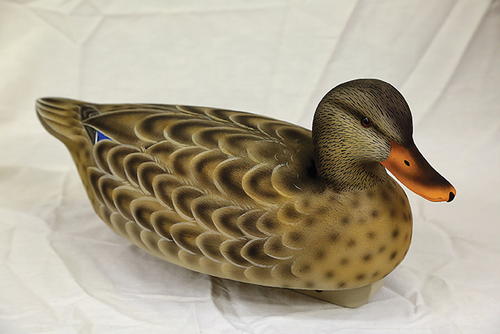
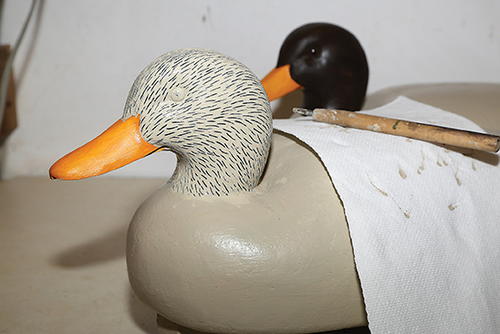
A Cork Mallard
Part Two: Painting
If you have an itch to paint, scratch it!
I developed and evolved the techniques presented in this tutorial during my 35-plus years of decoy making and I have used them to make more than 500 cork hunting decoys that have seen service in gunning rigs from Alaska to Florida. These methods are the distillate of many hours of experimentation, trial and error, and conversations with other decoy makers.
Periodically I receive decoys that I have made, often decades earlier, to be repaired and repainted. Many of these decoys have seen hard service and, although they show considerable wear, they still look great and confirm my belief that my painting methods and materials produce a product that will stand the test of time.
Over the past 15 years I have taught the methods demonstrated here to many students and have found that even with little or no prior painting experience they are able to create beautiful paint jobs in a surprisingly short period of time.
INSTRUCTIONS
-
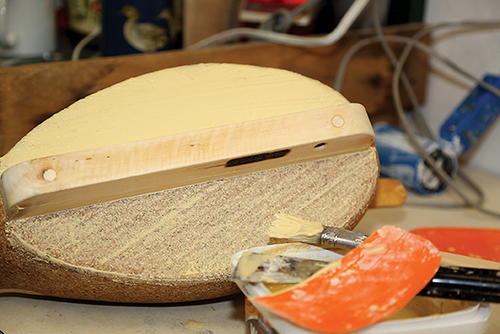
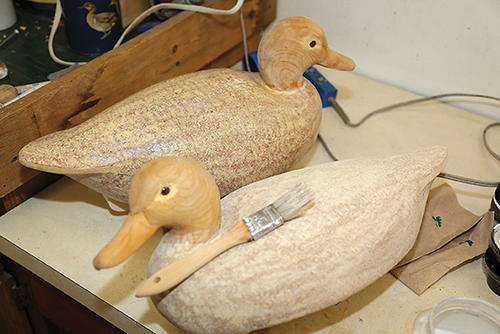
My preference when painting cork is to create as smooth a surface as possible by filling all of the voids and dings in the carved cork surface with Elmer’s interior wood filler. To prevent the raw cork from absorbing water and drying the wood filler while I work, I first seal the body with one coat of Jansen’s Cork Sealer. Then I brush on a heavy coat of wood filler and drive it into the voids on the flat bottom with a putty knife or a stiff piece of plastic for the curved sides.
-
After the wood filler has completely dried and I’ve sanded the body smooth with 100-grit sandpaper, I give the body and keel two more coats of sealer. Seal the head with a single coat of spar varnish and allow it to dry for 24 hours.
-
These decoys have been base coated with Golden acrylic paints as follows:
On the bill, use cadmium red, cadmium yellow medium, and a drop of phthalo green to mix the orange base color.
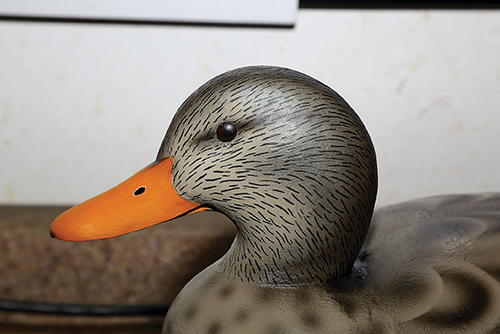
For the head, mix a small amount of carbon black with burnt umber to create a very dark brown (nearly black) for the undercoat of the scratch-painted head.
The body gets a putty color from a mix of titanium white tinted with yellow ochre, raw umber, and a touch of green oxide to kill any pink (from the umber) that may show up when making the mix. The final color should be a little “cool.” The cool base is an important starting point that will allow you to warm up the decoy colors in a controlled manner in the final stages of painting. -
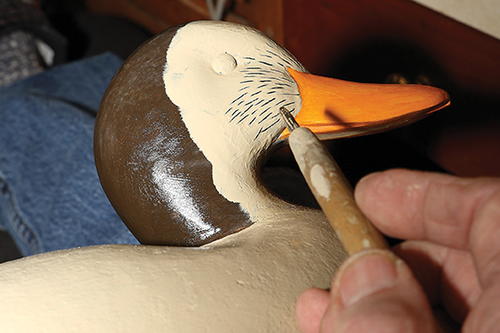
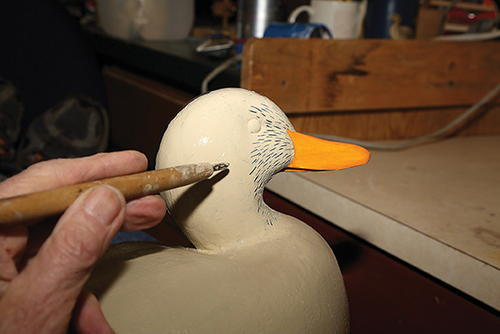
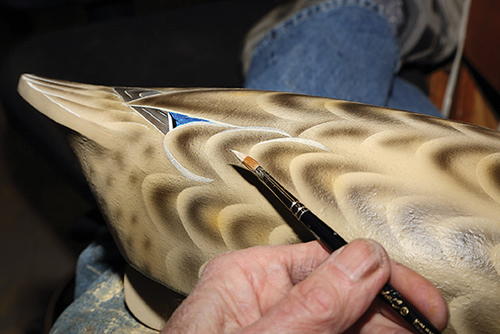
Use a large brush to coat the entire dark portion of the head with a thin coat of the Slow-Dri. This coating will retard drying as you work. Make sure the coat is thin. If it’s too thick, the paint you apply will slide around as if you are trying to paint over grease. Apply the base color to small areas of the head as shown here.
-
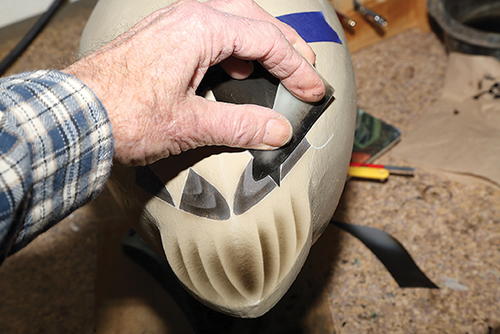
While the paint is wet, use the scratch tool to expose the dark paint below to create the tick markings characteristic of puddle duck hens’ head plumage. Work quickly, because the “wet-edge” dries as you proceed. Keep the scratch tool clean by wiping it on a paper towel and use mist from the spray bottle to retard drying.
-
When you finish scratching one area and before it dries, add more paint to the next location you intend to scratch.
-
There is a knack to using this technique and with time you will develop a rhythm that allows you to work quickly, without premature paint drying, and produce a neat end product in about 20 to 30 minutes.
-
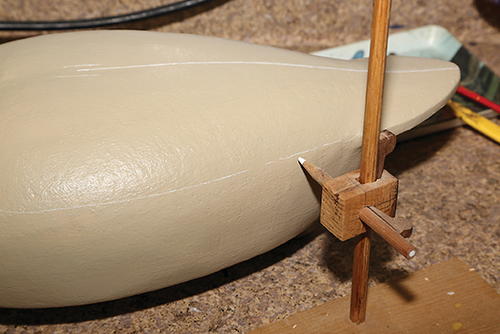
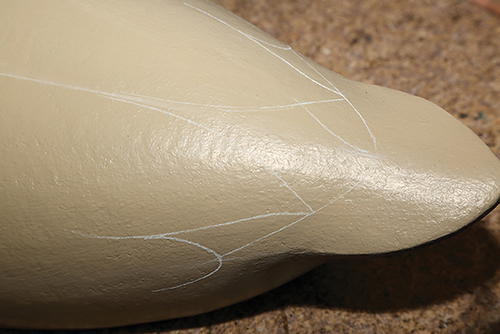
In order to maintain symmetry during feather painting layout, I like to establish a centerline down the middle of the back and a height line on either side of the decoy body. Here I am using a simple, shop-made tool to find the center. The tool is a 4"-thick scrap of cork with a strip of acetate sheet pinned to it. Set the acetate so that it overlaps the back to where you estimate the decoy’s centerline to be, and make a mark. Switch the tool to the opposite side and make a second mark as shown. The exact center lies between those marks. Use a flexible ruler and draw the centerline to the point of the tail.
-
I use this shop-made height gauge to mark height lines on both sides of the decoy, forward from the base of the tail.
-
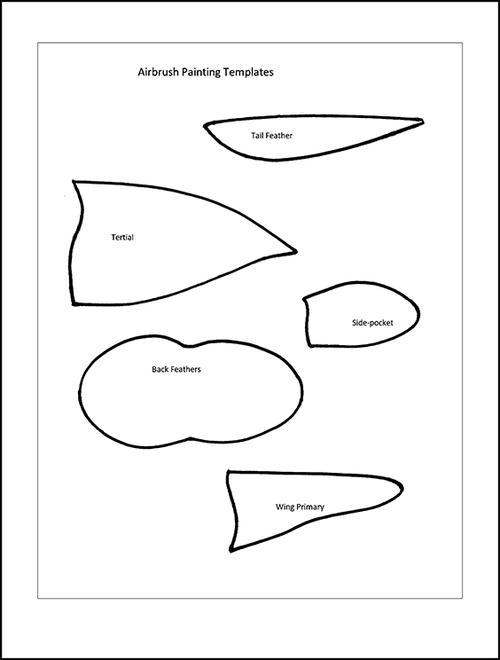
Using a white charcoal pencil and templates, I have traced the large tertial feathers, the primaries, and the first side-pocket feather. I use the centerline and the height gauge lines to help position these feathers. When airbrushing decoys, I use a general- purpose, double-action, gravity-fed airbrush with a .035-mm needle and I operate at about 15–20 pounds of air pressure. Most of the paints that I use are Golden High Flow acrylics.
-
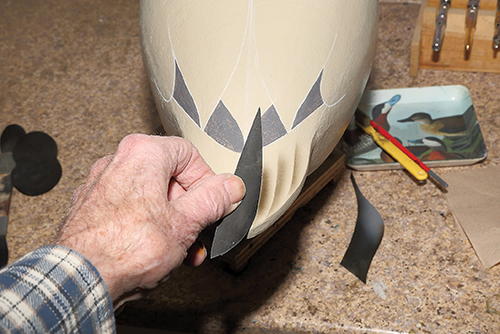
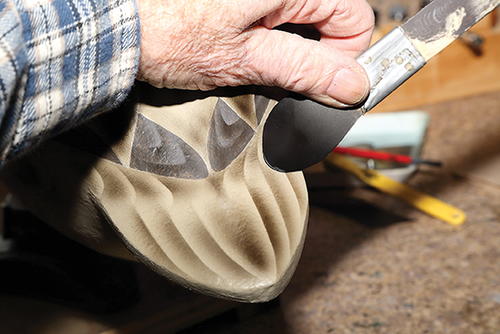
I always start airbrush painting with the tail and a vinyl-plastic template to mark the edge of each feather, one at a time. Start by covering the second feather in from the side of the tail with the template, leaving the edge feather exposed, and gently spray the dusk color along the edge of the template to darken the center of the outer tail feather. Leave the outer edge of the feather lighter in color than the center. Pick up the template, wipe off any wet paint, and move it to cover the third feather in. Repeat until you reach the center feather. At that time, turn the template over and begin on the other side of the tail. When you have painted all of the feathers on the other side of the tail, the center feather will be the only feather left to paint. It is best to paint this feather freehand by darkening the center and leaving the edges lighter in color.
-
I’ve painted the primaries with Golden Neutral Gray #4 before airbrushing. I am using the primaries template to paint the individual wing feathers in the same way I painted the tail feathers. If you look carefully you can see that I’ve taped the tertial template in place to prevent overspray from getting on those feathers while I work on the primaries.
-
Using the side-pocket template, paint the tail coverts in the unpainted strip between the tail feathers and the primaries.
-
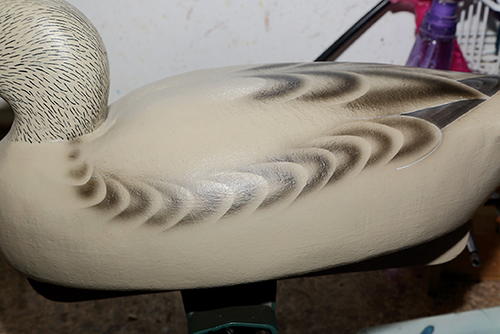
Paint the tertials freehand while covering the first back feather with the large back feather template. Notice that I’ve painted the exposed rump between the tertials and the primaries with large, soft dots to create the impression of soft feathers in this area. Use your templates as shields so that you can paint this area without getting overspray on areas that aren’t painted yet.
-
Paint the back feathers one at a time, switching to the smaller template as you move forward with your painting. I generally follow the centerline forward and quit when the space runs out up near the back of the head. At this point quit painting the back and move to the side pockets.
-
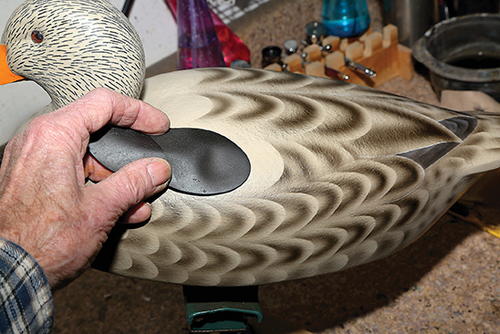
When I paint the side-pocket feathers, I keep the sharper curve of the template up for the first two feathers, and then I turn the template over so the remaining feathers have less curve on their top edges. This gives the line of feathers a curve that dips and then rises as the row approaches the neck. As you approach the neck, shorten the feathers. Near the base of the neck, stop using the template and continue the row with soft dots.
-
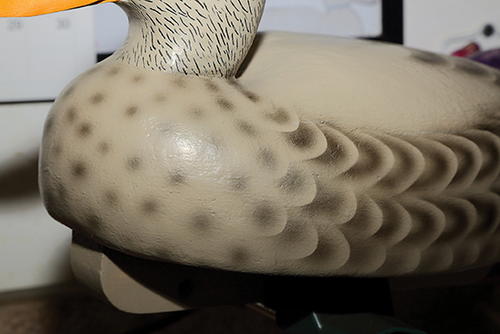
I add additional rows of side-pocket feathers to complete the sides of the decoy. Near the breast I fade the side-pocket feathers into the breast feathers, which I render with soft dots. The dots are in curved rows, with adjoining rows staggered.
-
Use the smaller back-feather template to paint in the remaining back feathers. In order to fit some of these feathers into the available space, you can paint only the top portions.
-
I paint the under-tail rump with soft dots in loose rows.
-
To add the eye stripe, darken the crown, and darken the cheeks, I use the airbrush freehand with dusky paint.
-
Use the dusky color to paint the saddle on the bill. Brush on carbon black to paint the nail. Look over your handiwork and darken any areas that are too light with the dusky paint.
-
Use Golden High Flow Transparent Brown Iron Oxide and Quinacridone Nickel Azo Gold in your airbrush to add the rich, warm colors to the interiors and margins of the feathers painted on the back and the side pockets. Apply the same color to the cheeks, breast, rump, and base of the tail. Study reference photographs of mallard hens and mimic the distribution of the warm colors on real birds. I concentrate the colors on the breast, the interior and bases of side-pocket and back feathers, the rump, base of tail, and so forth. The under-tail and feather tips get cooler colors.
-
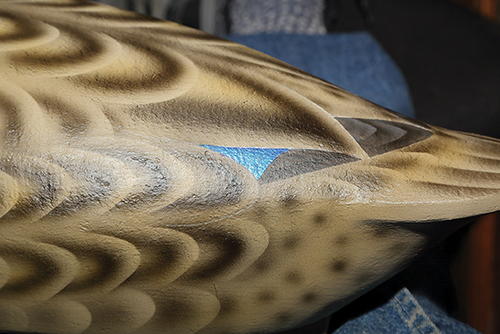
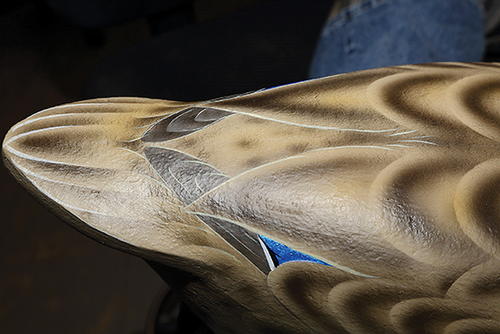
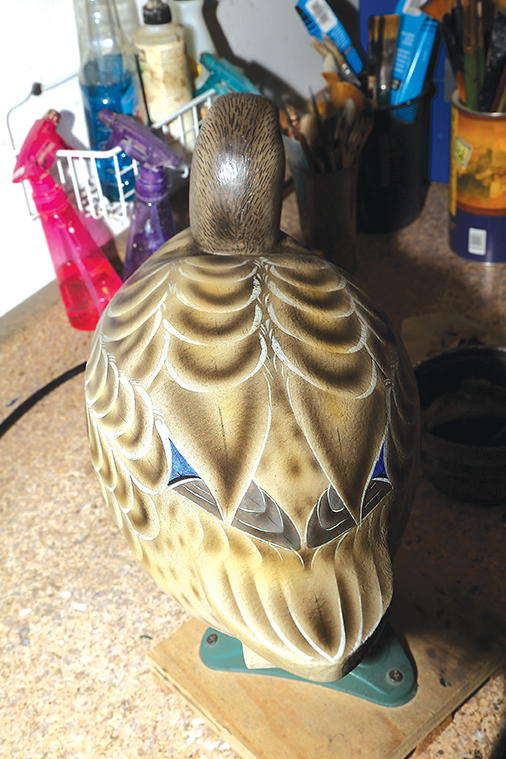
Most people expect to see the speculum on a hunting decoy so I always add one. The color here is two coats of Createx Pearl Blue applied with a sable brush over a white gesso base.
-
Use high-quality sable brushes and thinned acrylic paints for detailing the edges of feathers. I tip the tail feathers with the base color lightened with titanium white and edge the primaries with raw sienna lightened with titanium white. I paint the edges of the speculum feathers with carbon black and the tips with titanium white.
-
I edge the side-pocket and back feathers with the original body base color applied heavily (don’t thin) with a red sable pointed round brush.
-
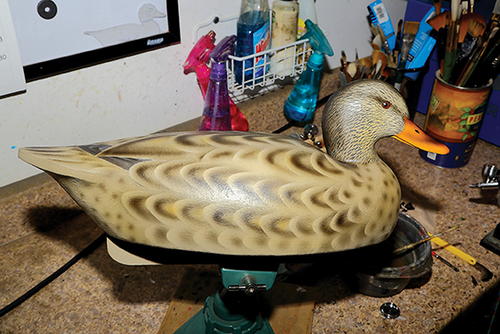
Here is the finished decoy awaiting its final coatings. Golden brand acrylic paints are very durable but I applied the airbrush paints in very thin layers. These would wear off quickly during use, so I add two spray applications of protective coatings. I first spray the entire decoy with Golden GAC 500 thinned with
Golden Airbrush Medium. Gac 500 creates an impervious, transparent
acrylic layer that isolates the paint from the second protective coating. The second protective layer is Golden MSA Matte Varnish thinned with turpentine. This product is incredibly tough and transparent (it actually enhances the painted colors), is rated for outdoor use, and creates a beautiful, velvety soft, matte finish that really enhances the softness of the painted feathers. It dries in minutes and cures in 24 hours. After that, you can take your new decoy on its first hunt!
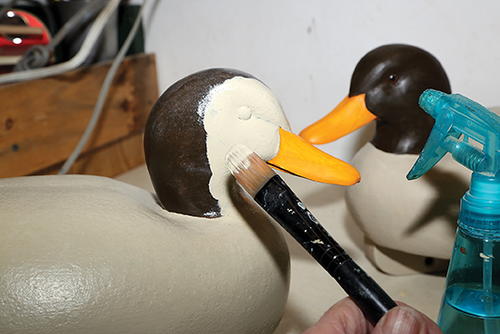


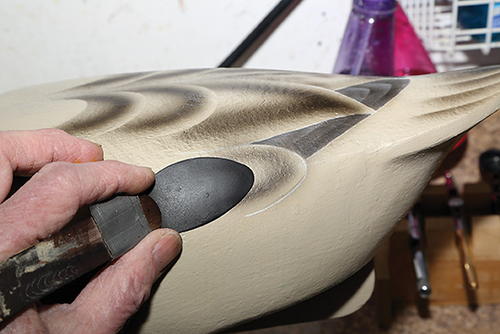


SCRATCH PAINTING THE HEAD
Scratch painting is a traditional method decoy makers developed long ago to create the “ticking” pattern common on the heads of black ducks and hen puddle ducks. It is a simple and effective way to paint these heads. In general, the process involves painting putty-colored paint over the dry, dark, base-coated head and then using a nail to scratch through the wet paint to reveal the dark below. This worked very well for Shang Wheeler, who painted his cork black duck decoys with very slow-drying oil paints. Modern acrylic paints dry quickly, so it would seem this process wouldn’t work with them, but it can be done!
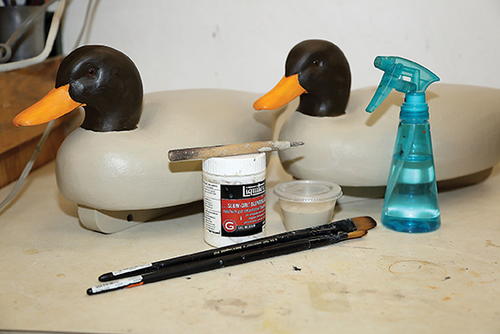
In the foreground of the picture for step 3, you will see the materials you need:
- Liquitex Slow-Dri Blending Gel
- Putty-colored base color paint
- Two large paintbrushes
- Scratch tool—a common nail with the head cut off and the point filed to a wedge shape, inserted into a short dowel handle
- Spray bottle of water and paper towels
AIRBRUSH PAINTING: TWO STEPS
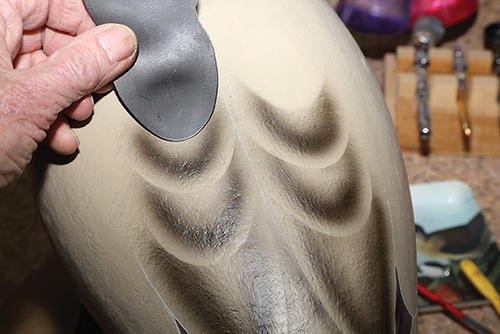
I will do the airbrush painting of this decoy in two basic steps. First, I lay out all of the feathers with a dusky color mix I make by adding a small amount of carbon black to sepia. The color should be very dark brown, tending to black. This creates a monochromatic pattern representing the basic layout of hen mallard plumage. Second, I paint all of the feathers with transparent paints to add the rich, warm reds, browns, and gold colors that are characteristic of hen mallard plumage.
Jim Higgins made his first cork decoy in 1974. Since then, his Sneakbox Decoy Company has produced hundreds of decoys for duck hunters from Alaska to Florida. Jim’s love of waterfowl and duck hunting led him to complete an MS degree in biology (thesis topic: waterfowl habitat selection) and start full-time decoy carving after his retirement in 2005. Jim shares a 230-year-old farmhouse in Eliot, Maine, with his wife of 50 years, Elizabeth. Each year they travel to hunt ducks in North Dakota and to fly-fish for cutthroat trout in Montana with their two grown sons.
Read NextCarve a Peregrine Falcon Head