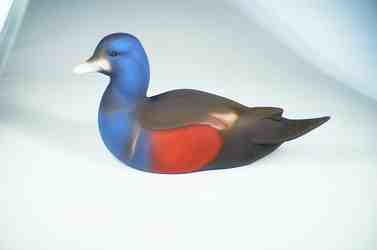
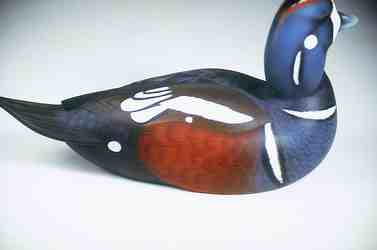
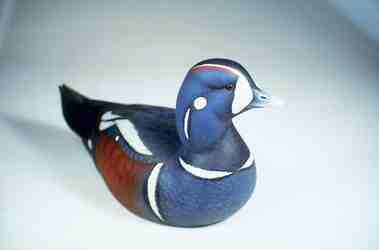
Harlequin Smoothie Painting
When painting a smoothie, the nice thing about making mistakes is that you can virtually paint over them. You do not have to worry about stripping paint or filling in texture. After all, what is texture? Practice, right? You start wood burning at the rump, and by the time you reach the head, you have “locked into the groove.”
I see so many carvers spend hundreds of tedious hours texturing their carvings, only to hurry the painting process. My advice is not to worry so much about texturing, but rather, focus on and practice painting. Years ago, when I first started making smoothies, my intention was to practice my weakest link, which was painting. At that time, I could produce two smoothies for every textured, decorative carving. I have heard it said that “repetition is the mother of skill.” The more done does, the better one becomes, Confidence comes with experience.
In this article, I will illustrate the steps of preparing and painting a harlequin smoothie drake. After reading an article or taking a course, if you can pick up a tip or two, you will improve as an artist, and thus the time will have been well spent. With this article, it is my hope that you will gain time-saving techniques, as well as information on paintbrushes, paints, and airbrushes.
Although this is my eighth harlequin smoothie, I learn and progress with each one. Remember, practice makes perfect.
“If we did all the things we are capable of doing, we would literally astound ourselves.”
—Thomas Edison
Victor Paroyan is a three-time World Champion for decorative wildfowl and a five-time World Champion for decorative smoothies. A carver since 1996, he is the author of Wildfowl Carving Magazine’s American Goldfinch workbench project.
Step-by-step instructions for painting your harlequin smoothie
For a closer look at each step, click on the photo to enlarge.
-
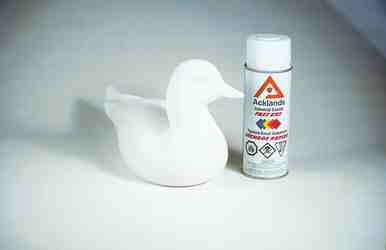
Once your harlequin is completely carved, rough-sand the decoy using 100-grit sandpaper. Then fine-sand with 300-grit sandpaper. To seal up any scratch marks or small holes, mix up a sanding solution of 80 percent Deft to 20 percent baby powder, and, with one heavy coat, cover the entire decoy (this is a little tip I picked up from fellow carver Glenn Ladenberger). Let the solution air dry for one to two hours. Finally, sand with fine sandpaper (350-grit or higher) or 000 steel wool.
-
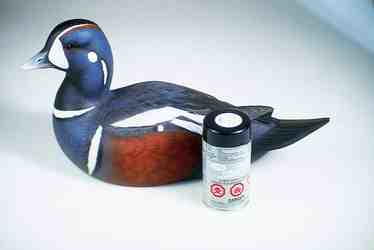
The next step is to primer coat the bird. Using an enamel-based flat white paint, spray the entire surface (two coats if necessary). Allow the paint to dry and harden overnight. This primer coat will fill any remaining scratch marks and give you a nice white canvas to paint on.
-
Proper reference is important for any project. I was fortunate, many years ago, to obtain a harlequin skin. (With a little work you can mount your own skin.) This skin was mounted by a fellow carver, Lionel Dwyer. In the past, the Royal Ontario Museum has loaned study skins to carvers. Natural history museums near you may have study skins, too. My point is that reference materials is not impossible to obtain.
-
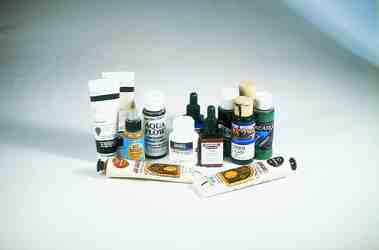
I use Jo Sonja’s paints for the principal coats, Liquitex for wash colors, and Chroma, Aqua Flow, Aero-Pro, and Createx for airbrushing. I use inks for fine lines and hairline splits.
-
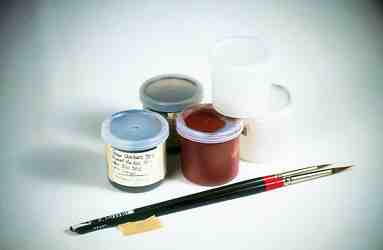
When painting over a long period of time, it is wise to mix up and store main colors in small, plastic jars (film canisters work just as well). When using water-based paints (acrylics), I prefer to use #2 or #4 Loew-Cornell paintbrushes. For very fine lines, I use a #0 Raphael. The four main colors to be used are:
a. French blue (80%), ultra deep blue (10%), raw umber (5%), smoked pearl (5%).
b. Gold oxide (75%), yellow oxide (20%), provincial beige (5%)
c. Burnt umber (65%), raw umber (25%), Prussian blue (10%)
d. Raw umber (40%), burnt umber (40%), ultra deep blue (10%), provincial beige (10%). -
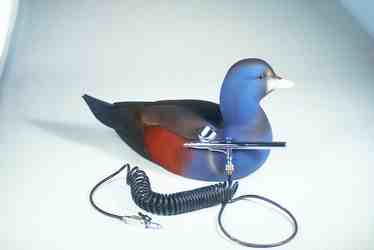
I do the bulk of my airbrushing with an IWATA HP-C airbrush with its one-ounce, gravity-fed cup.
-
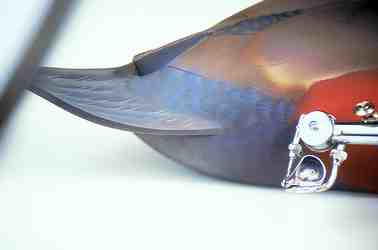
Using the IWATA HP-C airbrush, I spray the dark color mixture (c) on the tail, rump, and shadows on the back and head. I next mask off the side pocket and spray with the orange mixture (b).
-
Using a watery version of the harlequin blue mixture (a), spray the head and chest. The underlying dark tones will create shadows, while the white primer undertones will create highlights. With the light brown mixture (d), spray the back and wings.
-
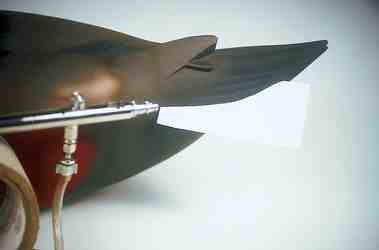
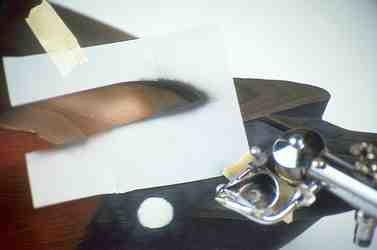
To create a dark edge on the tail feathers, cut out a stencil of a tail feather. Using carbon black, spay with a smaller airbrush. I use a Badger 100SG, a tool that has become one of my favorites since I first tried one that was given to me by Georgetown Arts. Airbrush the black edges.
-
Using a fine paintbrush (#2 or #4 Loew-Cornell) and carbon black paint, brush on the rump feathers.
-
Switching to my Paasche AB airbrush, I airbrush carbon black on the inside of each rump feather. Then, with my harlequin blue mixture (a), I lighten the centers of the tail coverts. Finally, with my #0 Raphael paintbrush, I put in splits using carbon black. The splits in the tail are done with the dark mixture (c) and lightened with smoked pearl paint.
-
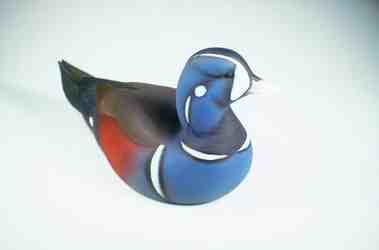
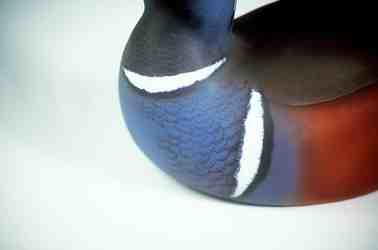
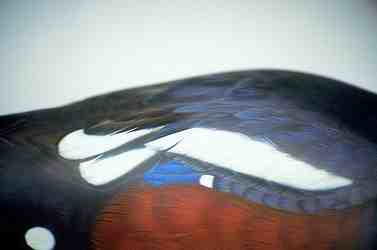
One the majority of the rump is finished, work begins on the head. Rough in the white patches using warm white. Make sure the patches line up symmetrically on both sides (three or four coats of white may be needed to cover the blue). Finally, with the Paasche, airbrush the shadows using carbon black.
-
Hairline splits of carbon black and warm white are brushed on with a #2 Loew-Cornell or #0 Raphael paintbrush. Do this for all black-and-white areas.
-
To create chest feathers, use small brush strokes of carbon black on the blue areas (chest) and the blue mixture (a) on the black areas (neck).
-
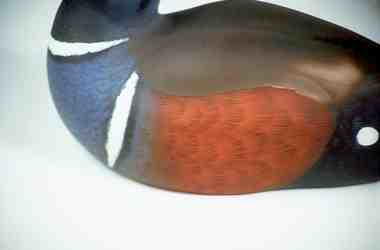
Using the light brown mixture (d), brush on a feather pattern for the side pocket. With the Badger 100SG airbrush and orange mixture (b), airbrush the centers of the newly created feathers to soften the blend.
-
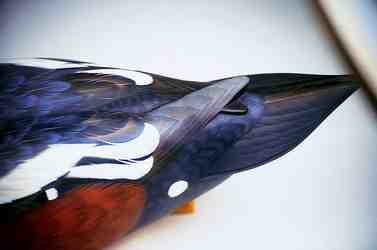
Using a stencil cutout of a primary flight feather, airbrush carbon black edges. As with the tail, put in some light-colored splits. Finally, apply a raw umber (Liquitex) wash.
-
As you did on the head and chest, block out the white feathers on the back and tertials using warm white.
-
Moving to the back, brush on a feather pattern with the harlequin blue mixture (a). Then, with the Paasche AB, airbrush the centers of the back feathers using the light brown mixture (d). Finally, the splits are put in with the dark rump color (c). Quills can be added later using pearl white.
-
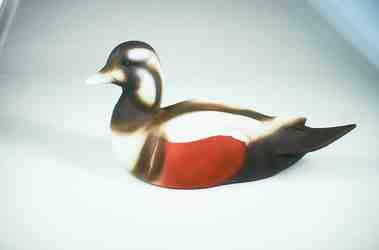
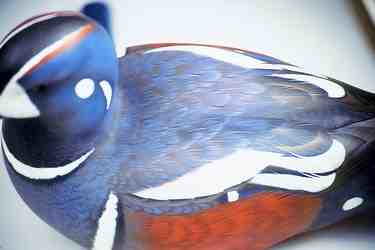
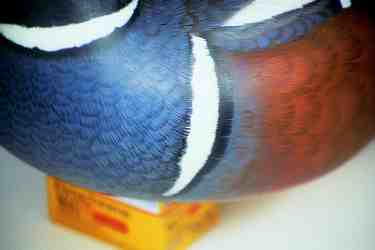
Here are the finished back, tertials, and side pocket. To create a feather-like appearance, use small, hairline strokes. By darkening and lightening the four main colors, you create different values. These values are used to shadow and highlight feather groups.
-
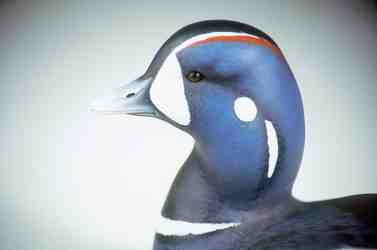
Paint the entire bill with the Paasche AB airbrush. First, paint the shadow and dark areas of the bill with a burnt umber-ultra deep blue mixture. Then, using raw umber, ultra blue deep, and warm white (to lighten), make a blue-gray color to airbrush over the entire bill. I highlight the tip of the bill and nostrils with titanium white. Finally, airbrush a Liquitex raw umber wash coat.
-
Once the basic colors and patterns are established, the cleanup work is left. These are all the details and finishing touches that give a textured appearance to the bird (highlighted feathers, splits, outlining feathers, shadows, quills, and so on).
-
The textured look of a smoothie is achieved by using tiny strokes of the four principal colors. I highlighted the chest with a lighter version of the harlequin blue mixture (a).
-
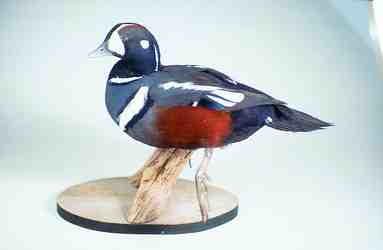
With the harlequin complete, it is often a good idea to set it aside for a few days or longer. When you return to your carving, you will get a fresh impression, and you may or may not notice faults in certain areas. For example, you may find that the white patch is too big or too small, or the head color is too blue. If there are areas that do not look right, you can correct them.
-
The last step is to seal your harlequin smoothie. Using Testors Dull Finish #1260 (available at most hobby shops), spray one heavy coat over the entire decoy. Let it dry for at least a day.


Fall 1998 issue of Wildfowl Carving Magazine
-
This painting tutorial is featured in the Fall 1998 issue of Wildfowl Carving Magazine.