The Blair School, Part One
If you want to carve in a regional style, you first must acquire a little understanding.
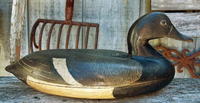
The two-piece construction of a “classic” Blair is obvious in this drake bluebill. This body joint would ride just above the waterline. The paint pattern includes blending and punctuated elements similar to those of the more numerous examples of marsh duck species that Blair carved. Note the location of the large speculum.
Carving in a historical, regional style is a journey for me. The research that's necessary to educate myself about a particular style is as enjoyable as carving and painting the decoy. The learning experience starts with a survey of decoys that exemplify the regional style that interests me or come from the hand of the specific maker I'm studying. What are the characteristics that set these decoys apart? Did different makers in a region use similar patterns? Are there any tell-tale construction methods or hardware that typify the region or some maker used exclusively? Was there some artistic flair that gives a specific maker away? By poring over photos from the excellent books available, along with an increasing number of photos accessible on the Internet, a researcher can begin to sort out the different styles or schools of historical decoys. However, the best way to learn is to interact. Attend shows and see the decoys first hand. Collectors and dealers are usually willing to discuss their stock. If you are lucky, you can even handle a decoy or two.
One of the more prominent and often emulated historical styles is the one attributed to John Blair, Sr. (1842-1928), of Philadelphia. Blair carved decoys in the late 1800s along the Delaware River. He was an avid outdoorsman and may have been a wheelwright and carriage maker. When you think about the talent a woodworker needed to craft well-balanced wood-spoke wheels and the parts of a finely crafted carriage, you can imagine the caliber of craftsman Blair must have been. Such a background would explain Blair's ability to craft some of the best-constructed decoys ever made. Whatever the source of his talent, the beautiful shapes, flowing lines, and tight construction joints of his decoys make them wooden works of art.
Any decoy aficionado will tell you, though, that a great decoy needs more than just great shape. It needs great paint as well. Blair's decoys certainly show excellent painting, although he did not paint them himself. We do not know who deserves credit for the fine work. The mysterious painter was probably a friend or coworker, but we know him only as the trolley painter or the carriage painter. At the time, painters added the details and fine finish by hand to the intricate carriages of the day, so a carriage painter would certainly have possessed the skill required to paint these wonderful decoys. The combination of masterful carving and masterful painting makes the Blair decoys so desirable. This rare juxtaposition of talents is as important to Blair style as the individual contribution of each craftsman.
It takes repetition and plenty of trial and error before a carver finds his or her own preferred approach to pattern making, carving and shaping, construction details, paint patterns and application methods, and finish hardware. Over time, these means and methods become a carver's standard operating procedure and the recurrence of specific details in design and execution becomes the maker's mark. With Blair's decoys, what started as the distinct style of one carving and painting team went on to influence a regional style that became known as the Blair School. I'll use the photographs in this article to point out some characteristics that define the Blair style.
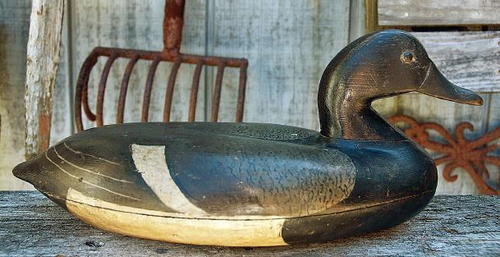
Some of the details of Blair's carving style are fairly obvious in the examples here. Some elements are considered essential for a decoy to be identified as a true Blair. Most recognizable are the flowing shape, raised shelf for mounting the head, the rounded shape of the crown of the head, and the bill's rounded end. To be considered classic style, the decoy must also have two-piece body construction and a rounded bottom. (Blair also carved flat-bottomed two-piece decoys and flat-bottomed, solid-body birds.) Another indication is the quality of the work itself. Blair was truly a craftsman, and the imprint of a master's hand is evident in his work. That intangible element may be the most difficult thing for modern decoy makers to emulate.
The paint is efficient, elegant, and masterful. The combination of smooth blends punctuated by single brush strokes reveals the signature of an artisan who was familiar with his medium. The paint schemes represent the essence of species required for a decoy but are void of much further detail. Some elements, such as the oversized speculums, are exaggerated and convey a little artistic flair that draws attention to the decoy and expresses the painter's pride in his work. Were these artistic elements meant for the ducks? Or did the painter include them to please the hunter or the maker? We will never know the true motivations or whether these stylistic elements were conscious additions or if they just developed from species to species over time. We do know that they are the unique artistic expressions from the mind and hand of a talented painter.
Once I understand the attributes of an individual carver's style or those of a specific regional style, I pick the elements I wish to emulate in my own carving. I exaggerate those elements to create my own interpretation of the original carver's style. Of course, I also incorporate elements of my own style as well. I hope that the results are a pleasing combination of both.
In part two of this series, I will paint and rig the wigeon decoy I carved. The two-piece construction, flowing shape, raised head shelf, and rounded bill already demonstrate Blair characteristics that will become more evident once I apply paint. I have included a pattern and encourage readers to carve their own Blair Style decoy, so we can all explore how to finish the decoy in the next issue. I am sure that understanding the history and details behind these decoys will help you recreate the style in a way that will make you proud.
This article is from the Winter 2011 issue. For more information on our issues, check out our issues page.
Read NextA Cork Mallard