
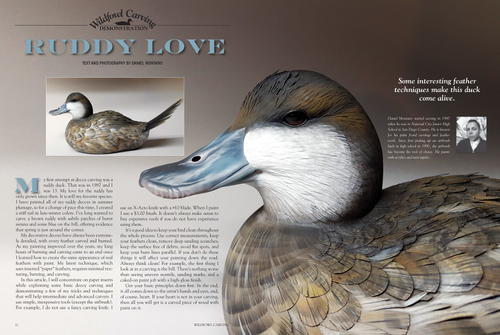
Ruddy Love: How to Carve a Ruddy Duck, Part One
Some interesting feather techniques make this duck come alive.
Daniel Montano started carving in 1987 when he was in National City Junior High School in San Diego County. He is known for his palm frond carvings and feather work. Since first picking up an airbrush back in high school in 1990, the airbrush has become his tool of choice. He paints with acrylics and uses tupelo.
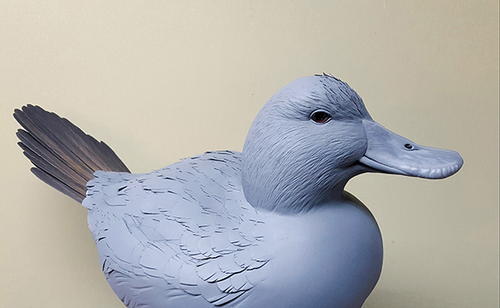
My first attempt at decoy carving was a ruddy duck. That was in 1987, and I was 13. My love for the ruddy has only grown since then. It is still my favorite species. I have painted all of my ruddy decoys in summer plumage, so for a change of pace this time, I created a stiff tail in late-winter colors. I’ve long wanted to carve a brown ruddy with subtle patches of burnt sienna and some blue on the bill, offering evidence that spring is just around the corner.
My decorative decoys have always been extremely detailed, with every feather carved and burned. As my painting improved over the years, my long hours of burning and carving came to an end once I learned how to create the same appearance of real feathers with paint. My latest technique, which uses inserted “paper” feathers, requires minimal texturing, burning, and carving.
In this article, I will concentrate on paper inserts while explaining some basic decoy carving and demonstrating a few of my tricks and techniques that will help intermediate and advanced carvers. I use simple, inexpensive tools (except the airbrush). For example, I do not use a fancy carving knife. I use an X-Acto knife with a #10 blade. When I paint I use a $3.00 brush. It doesn’t always make sense to buy expensive tools if you do not have experience using them.
It’s a good idea to keep your bird clean throughout the whole process. Use correct measurements, keep your feathers clean, remove deep sanding scratches, keep the surface free of debris, avoid flat spots, and keep your burn lines parallel. If you don’t do these things it will affect your painting down the road. Always think clean! For example, the first thing I look at in a carving is the bill. There’s nothing worse than seeing uneven nostrils, sanding marks, and a caked-on paint job with a high-gloss finish.
Get your basic principles down first. In the end, it all comes down to the artist’s hands and eyes, and, of course, heart. If your heart is not in your carving, then all you will get is a carved piece of wood with paint on it.
Materials List
- Tupelo wood cutout
- X-Acto knife with #10 blade
- Dremel tool/Foredom tool
- 1⁄32" Dremel bits
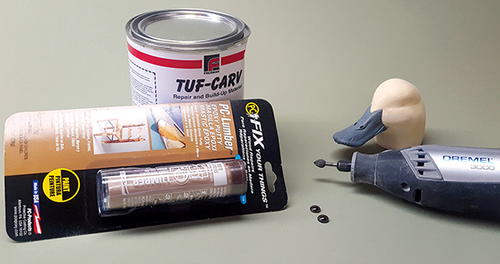
- TUF-Carv/Bondo filler
- 2-part wood repair epoxy
- 9 mm Tohickon dark brown eyes
- Study bill
- 320- and 220-grit sandpaper
- #0000 and #4 steel wool
- Krylon primer
- Wood veneer for tail feathers
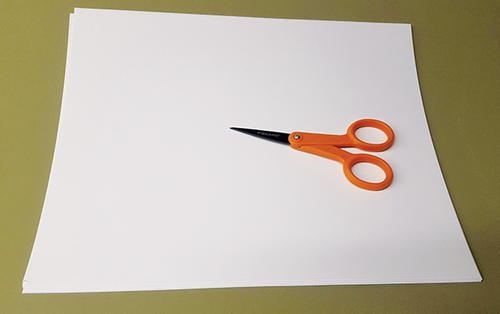
- 8.5 x 11 white copy paper and scissors
- CA glue (such as Krazy Glue)
- Wood burner
- Painter’s tape
Ruddy Duck Carving Demonstration
For a closer look at each step, please click on the image to enlarge.
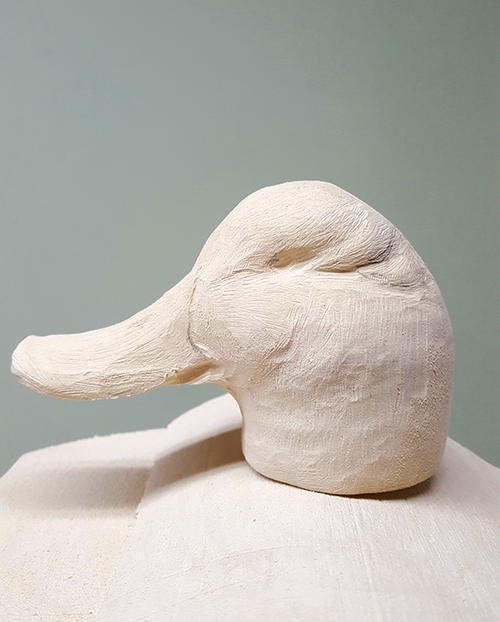
Head
I use good quality tupelo gum wood from Louisiana. However, you can use my techniques with any kind of wood.
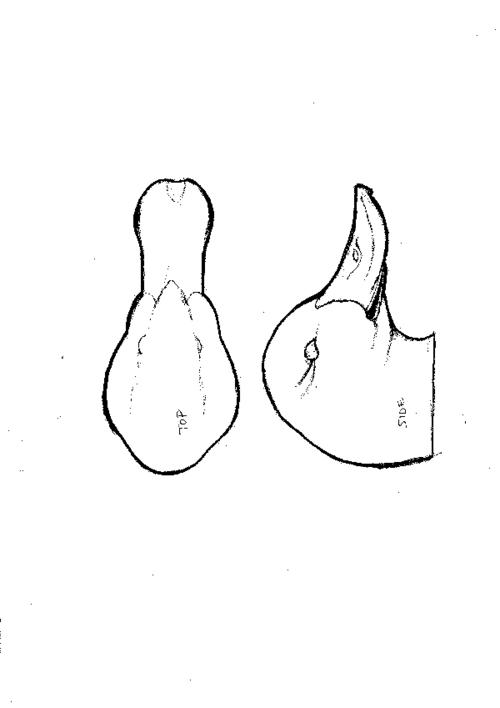
When I begin the head (A), I’m always thinking “round.” I draw a centerline right down the top of the head to help keep it symmetrical. I use a Foredom tool with a cutter bit to remove major portions of wood rapidly. I do all fine detail with a Dremel tool.
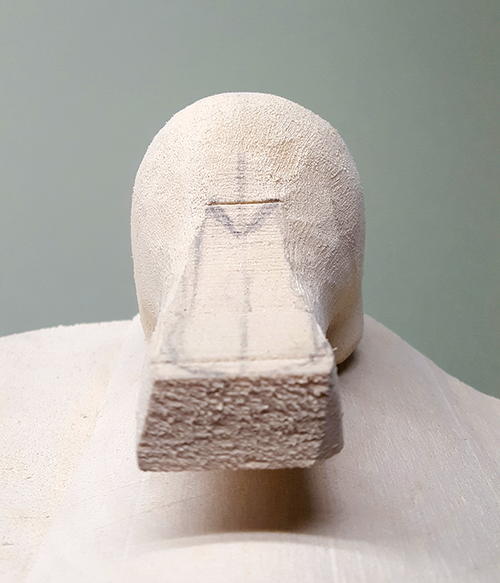
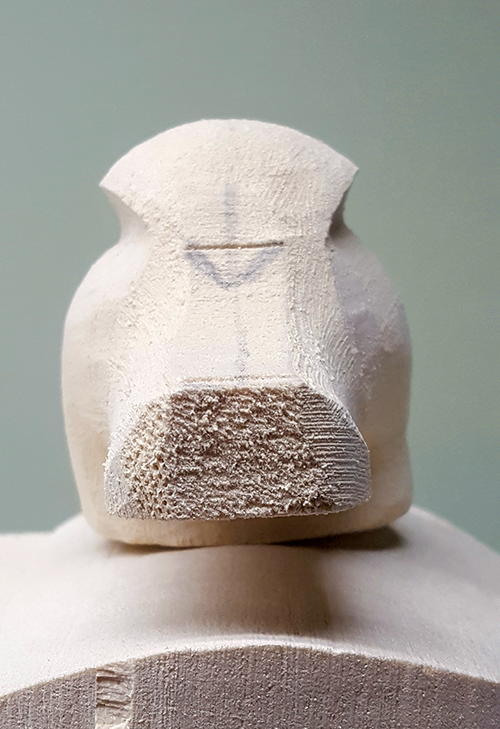
Once I’ve rounded the head, I always check all the angles—from the top, side, back, and underneath (B). It has to look good from every angle and I mean, every angle! I then proceed with the eye sockets (C), removing most of the excess wood but still leaving enough meat to work with. I want the head to start taking shape so that I can begin shaping the bill and tie them both together as I go. On this head, I shaped some bumps behind the eye area (D), giving it some character.
-
A
-
B
-
C
-
D
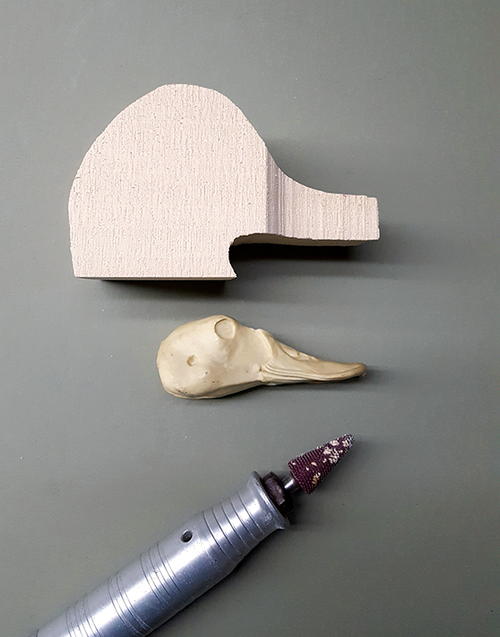
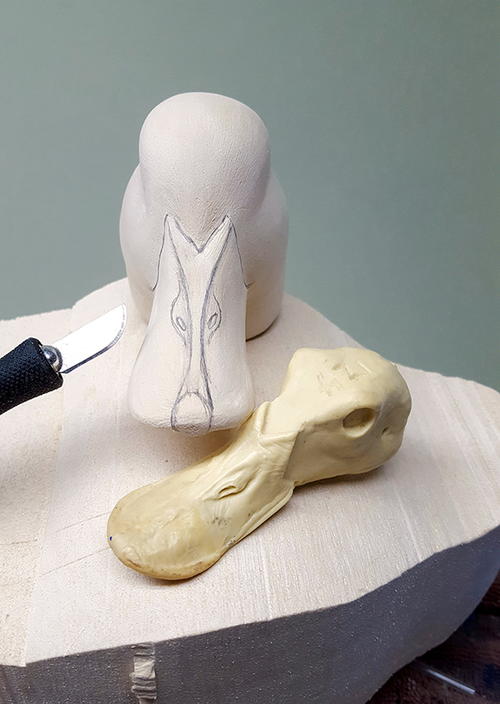
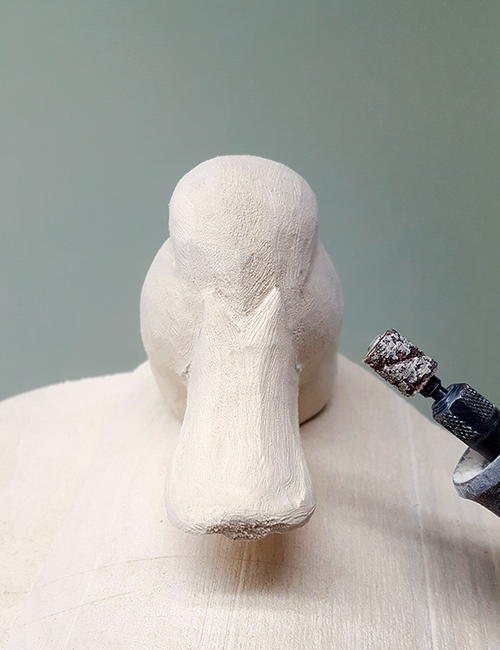
Shaping the bill
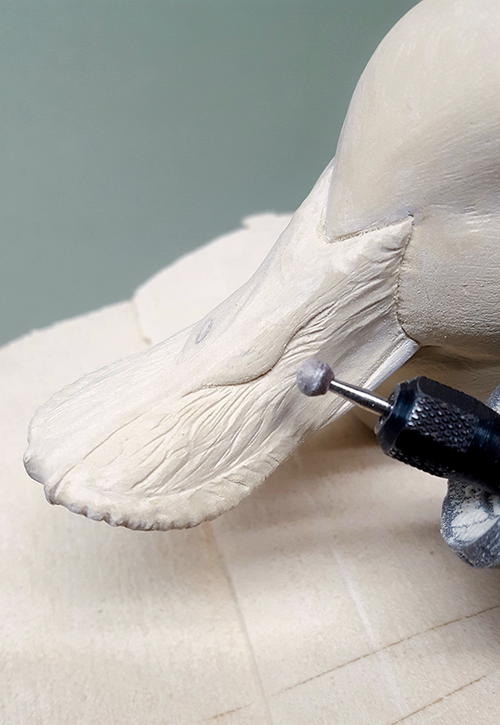
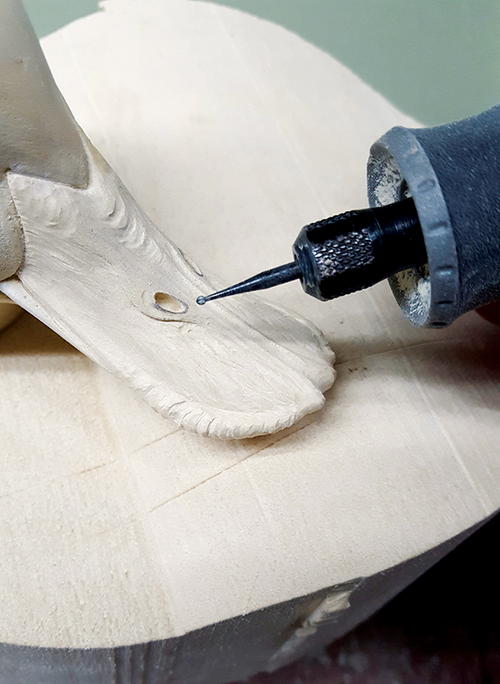
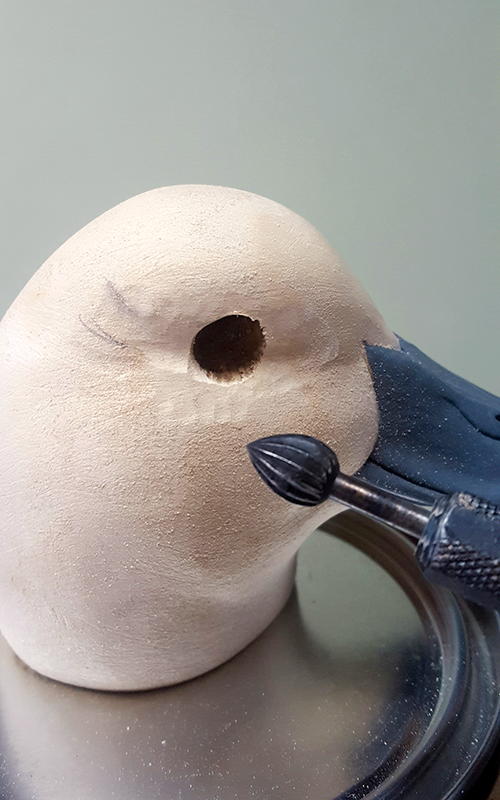
Here the bill (with my study bill) is shaped and ready for detail (A). Before beginning the detailing process, I use 320-grit sandpaper to eliminate all rough areas and grinding marks from the Dremel (B). I use a 1⁄32" cylinder bit to create wrinkles (C). I make them really deep. Once the detailed bill is ready, I will use primer to fill the wrinkles, leaving a flawless, smooth texture. After placing the wrinkles, I switch to a ball bit (D).
This gets rid of any sharp lines and creates a soft texture. I now shape the nostrils and make the nostril openings with a micro ball cutter (E). Be very careful not to hit the edges of the openings. If you do, you can use TUF-Carv repair paste to reshape them.
-
A
-
B
-
C
-
D
-
E

Prepping the bill
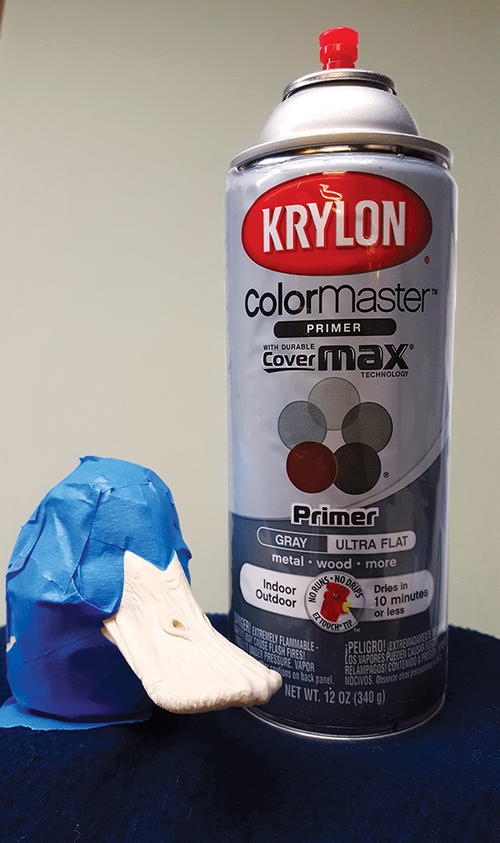
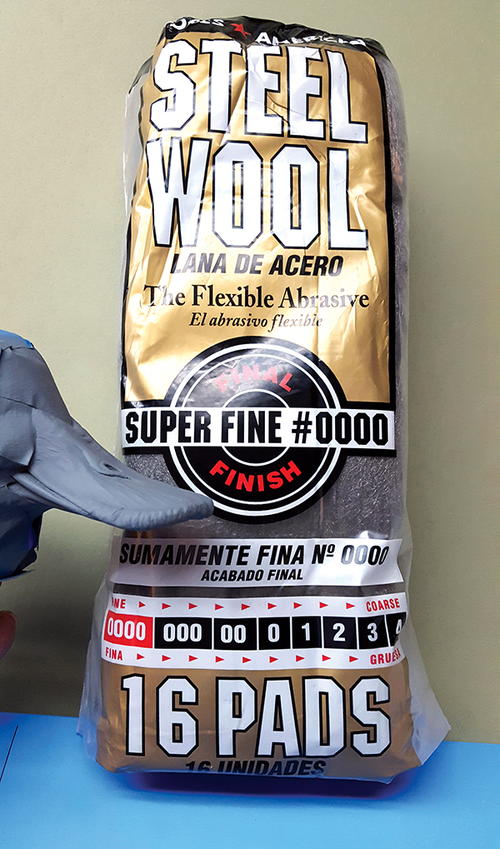
I’ve detailed the bill with wrinkles and shaped it to match my study bill. With a ruddy, I make the bill just a touch oversized and give them that curved-up look these ducks have. I take blue 2" painter’s tape to mask the head (A). When I remove the tape, the bill will stand out. I can modify the head shape to complement the bill in case it doesn’t line up. I use Krylon primer. I have tried other brands, but Krylon is the best for my method. I like dark gray because all imperfections easily show on dark surfaces. This particular primer is also a sealer. It dries in minutes and sands well. I apply five to seven coats, using steel wool between coats (B). Be sure to blow off any metal particles before applying the primer. As you can see, there are no sanding marks—the bill is super smooth and the wrinkles look natural (C). It is imperative that you have a smooth surface before you paint, otherwise imperfections will show through the paint no matter how good you are. This applies to the body, too.
-
A
-
B
-
C

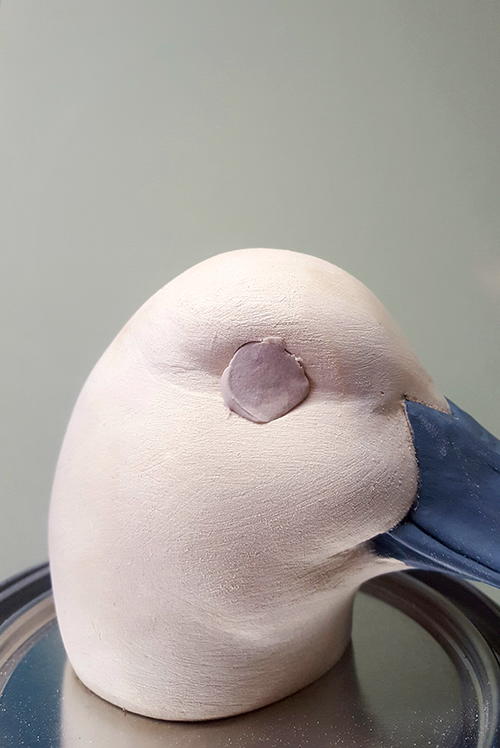
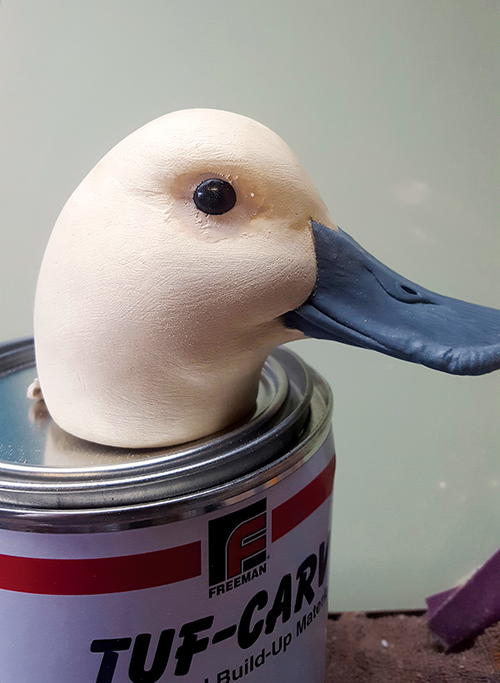
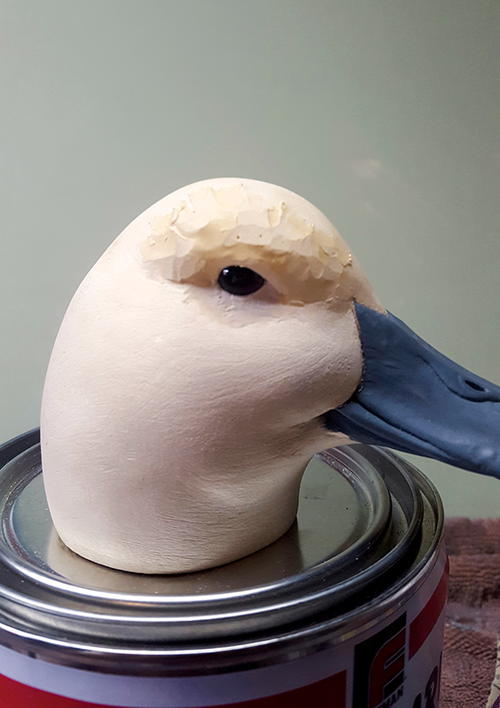
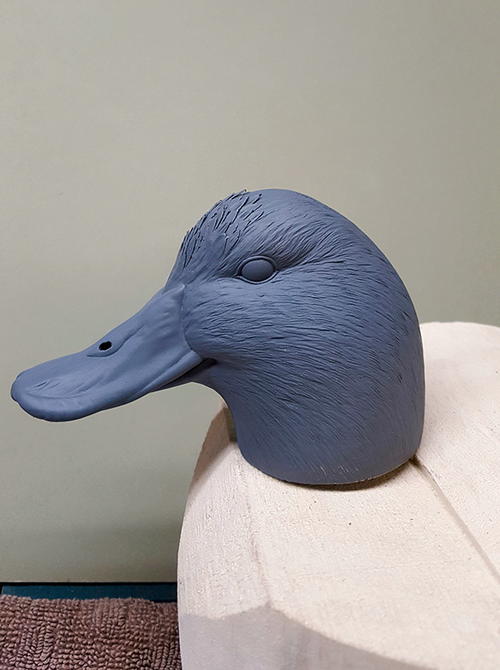
Setting the eyes
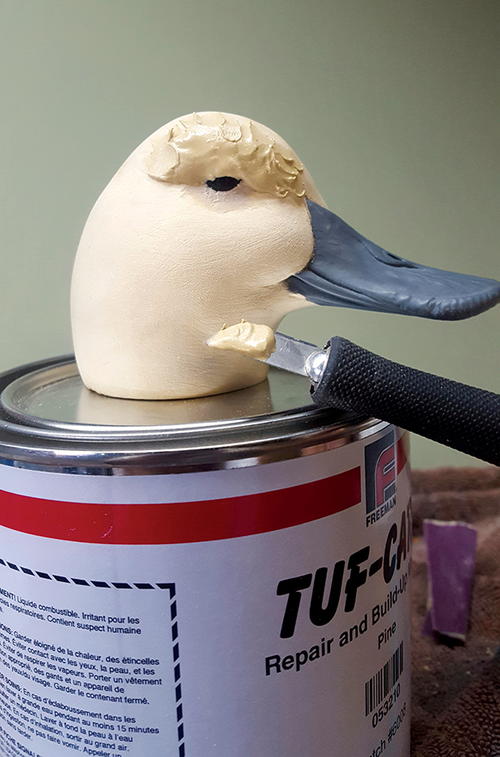
Now for the eyes. Here (A) you can see my supplies. I use a cutter on my Dremel for the eye openings (B). I make the holes oversized so I have enough room for adjustments. I fill the holes with putty epoxy (C). I love this stuff because it gives you at least 20 minutes to work. I stuff the holes and insert the 9 mm Tohickon eyes (D). Take a good look from the front and top and adjust as needed. Be sure to remove excess putty while it is still soft. This will eliminate the need for sanding around the eyes and keep you from maybe scratching them. When the eyes are aligned and set, I cover them with a bit of blue tape for protection. The next step, on all my birds, is to create the eyebrows with filler (E). This gives my birds an attitude that has become my signature look. I apply TUF-Carv right above the eye, creating the brow. I do one side at a time. While the filler is still soft, I shave off the excess and shape with my X-Acto knife (F). I continue shaping the brows after the filler hardens, using a small sanding cylinder on my Dremel. Be extremely careful not to nick the eyes. Get the basic shape down and finish shaping by hand with 80-grit sandpaper. I start creating the eyelids with my X-Acto (G). I cut the eye shape and begin to round the lids by scraping them with the blade. Do not try to sand them at any point. Use the tip of the blade to shape and round carefully. Next, sand the entire head with 320-grit sandpaper. Double-check for flat spots and grinding marks.
-
A
-
B
-
C
-
D
-
E
-
F
-
G

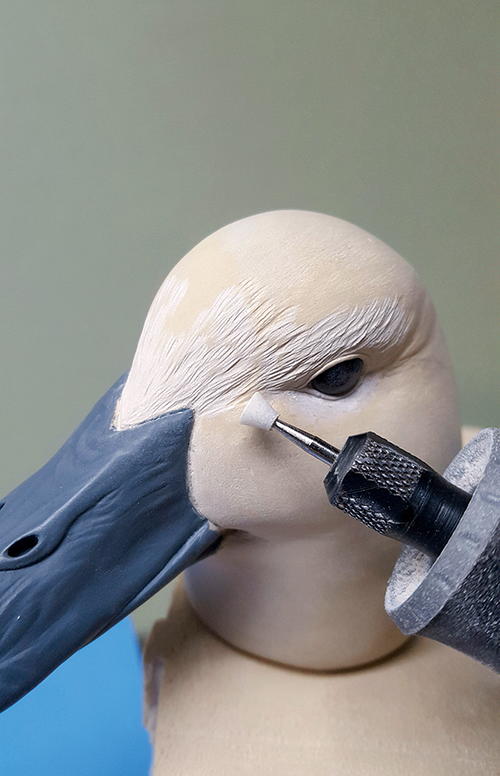
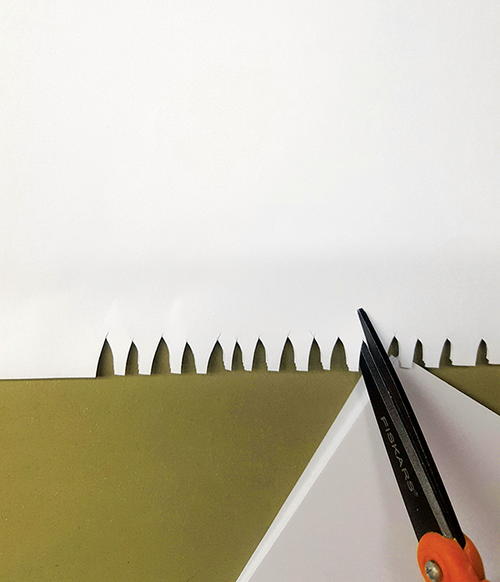
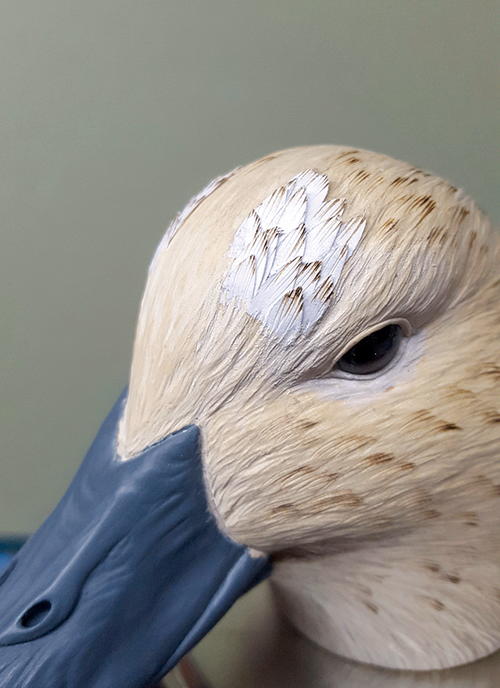
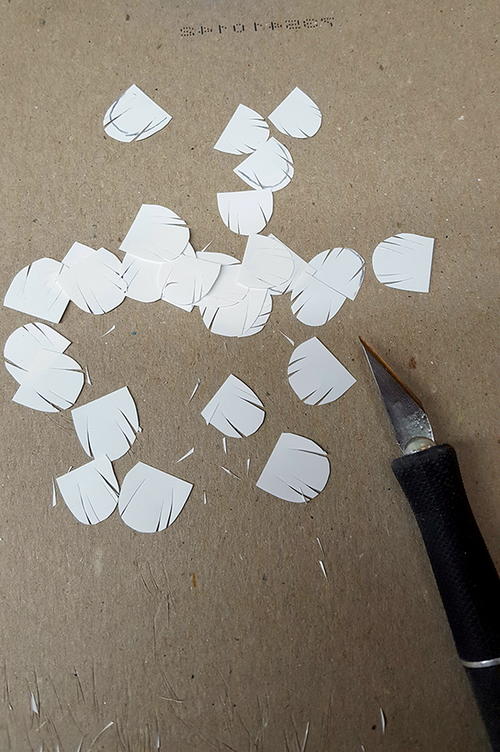
Texturing the head/adding the feathers
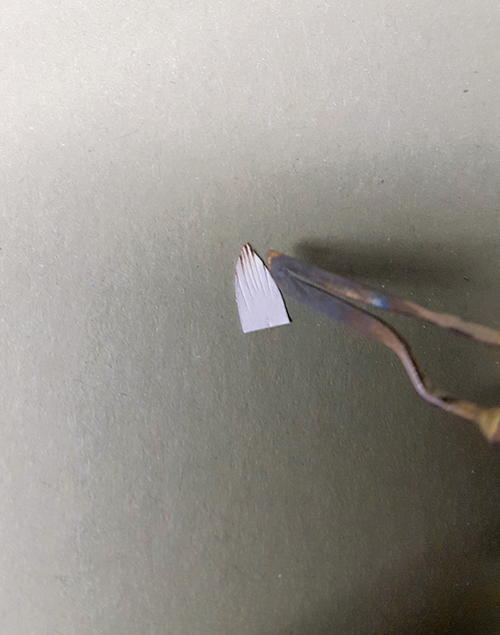
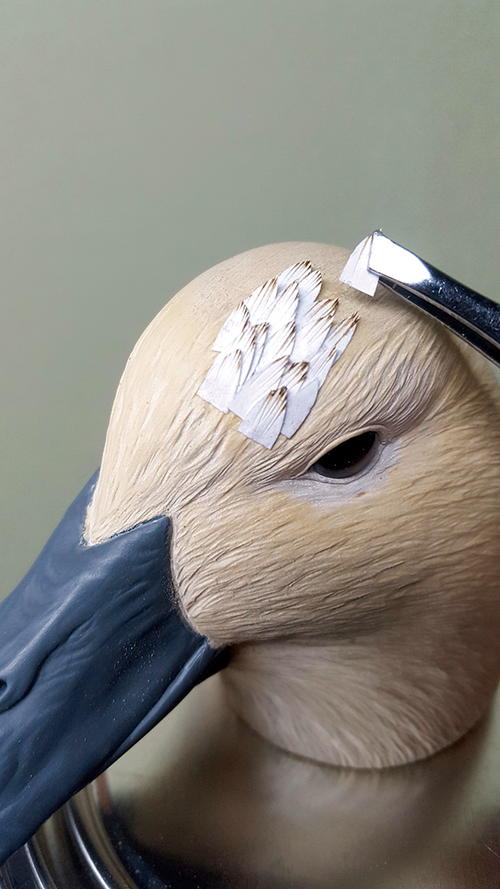
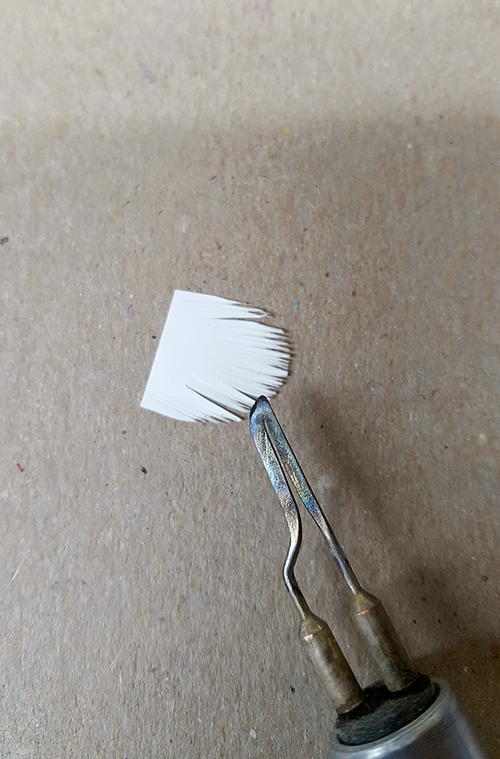
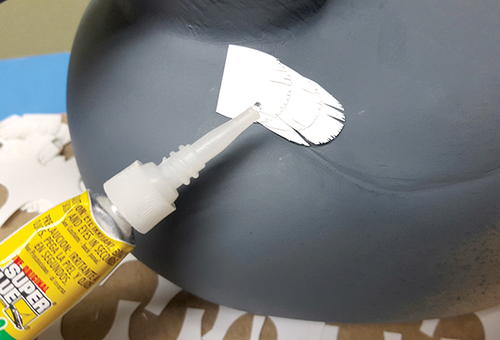
I use a 1⁄32" cylinder Dremel bit to texture the entire head. I begin at the front and work my way back (A). I draw in some guidelines with my pencil and create feather groups. At the front, the feathers are small but they gradually get bigger as you continue toward the back. This texturing will require some practice. I curve each line that I texture, creating a soft texture effect (B). Once the entire head is textured, I begin the paper feather process. I use standard white copy paper (C). Draw in your tiny head feathers and use scissors to cut out each one (D). I use a stack of three sheets to help speed up the process. Cut as many as you need. Once I’ve cut out the feathers I burn each one (E). Paper burns just like wood. Burn at a #4 or a temperature that doesn’t overheat the paper. I keep a piece of 320-grit sandpaper handy to sharpen my burning blade. When you’ve burned enough feathers, you can glue them into place with CA glue. You will need tweezers to insert each feather and help keep the glue off your fingers (F). I begin in the front and work my way back. I want only a few feathers on the crown, but it’s entirely up to you on how many. To glue, add just a dab and only on the front edge of each feather. Do not cover the entire feather with glue, and do not overload. You do not want glue seeping through and creating a mess. Press and hold for a few minutes and then insert the following feather underneath and repeat the process. Make sure to stagger your feathers and avoid that fish-scale look. Overlap them and create small feather groups.
-
A
-
B
-
C
-
D
-
E
-
F
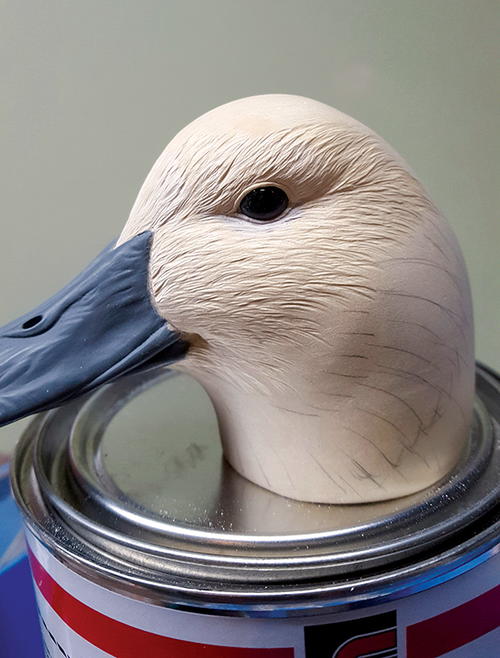
Head features, continued
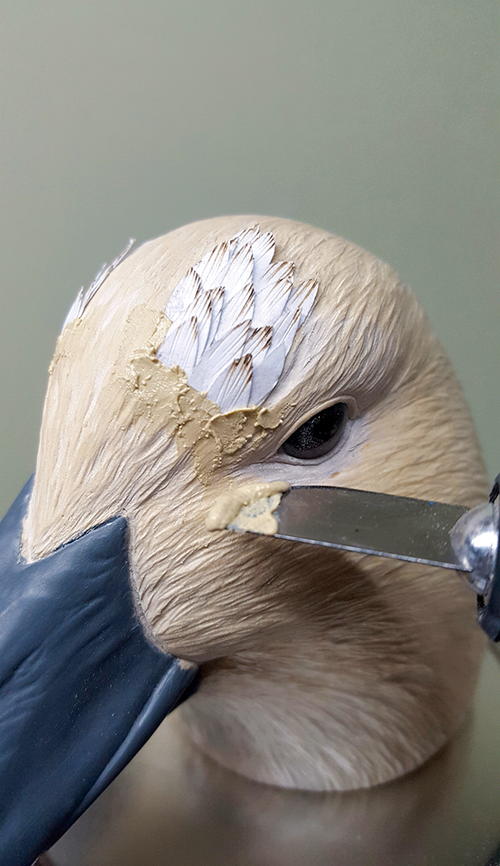
To hide the beginning seams of each feather, I cover them with filler (A). Once that hardens, I sand the filler and texture to blend. I do deep, sharp texture to help hide this area and blend flawlessly (B). Then come back with your burner and burn in some random feather edges (C). Now prep with Krylon primer (D). You need just a few coats. You don’t want to cover all the fine texture lines, but use enough to seal the head and give it a smooth
surface for painting. Knock down any rough areas with #4 steel wool.
-
A
-
B
-
C
-
D

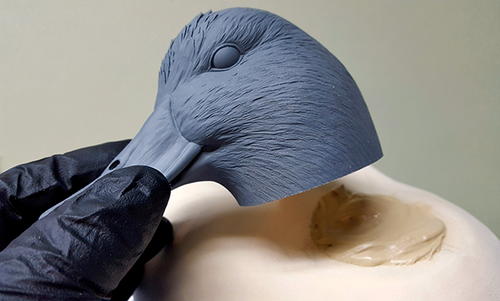
Attaching the head
First, round the body. I won’t go into too much detail on the body, other than to say it’s the same process as the head. Think round. The head is now ready to be attached. Since this is a decorative floater and will be handled with care, I will not use a dowel to attach the head. I use a fair amount of TUF-Carv on the neck joint (A). TUF-Carv is also an epoxy, so the head will be permanently attached. Press down on the head enough so that the filler oozes out, assuring that the neck joint is completely filled with no voids. While the joint is still wet, I take my knife and spread the excess, blending it to the body (B). When it’s dry, sand and shape the neck joint and add texture. When painted, the neck joint will not be visible, especially on a semi-low head position.
-
A
-
B

Body features
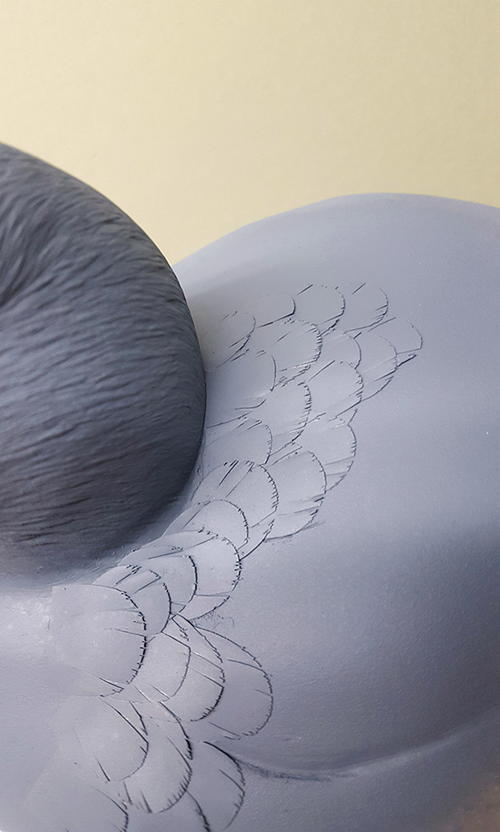
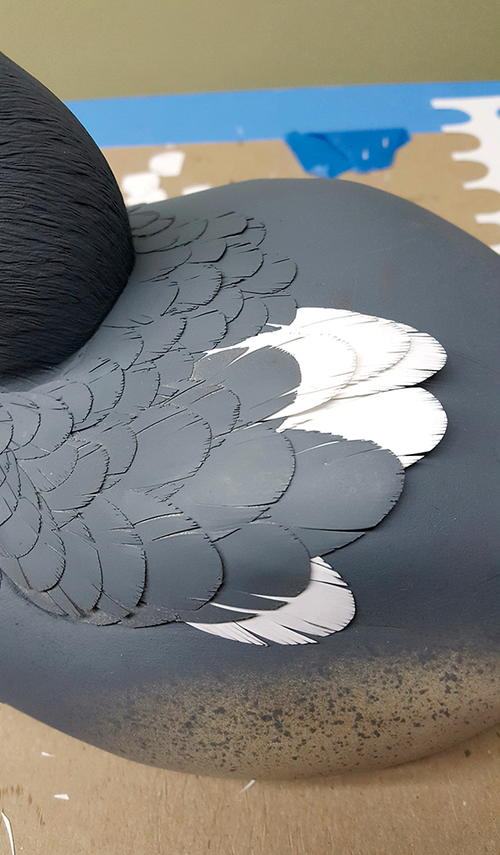
This is the same process as the head, using sheets of standard white copy paper (A). Draw your feathers and cut out with scissors. I use a standard #11 X-Acto blade to cut feather splits on each feather (B). I burn them and prime each side to waterproof them, especially on the side pockets close to the waterline (C). Before inserting feathers, I prime the entire body with Krylon primer. For added security, add extra coats of primer on the lower half of body, which will be underwater. When adding feathers, I work from the front to the back. Dab some glue on the front edge of each paper feather. Do not cover the entire feather with glue. You want room to tuck the next feather under, with enough play for adjustment (D). I recommend drawing in your feather groups as a guide. If you make a mistake, you will have to tear off the feathers. As you create feather groups, be sure to prime as you go (E). This helps me view each group, making sure that they all have a natural flow (F).
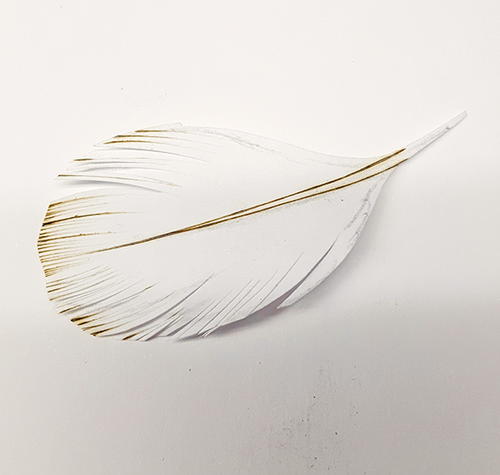
As you can see, my feathers have a great flow. Each is individually raised, and they are starting to look like real feathers (G). Here is a close up of a paper feather (H). Paper burns well with low heat and looks just as good as wood, if not better. You can also shape a feather by using your fingernail to gently pinch and pull it back to get a desired curve.
-
A
-
B
-
C
-
D
-
E
-
F
-
G
-
H
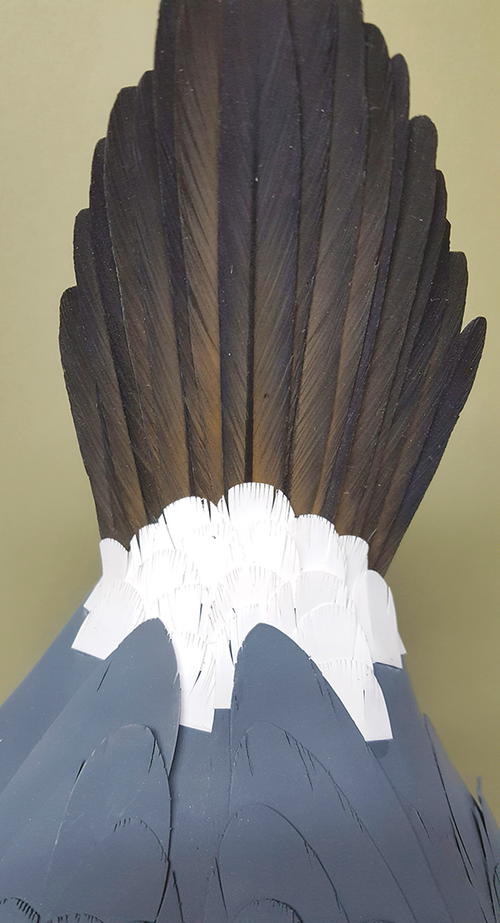
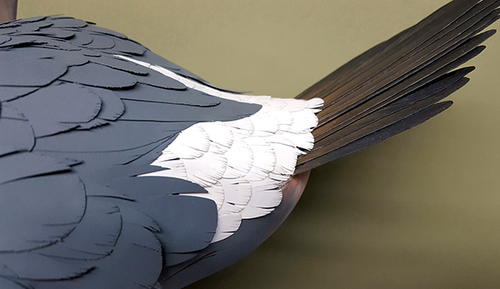
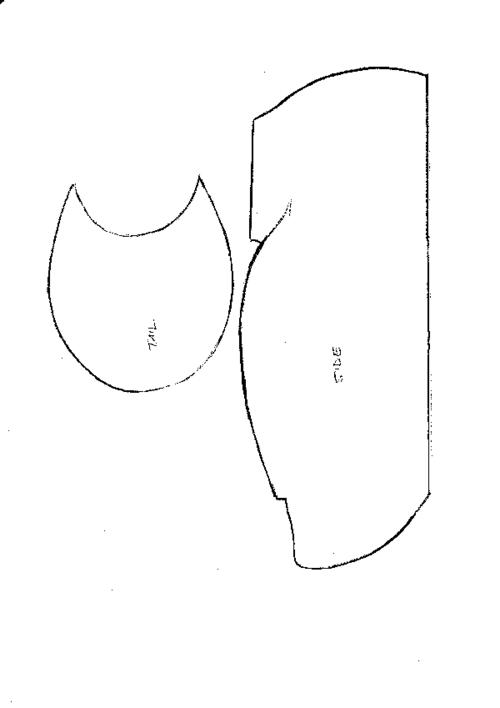
Tail Feathers
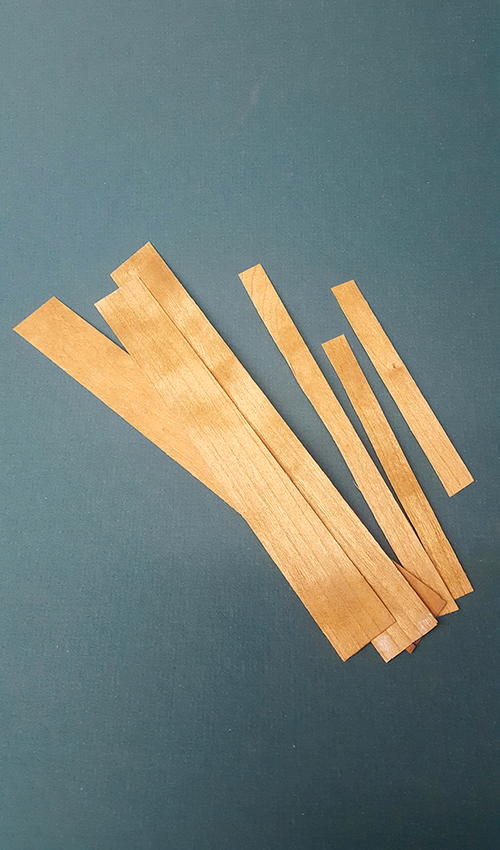
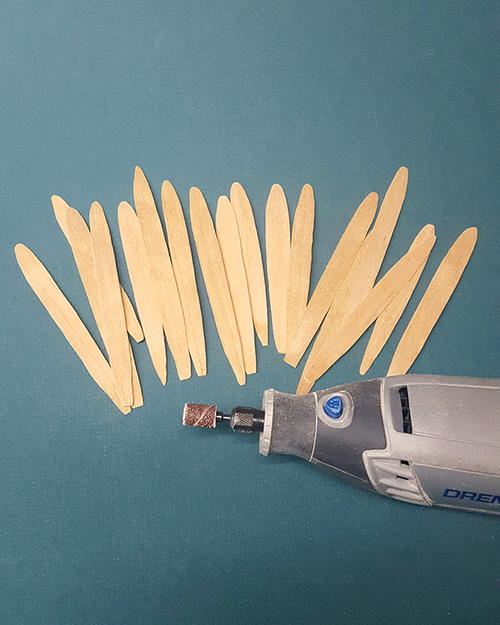
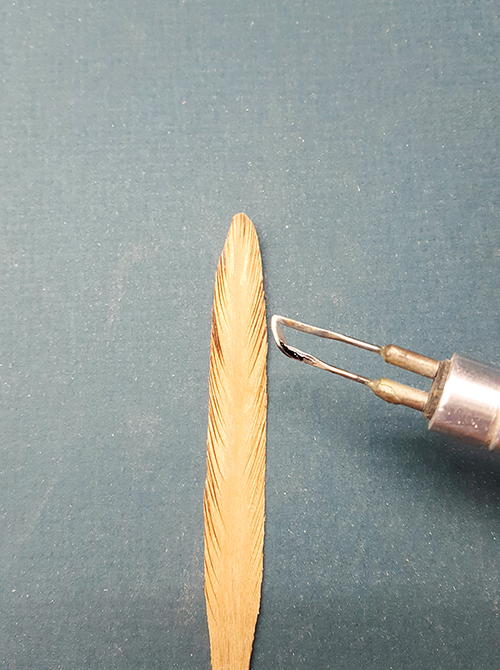
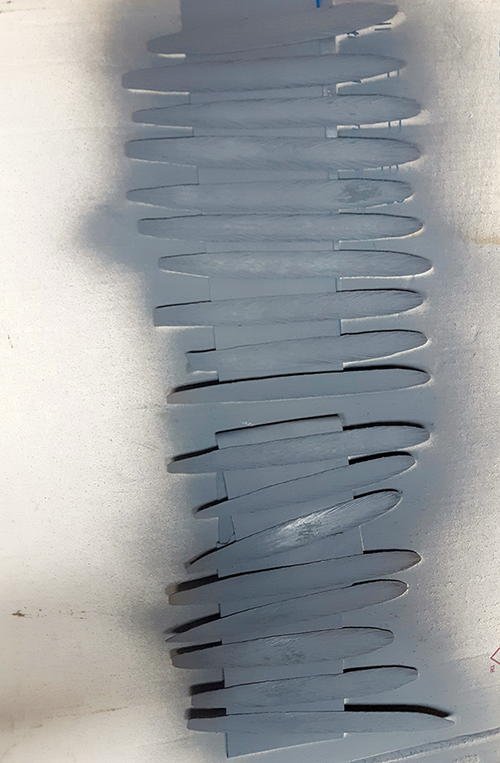
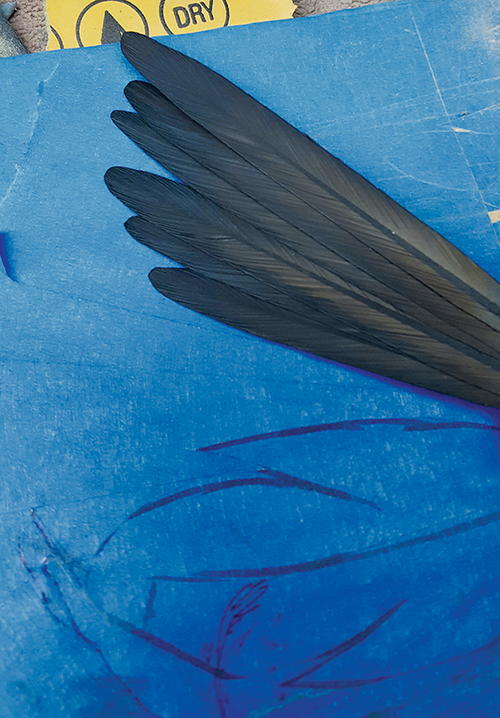
For the tail feathers, I use maple veneer (A and B). It’s super thin and strong. I shape, burn, and prime each feather (C and D). I paint before inserting them (E). Better to do it now than later. If you insert them before painting, it will be much harder to paint them. A ruddy has 18 tail feathers. I often see ruddy carvings that do not have enough tail feathers, which is a big mistake.
-
A
-
B
-
C
-
D
-
E
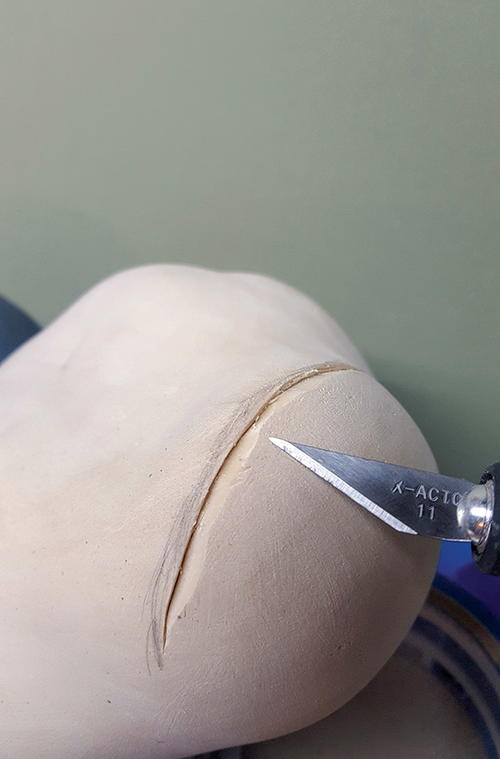
Tail inserts
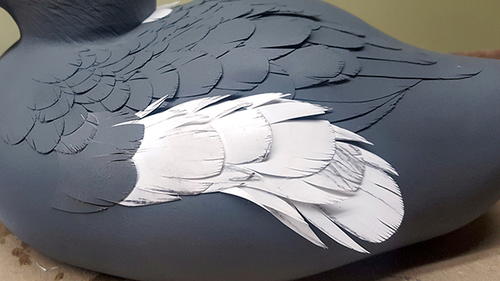
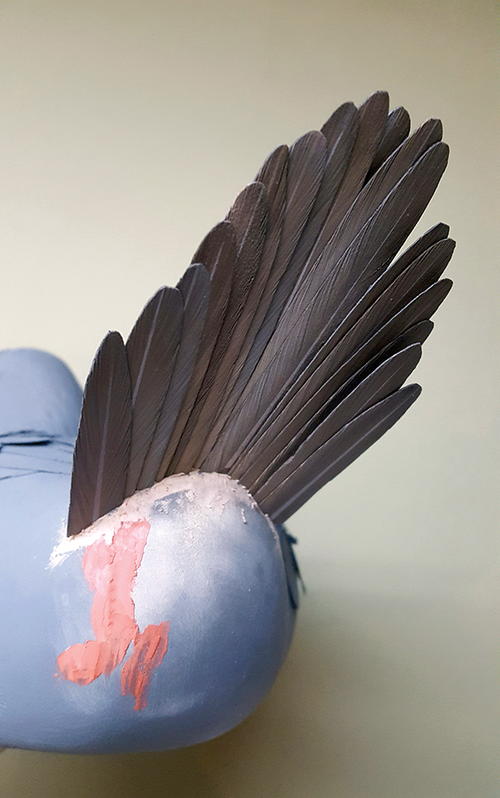
Before inserting the feathers, I notch out the shape of the tail feather group (A). The ruddy has a cupped group of feathers. I usually insert them one by one, but this time I group them together and insert the entire group into the notched rump. I use filler to secure them (B). Carefully mask the tail feathers and prime the rump area. Continue with paper feathers on the upper and lower coverts. Insert, glue, and prime (C and D). Once all the feathers are added and inspected, I texture a few feathers below the waterline, the side pockets, and the rump (E). I do this so that the paper feathers blend with a semi-textured body.
-
A
-
B
-
C
-
D
-
E

Conclusion
Give the entire bird a few final coats of primer, and then double-check the paper feathers and add glue as needed. Surprisingly, this decoy floated flawlessly, with no weights required.
This ruddy is now ready for paint. I will explain my painting techniques in part two.
Ruddy duck drake pattern
60% life-size
By Daniel Montano © 2017

Daniel Montano

Read NextEastern Bluebird, Part One
Share This Article
YOUR RECENTLY VIEWED ARTICLES
Free tutorials, expert tips, exclusive partner offers, and more straight to your inbox!
Thanks for your comment. Don't forget to share!
Report Inappropriate Comment
Are you sure you would like to report this comment? It will be flagged for our moderators to take action.
Thank you for taking the time to improve the content on our site.
