wildfowl-carving.com

Eastern Bluebird, Part One

Here's how to carve this much-loved ambassador of happiness.

By: Jeff Rechin
Photography by Jeff Rechin

Jeff Rechin is recognized as an elite sculptor whose artistry and technique have garnered him two Best in World titles at the prestigious Ward World Championship. You can see more of Jeff’s work at http://jeffrechin.blogspot.com. 

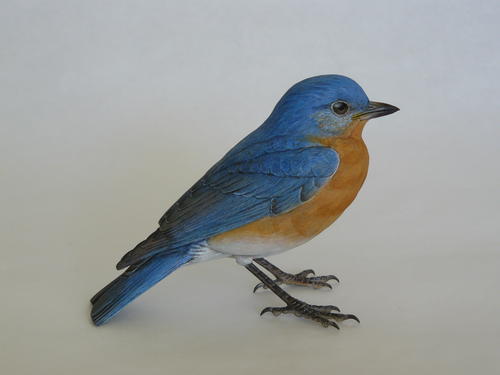
In this article I will be sculpting an Eastern bluebird. No matter how many times I observe them, I never tire of these beautiful small birds. During this project, I will carve the bird as a whole, rather than starting and finishing one area at a time. I find that, as I sculpt, I tend to move around the bird from one area to another instead of carving each to completion. If I carve each area to completion, one by one, I have to match the rest of the piece to the finished sections, and that can be difficult.

That being said, in this article you will see how I progress, integrally pulling the bird together as a whole until I have a completed bluebird. I intend this to be a free standing bird, without a base.

For part two of this article, click here

Read the rest of this article in Wildfowl Carving Magazine’s Summer 2015 issue.

Carving an Eastern Bluebird

How To

Click on any image to enlarge it. 

  1. Here I have a clay model I worked up, and the tupelo wood blank I generated from the model. I have penciled in a center line all the way around the blank, and an angled line intersecting the center line for a turn in the head.

  2. The angled line here shows how I will carve a slight turn to the head. This will add some animation to the carving, since the rest of the bird is pretty straightforward. Here I am using a #5 8 mm gouge to pull in equal amounts from each side to the angled line.

  3. After angling the head, I redraw the profile. As you can see, I left extra wood so I don’t come up short during the process of turning the head.

  4. Once I have turned the head, I remove wood to bring the head down to the profile lines—or at least close to the lines, until I am ready to commit to the drawn profile.

  5. After working the head angle and profile, I start on the body. This is the top of the blank. I’ve drawn in the body taper (wing area) and parallel lines of the tail. I will remove the wood outside these lines (the crosshatched areas).

  6. Using a #5 8 mm gouge, I start to move the wood in toward the body and tail lines I’ve drawn. I never seem to go all the way to the lines at the start because I prefer to leave a small margin of wood to allow for any drawing changes I might want to make. In this top view you can how I’ve pulled in both side to get the basic body shape.

  7. I’ve penciled in where the primary feathers end. I’m lowering the tail surface because I will later cross the primary sets here.

  8. I will remove the cross-hatched areas at the end of primary feathers down to the tail surface, and then I will redraw one primary set so it crosses over the other.

  9. Here I’m angling in the primary set from the lines in last photo. I redrew the primaries to add more overlap to them, which adds visual interest.

  10. This photo shows the bird at this point in the roughing out stage. I’ve pulled in the head and bill sides and set up the tail and primaries.

  11. With the head turn established, I pull wood in to create the bill. I also establish the crown and forehead.

  12. I carve the bill inward to the pencil lines.

  13. Once I have established a good head profile, I start to carve in the eye channels with a #9 5 mm gouge.

  14. This front-view of the head shows how I angle the sides of the head from where the head joins the body up to the eye channels. The head is looking much more bird-like now.

  15. On to the underside of the tail and the under-tail covert feather group. I pull the tail in closer to lines I have drawn.

  16. Working from the bird’s underside, I use a parting tool to carve out the under-tail covert group, which tapers to the tail surface at the rear. This is the #12 6 mm parting tool I use throughout this project.

  17. Here you can see how I want to cross the primaries. I’ve carved the outside lines of these groups but have yet to remove the triangle of wood between the primary tips.

  18. The cape feather section sits on top of the wings. Using a #9 5 mm gouge, I outline this section and lower the surface of the wings, putting the cape group on top of wings.

  19. This photo shows a side-angle view of how I step down the cape, lowering the wings where they meet this section.

  20. I’ve tapered the cape down to the wings. If I carve away any pencil marks, I always draw them back.

  21. The wings will sit outside of the breast and flanks. Later I will roll in the hard edge towards the body.

  22. I’ve located contour channels, shown here, which is where the legs will exit the body. I’ve laid in one of these channels. Again, I always redraw my lines. The hole in the bird allows me to put it on a dowel so I can see how it will sit when I’m finished.

  23. This bottom view shows how I’ve laid out the channels for the legs and added contour to the under-tail coverts.

  24. With the head and wings brought in from side to side, I can begin to round the breast area. Also, you can see how I have penciled in some contour to the belly area.

  25. Back to crossing the primaries. Here you can see how one group crosses the other. I’m undercutting to separate the two groups.

  26. The basic rough out of the bird is still a bit blocky, 27 but I’m getting to the point where I will round the head and body to eliminate the hard edges you can see here.

  27. I’ve always said that the pencil is one of the most important tools in the sculpting process. Here I draw in some belly contours. Without this pencil work, you don’t know where to go.

  28. Now I’m separating the primary and secondary feather groups with a parting tool. Later, I will carve the primary set to sit beneath the secondary group.

  29. Contouring on the breast provides some interest to an otherwise flat area.

  30. With the head profile drawn in and bill location basically where it should be, I can locate the eye position and use a small stone to put in the sockets.

  31. I’ve put the head put in the round (in other words, removed the hard edges) and added some feather contour. I now begin to create the wings’ secondary and covert feather groups. Later I will carve individual feathers within these groups.

  32. When carving the wing elbow, secondary covert group, and secondaries, I add them in a step down fashion from one feather group to the next, basically the way shingles on a roof sit one on top of the next.

  33. Again, I take a “V” or parting tool and use it to carve the individual feathers, lowering the surface at the carved feather lines in step fashion, putting one feather on top of the other.

  34. This is the underside of the tail, showing how I pencil in feather shafts and other tail feathers I will carve. The feather shafts are usually more prominent on the underside of the tail feather than they are on top.

  35. The wing feathers are done, except for the primaries. I will texture these flight feathers with a burning tool.

  36. You can use glass eyes if you prefer, but I use a two-part quick wood putty to form the eyes, giving me the ability to paint them the way I think will work best. With the eye in place and some sanding of their surfaces done, I will use the same putty to make the eye rings and while still soft press detail into these rings.

  37. I use a stone to texture the head and body. It gives me a looser, softer look for these areas and gives you more “swing” than a burning tool.

  38. Anywhere I don’t use a stone, I use a burning tool—basically for the stiffer flight feathers of the wings and tail.

  39. I carve in the feather shafts on the tail’s underside. Normally, I just burn the quills on the top side instead of carving them as I do here.

  40. With the bluebird carved and textured, the last step will be to apply a coat of 50/50 lacquer and thinner to seal the bird. This mix will soak into the wood and seal better than straight lacquer.

  41. This bluebird will be standing. This photo shows one of the legs, with toes soldered in place and the joint filed to smooth the surface. I’ve bent the ends of the toes into a curve and filed then to form talons.

  42. The finished bluebird has been carved, textured, and sealed. You can see how I’ve soldered the toes to the legs.

  43. These are the finished legs. I applied epoxy putty and let to harden before using an X-acto knife to carve detail was carved into the surface of the legs and toes.

Pattern

  1. Bluebird Pattern

YOUR RECENTLY VIEWED ARTICLES

Free tutorials, expert tips, exclusive partner offers, and more straight to your inbox!

Reviews

I have not made this yet so I cannot rate it.

Include a Photo Include a Photo

Click the button above or drag and drop images onto the button. You can upload two images.

Cancel Reply to Comment

Thanks for your comment. Don't forget to share!

Close

Report Inappropriate Comment

Are you sure you would like to report this comment? It will be flagged for our moderators to take action.

Thank you for taking the time to improve the content on our site.

Sign In to Your Account

Close Window
Sign In with one of your Social Accounts
Facebook Twitter
OR
Sign In using Email and Password