wildfowl-carving.com

Rose-breasted Grosbeak Part One

In Part One, Bob removes everything that doesn't look like a grosbeak. Then he makes what's left look more like one.

By: Bob Lavender

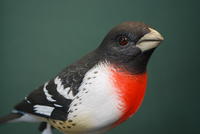
Grosbeaks have always been some of my favourite birds. The rose-breasted grosbeak has more striking plumage than the others, with a tuxedo suit and reddish-pink bib that gives it a sharp transition in colors. Despite the flashiness, I’ve always found it to be a difficult bird to find, even when I hear one in an old dead tree singing its heart out.

For this carving, I’ll present the grosbeak in a spring setting on a birch branch. I will give it plenty of movement by turning the head to the right, flipping the tail to the right, and dropping the left wing. The right wing will be over the bird’s back. This will give the impression of the bird getting ready to take off from his perch.

I do most of my initial carving in what I refer to as “straight angle” cuts. This lets me remove all the unwanted wood quickly and keep the carving balanced during the initial stages. I have found that if I start rounding the bird too soon, I end up taking off too much wood from one side or the other.

The painting portion of this project is continued in Part Two from the Spring 2015 issue.

Bob Lavender is a retired Canadian Forces military cook residing in Saskatoon, Saskatchewan. He has been carving competitively since 1987 and has been a consistent blue-ribbon winner across North America.

Read the rest of this article in Wildfowl Carving Magazine’s Winter 2015 issue!

Wildfowl Carving Demonstration

Step-By-Step Instructions

For a closer look at each step, click on the image to enlarge.

  1. You can never have too much reference material. I use a study skin (always the best possible reference). You also need a good pattern (to be used as a guide only) and a good piece of wood for your blank. A poor piece of wood will only hinder your progress and your tools’ effectiveness. I have chosen jelutong for this project.

  2. I leave extra wood at top and bottom of the wing tips. This will let me move the wings around a bit to give the carving some movement. I establish a center line through the entire body. Taking the measurements from the pattern, I mark off the neck area and draw a center line that turns the head to the right. Turning the head too much will create more difficulty when going back to the side profile later. I then draw on the tail’s center line from the tail’s pivot point (the “pygostyle”), also moving the tail to the right. Now I draw on the wings, putting the right wing over the back, and the left one out and dropping down the side. I will remove the wood I have marked with black straight up and down along the side of the body. I do this with a ¾" sanding drum. I do the sides of the head also.

  3. By this stage, the carving is beginning to take on the feeling of action I want. I now draw the tail and indicate the unwanted wood. I’ve marked the unwanted areas in black; the center image shows this area with the wood removed. I’ll do the right wing trailing edge and the left wing trailing edge.

  4. When you turn the head, it has angles that you must remove. In this case, when I turn the head to the right, I need to angle the right front side back to match the left front, and I need to angle the left rear side forward to match the right rear side. I’ve marked the two areas in black and will remove this wood until the top of the head is balanced.

  5. I now want to remove the wood from the lower portion of the left wing and, at the same time, create the lower-tail covert area. I remove only the wood marked in black, leaving the light area for the left wing’s edge.

  6. I remove the corners from the body by dividing each side of the body, top and bottom, with a center line. Then I draw a line dividing each half into halves, this time following the body’s outside contour. Finally, I darken the outside quarter area (two per side) and remove the black area. Do this on the body only from the neck to the tail area. This is how I start to round the body. Remember to carve in straight-angle cuts to remove the initial wood.

  7. With the corners removed, I now round off the shoulders.

  8. I start on the head by shaping the beak and the front area. This is the last of the straight cuts. I use a variety of small round diamond bits and stones. “Slow and easy” is the key.

  9. Draw in the lip line and gape. Then draw the eye channel and eye. Remove the gape wood (marked in black) using a pointed round diamond. Remove this wood so it runs parallel to the lip line. Drill 6 mm eye holes.

  10. Now I use a pointed round diamond cutter to carve in the eye channels. Bring the beak to a slight point, leaving it 2 mm wide at the tip. This will leave some extra wood for final carving and sanding.

  11. At this stage, I take a 1/2" sanding drum and use it to round the head, neck, and shoulders, creating a smooth transition between the neck and body.

  12. I realize that I drilled the eye holes too high and must correct the problem. I could start the carving over; instead, I’ll show you how to make the repair and not lose your project. I fill the eye channels and eyeholes with two- part Apoxie Sculpt and let it set for 48 hours. Then I repeat steps 9 and 10, and continue on.

  13. I burn in the lip line with a large skew. Then, with a pointed round diamond, I cut in the lip line, slightly rounding the beak. Carve the ear covert area using a round diamond bit. I’ve also created the throat patch area.

  14. Using a 1/2" sanding drum I round off the shoulder, back, and breast areas.

  15. To create the cape, I first mark the width and depth of this area. To raise an area, you must lower the area next to it. By lowering the scapulars, I raise the cape. I use the edge of a ½" sander to make these cuts, and I round the edges with a round diamond ball.

  16. I do the same procedure with the scapular area, lowering the wing area to raise the scapulars.

  17. I now draw on the wing’s leading edge from the side view and also draw the lower breast and under-tail covert areas. Take time with this important cut, as you are creating three different parts of the bird.

  18. Once I’ve shaped the wing, I sand the area and burn on the flight feathers. Notice that I’ve raised the tertial and secondary areas and pushed in the wrist by the breast and scapulars. I do this very slightly, as it will really show up during the painting. I use a pointed round diamond and ruby cutters to create my final feather groups.

  19. This photo shows where I’ve cleaned up the breast, lower-tail coverts, under-tail, and wing areas. I use a pointed ruby bit to do this.

  20. Because the left wing is dropped down, you will see more of the feathers here than on the right wing; otherwise, the structure is the same. I burn my feathers with a Guge pen.

  21. I try to give the body some life by creating soft, puffy areas. I draw on some feather groupings through the breast and lower-tail covert areas, using nice flowing lines, avoiding straight lines, and trying to be “consistently inconsistent” in order to create a natural feel of randomness.

  22. I carve these feather groupings with a diamond ball, and then I remove the rough edges and sand them, creating a soft transition between all areas. I start sanding with 220 grit and finish with 400-grit.

  23. I do the same feather-group drawing on the cape. As you create these feather groupings, you can draw individual feathers as you put one group on top of another. Notice how the feathers are in a flowing line (not straight), varying in size and slightly in direction. This all helps to give the bird life. I add texture using a white tapered stone with a 1/2 mm cutting edge.

  24. I draw on the remaining feathers and add texture as before. I do the burning last.

  25. When the carving is fully textured and burned, I de-fuzz the carving (using burgundy scouring pads) and seal it using a mixture of 2/3 wood lacquer and 1/3 lacquer thinner. I then de-fuzz it again.

  26. In preparation for the eyes, I fill the eye hole with 2-part Apoxie Sculpt. Push the eye to the desired depth and angle. Remove any excess epoxy and make a smooth transition from the eye out to the head.

  27. I use a small round tool, flat on one side. I press down approximately 1 mm from the eye, raising the epoxy to create the eye lid.

  28. I let the epoxy cure for 24 hours and then seal the carving two more times. I apply two coats of gesso. I am now ready to paint.

Rose-breasted Grosbeak Feet

  1. The tools I use for carving this project are ¾" and ½" sanding drums, diamond cutters (pointed and round end), pink stones, and a white tapered stone for texturing.

  2. I use 1 mm brass rod for the toes. I bend the talons with needle-nose, round pliers. I grind the sides off the talons using a 1" belt sander.

  3. I use 2 mm brass rod for the tarsus. I drill the holes in the branch. (Note: I do some positioning with the bird and branch before drilling the holes.) When the branch is ready, I set the bird in a position so the feet are in the bird’s center of balance. Once I’ve drilled the holes in the bird and it is on the branch, I turn the carving around to view it from all sides. If the bird needs to be moved, I redrill the holes until the bird is well balanced from all sides. I then fill the holes with Apoxie Sculpt.

  4. I use Apoxie Sculpt for the webbing and scales on the toes.

  5. I allow the Apoxie Sculpt to dry for 24 hours, and then I cut the toes to the desired length. I use Handibond Thick glue and Handibond Accelerator to glue the toes to the branch. I then fill in the gaps between the toes and tarsus.

Wildfowl Carving Pattern

  1. Life-size rose-breasted grosbeak

YOUR RECENTLY VIEWED ARTICLES

Free tutorials, expert tips, exclusive partner offers, and more straight to your inbox!

Reviews

I have not made this yet so I cannot rate it.

Include a Photo Include a Photo

Click the button above or drag and drop images onto the button. You can upload two images.

Cancel Reply to Comment

Thanks for your comment. Don't forget to share!

I think this was a great article and enjoyed carving so much that I carved two. See photos

This was a great project to carve. Attached is my finished project. Ed

I enjoyed this article and proceeded to carve this bird.

I have just finished my Rose-breasted Grosbeak and am happy with results. Mounted on a carved branch

Close

Report Inappropriate Comment

Are you sure you would like to report this comment? It will be flagged for our moderators to take action.

Thank you for taking the time to improve the content on our site.

Sign In to Your Account

Close Window
Sign In with one of your Social Accounts
Facebook Twitter
OR
Sign In using Email and Password