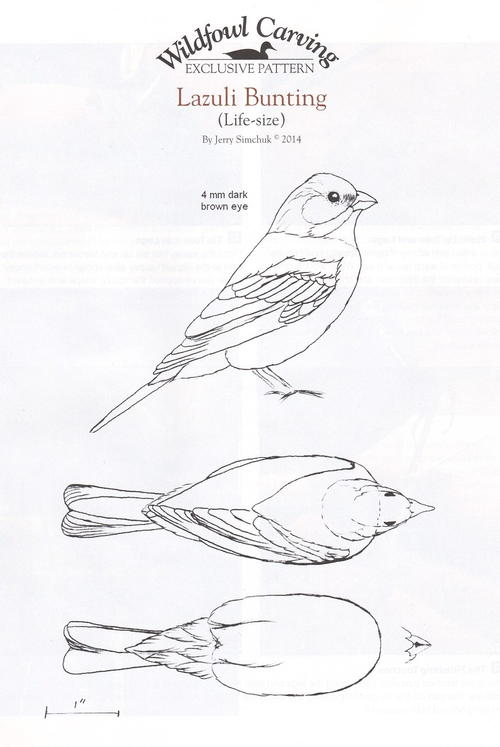
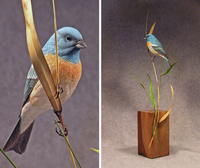
Western Brilliance: The Lazuli Bunting, Part One
Part one covers carving and texturing of this colorful bird.

Since entering his first competition in 1994, Jerry Simchuk has competed regularly at top-level bird carving shows around the country. A full-time artist since 2004, Jerry has been creating wildlife art sculptures in bronze. He currently lives in Spokane, Washington, where he continues to build his reputation as a wildlife artist, carver, judge, and instructor. You can reach him at Jerry@Simchuk.com.
The lazuli bunting lives in the western half of the United States, where it prefers grassy or weedy areas and open places near brush or trees. It is a very close relative of the indigo bunting, which resides in the eastern half of the United States. Where the two ranges intersect, the lazuli and indigo are known to cross breed, so you may encounter hybrids.
During a visit to the National Bison Range between Kalispell and Missoula, Montana, I had an opportunity to view a number of lazuli buntings along a brushy streambed. The habitat was a mix of various bushes, wild rose, and sage. After returning home I began working on my carving. There isn’t anything better than being able to observe your subject personally when you work on a project.
The lazuli bunting will be painted in part two, featured in the Summer 2014 issue.
Read the rest of this article in Wildfowl Carving Magazine’s Spring 2014 issue!
Wildfowl Carving Demonstration
For a closer look at each step, please click on the image to enlarge.
-
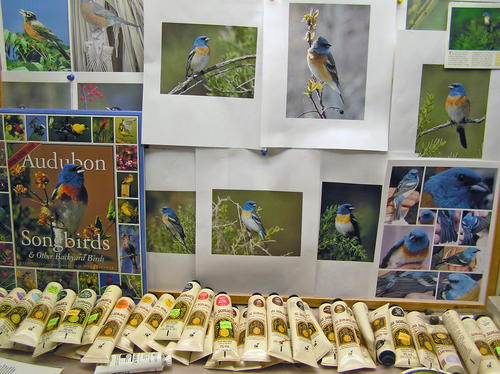
Carvers say you can never have enough reference. In order to make a realistic bird, you must have a lot of good-quality reference material. I surround my work area with as many photos, magazines, books, and study skins as possible.
-
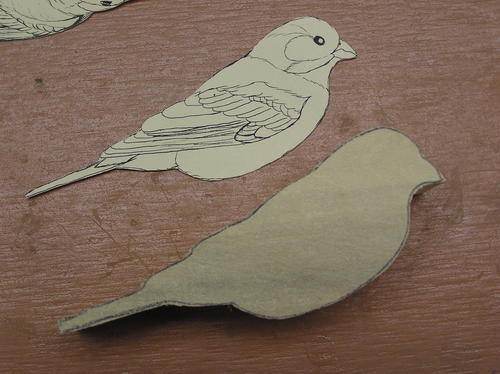
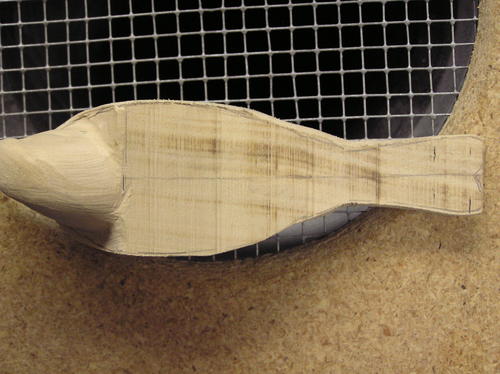
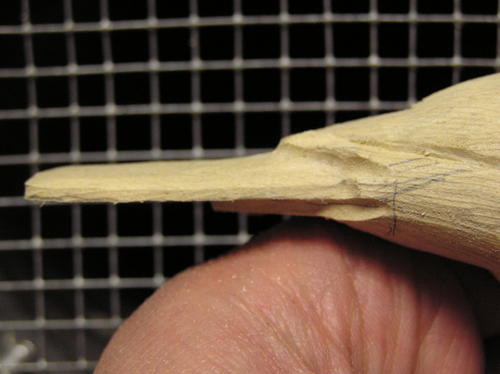
Cut the Blank
Find a block of tupelo that fits both the profile and top-view patterns, preferably a piece that has the wood grain running in the direction of the tail and head. This will give strength to the primaries, tail, and beak. Use the profile pattern to cut the profile view on a band saw. Cut only the profile on the band saw, as you will need extra wood to turn the head. -
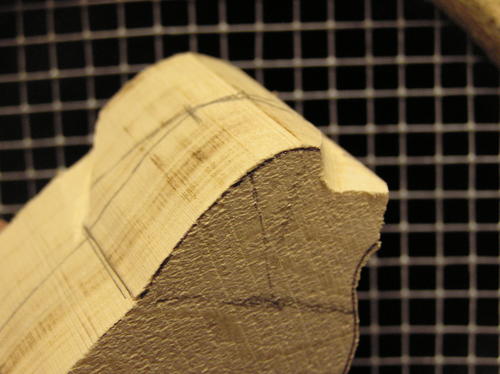
Head Placement
After drawing the centerline on the blank, determine how you want to turn the head. The general rule of thumb is to turn it no greater than 30° left or right. Find the pivot point for the head. This will be the center of the neck, in this case just behind the crest. Draw the head’s new centerline, which will go through the pivot point. Draw reference lines that identify the new front of the beak and back of the head. Also, identify the lower portion of the head’s profile. Once the lines are in place, you then cut in the front of the new beak line, the forehead, and the back of the head. As you cut the wood, be sure to cut perpendicular to the head’s centerline. In other words, straight up and down as you view the head straight on. -
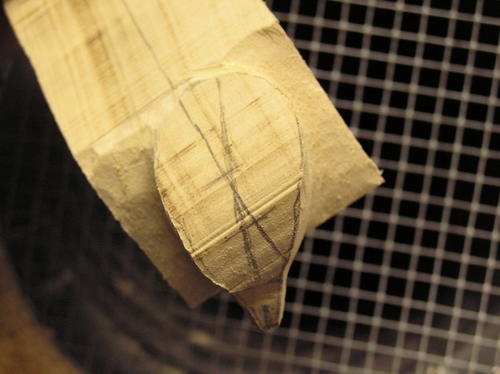
Block in the Head
It is time to define the top of the head. Take the top view of the pattern and draw in the outer shape onto the block. As with the previous step, you will cut straight up and down to the centerline as you cut up to the line you drew. -
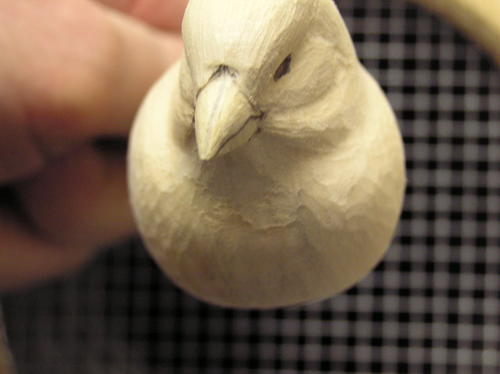
Square Up the Head
The head needs to be level as you look straight down its centerline. There is excess wood to the left and right at the back, the left at the front, and the top left of the beak as viewed from the front. Work those high points down until the top surface of the head is level from side to side. -
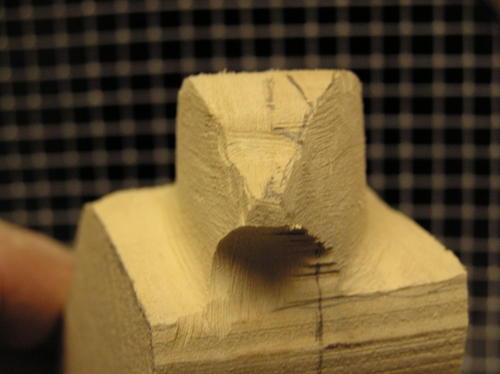
Beak and Eye Placement
It is a good idea to leave extra wood around the beak area as you block in the head. Using the pattern, draw in the top view and profile for the beak and identify the eye placement. It is important to assure balance from side to side at this point. -
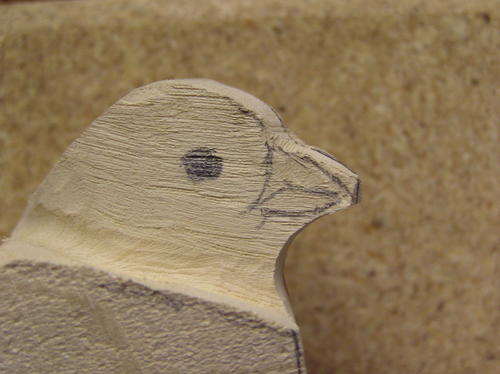
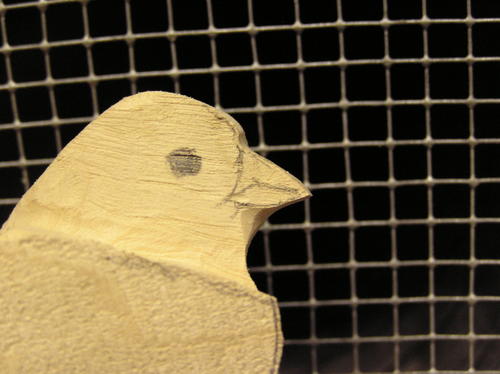
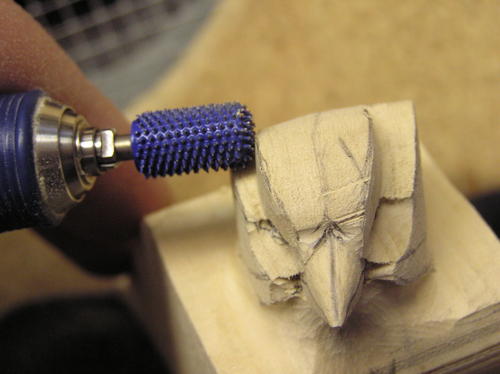
Block in the Beak
True up the beak at this point. Be sure to cut through your pencil marks or the beak will be too wide or thick. If necessary, recheck the shape with the pattern. The second image shows some further refinement of the beak along with identification of the cheek patches. -
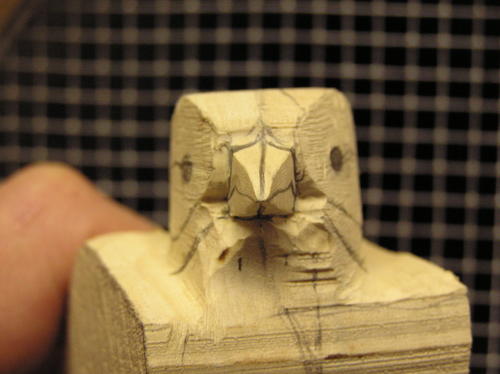
Eye Channels
Now cut in the eye channels. Refer to your pattern to find the width. This width is the innermost front of the eye. Cut from the back of the eye and move forward to the edge of the beak. Cut into the eye channel on both sides evenly until you get the proper width. Verify the balance from side to side as you view the head from the front. -
Top of the Head
Before you can shape the head feathers, you must first establish the proper widths. The top of the head is narrower than the cheeks. Use your pattern to draw the top head profile lines. Cut on the outside of this line straight down to the top of the eye channel in front and behind the eye. There is a flow line behind the eye that is separate from the cheek, as found on the pattern. -
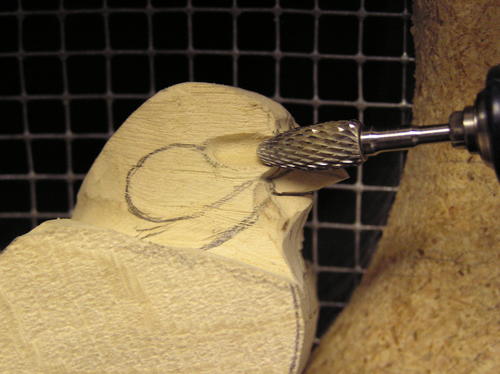
Shape the Cheek Patch
Use a carbide cutter to shape the cheek patches. Refer to your pattern to establish the maximum width of the cheek patch. Taper the cheek into the eye channel gradually. This will create a natural look. -
Round the Top of the Head
At this point, all the head feather groups are in place, so round off all harsh edges. Make sure there are no flat spots on the head. -
Block in the Body
You need to shape the body before melding the head into it. Use the top view pattern and outline the body and tail on both the top and bottom of the block. Cut straight to the lines, leaving a squared body and tail. -
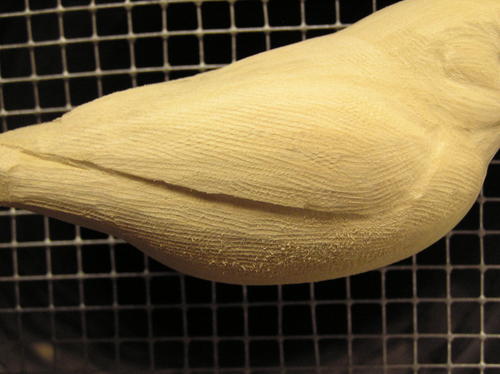
Initial Body Shaping
Identify the widest point on the bird’s body. This will be just above the lower edge of the wing as viewed on the pattern. Round the top of the body down to this line and the bottom of the body up, from the belly centerline, to this line. Keep a rounding motion going at all times so you don’t get any flat areas. Look down the body periodically to see that you are getting a round look as you view it from the front or back. Once it appears round, you are done. -
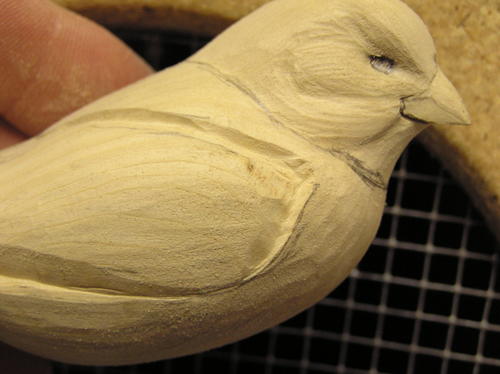
Establish the Wing
Using the profile pattern, outline the wing as it will reside on the body. Use the top view to outline the wing as it would appear looking straight down on the body. You will have two lines representing the cape-wing section. These two lines need to meet as one. Cut straight into the line that represented the top view and straight down to the line representing your profile view. This will give you the single line representation of the cape-wing section. You will use the same principle when cutting the excess away to represent the single line for the lower wing line. -
Crossed Wingtips
This pattern has the wingtips crossing over the back. Leave wood outside and below the wing line to represent the flank feathers if this is going to be a puffy bird. If the bird’s wings are outside the belly and breast feathers, then you will want to cut under the wing. When you have the straight cuts, you can round off the harsh edges as shown in the second image. -
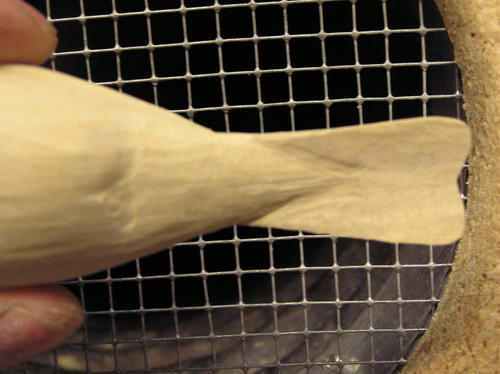
Center Indentation
Using the cape and centerline as reference lines, you can create the indentation down the center behind the cape and round into the crease. Rough in the flank feather group during this step as you undercut the wing. -
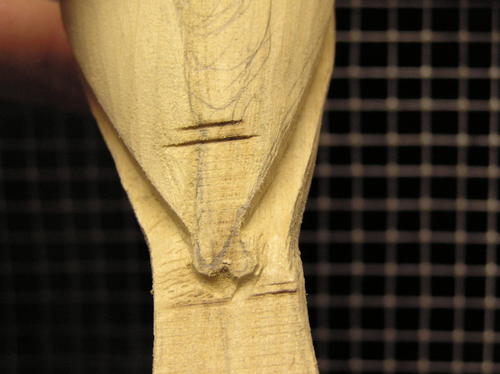
Under-Tail Covert Definition
While working the flank feather group and the crease for the vent feather area, you will also want to rough in the location of the under-tail covert feathers. The pattern has a drawing of the under-tail view showing the point of the under-tail covert feathers. -
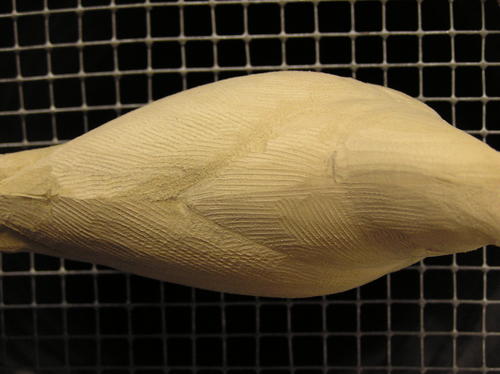
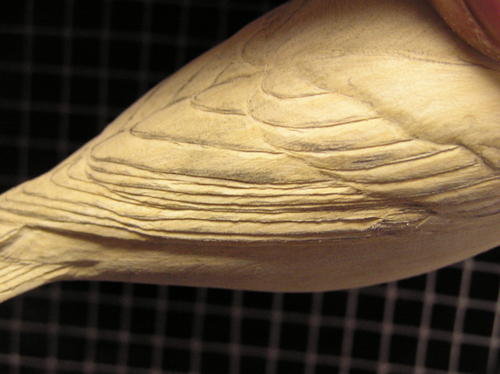
Definition of the Wing Feather Groups
Draw in the individual feather groups that make up the wing. Going from front to back, these groups are: scapulars, medium wing coverts, greater coverts, alula, primary coverts, tertials, secondaries, and primaries. Once you are happy with the layout for both sides, you can define these groups by cutting them in. Think about each group lying on top of the other with the primaries on the bottom. Once you’ve rough cut the wing feather groups, soften the transition from one group to the next. Blend the lower forward edge of each group out flush onto itself. It will look like shingles stacked on top of each other when you are done. -
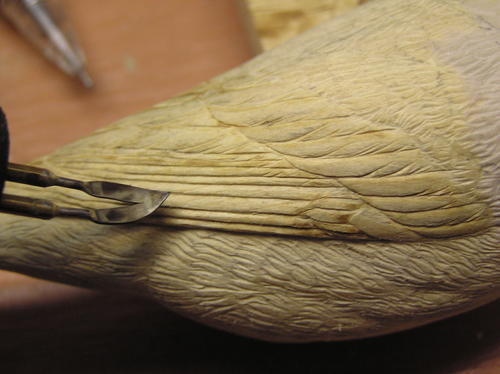
Feather Edges
Now roll the upper feather group edges down onto the next lower feather group as shown here. -
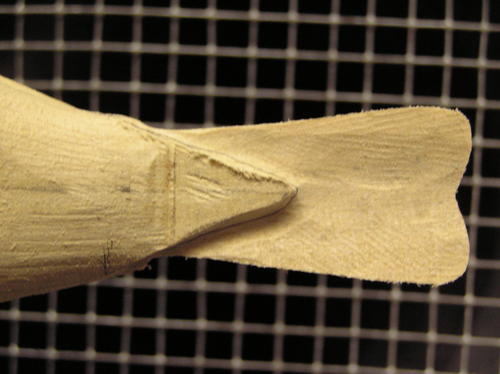
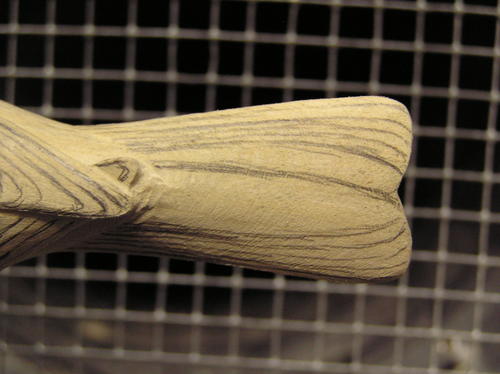
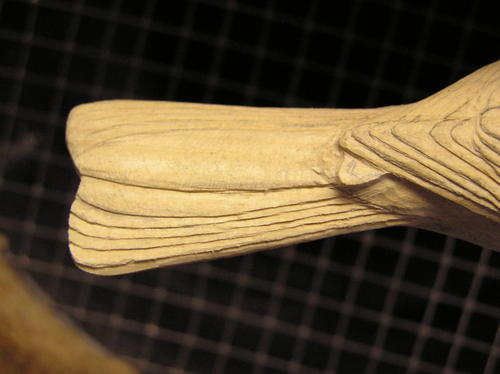
Definition of the Tail
Rough in the tail by cutting up into the centerline on the underside, giving it an arched appearance. Taper the top slightly to the outside edge. Be sure to leave about 1/8 of an inch thickness on the outside of the tail for layering in the feathers during later steps. -
Flank, Vent, and Under-tail Coverts
With the tail and wings in place, refine the placement and shape of the flank, vent, and tail covert feather groups. -
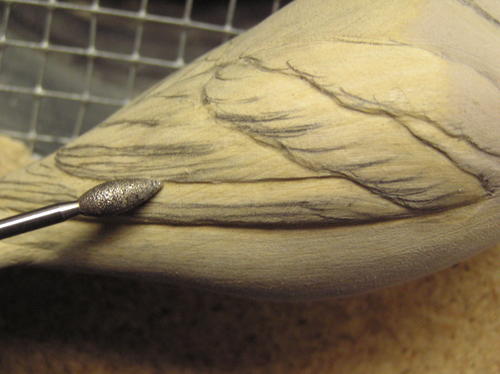
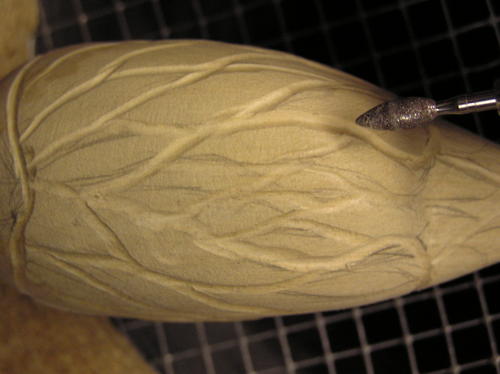
Soft Feather Groupings
In the breast, belly, under-tail coverts, and cape, create flow lines radiating out from the centerline and to the tail. Randomly connect one flow line with another with S curves and arcs so it appears graceful. Once you are pleased with the look and flow of these groups, cut them in with the diamond flame. Be sure to vary the depths of these cuts. Typically, you will have shallow cuts in the breast and deeper ones in the centerline area and as you get to the back portion of the belly and flanks. -
Transition
After making the initial cuts, roll off the edges on both sides of the cut to represent a smooth transition. -
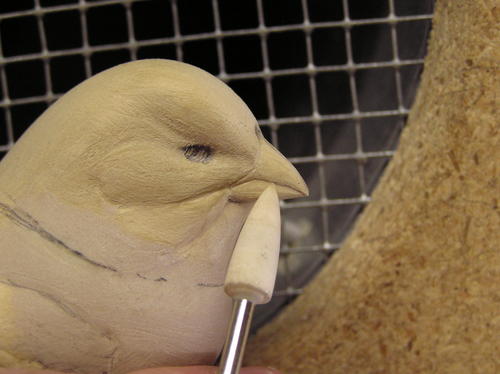
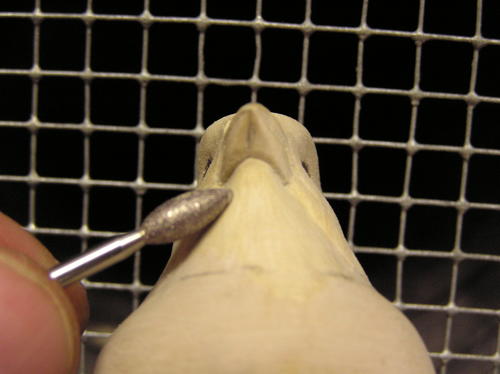
Shape Upper and Lower Mandibles
Round the upper mandible up to the top centerline, with the lower edge having a slight roll under (into the crease). The lower mandible will have more of a flat bottom while still having a rolled lower edge. It too will roll in at the upper edge (into the crease). This is the time to create the inset appearance of the throat feathers as they set up under the lower mandible. -
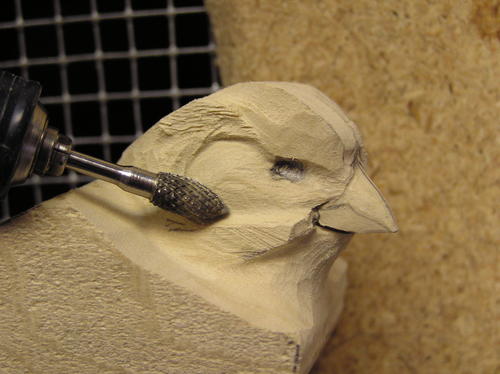
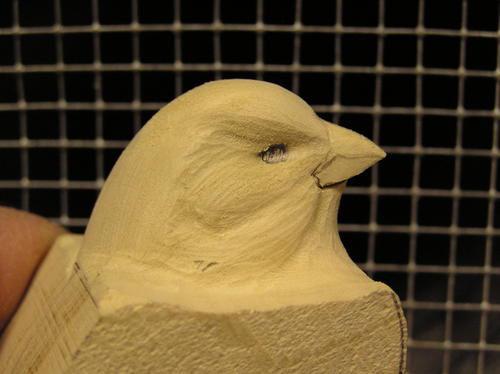
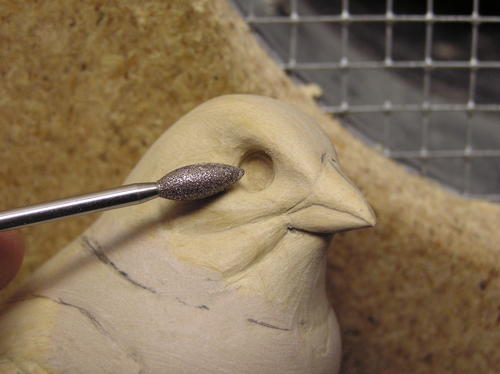
Define the Eye Socket
Verify the proper placement for the eye, assuring balance from left to right and up and down. Draw a 4 mm circle to indicate the eye socket. Using a carbide cylinder, cut straight into the head with a slight forward angle. You can verify the opening by placing the eyes into the holes. Assure proper depth by measuring between the outside of the right and left eyes. Refer to your pattern for this measurement. Once you’ve established the depths, eliminate the harsh edge by rolling a diamond or ruby flame bit out of the eye socket into the feathers all around the socket. -
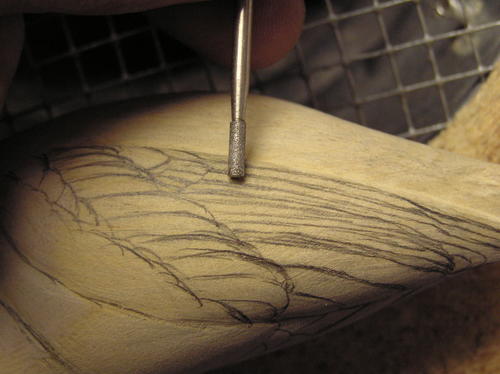
Wing Feather Layout
The wings and tail are the only areas in which I cut and shape individual feathers. Starting with the wing, draw in feathers for each of the feather groups except the scapulars. Try to create a random feather layout for a more natural look. If it’s too uniform, it will create a stiff look to the bird. Using a safe-end diamond cylinder bit, cut around the lower edges of all these feathers. -
Feather Shaping
Take a diamond flame and go back and roll the edge of each feather down to give the feather a tapered look. This is to prevent a sharp drop-off from one feather to the next. -
Splits
I define splits and quills with the stones and burning tips. I start with the stone to define the splits and then follow up with a flat-edged burning tip. I burn the quills with this flat-edged burning tip. -
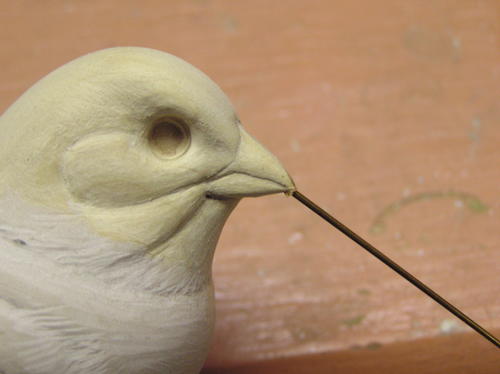
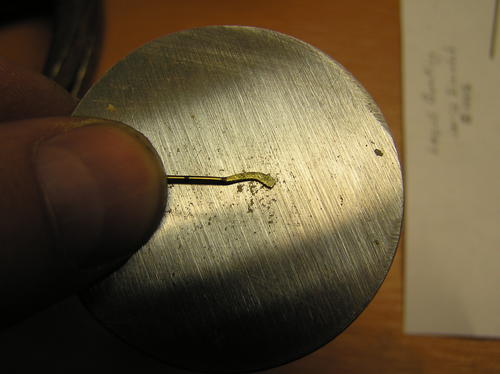
Protecting the Beak Tip
I protect the fine tip of the beak by inserting a brass rod. Use a small diameter drill bit to create the hole for the rod to slide into. Super glue secures it. Cut the rod near the point of the tip so you have to do only minimal grinding and reshaping. -
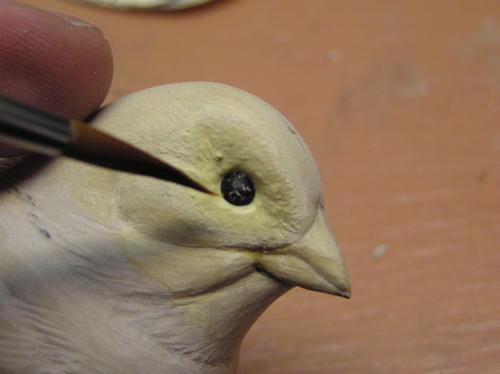
Eye Setting
I use plasticine clay as the socket filler. Set the eyes based on the width on the pattern. Make sure the eyes are straight up and down as you look straight at the bird. Set them so they are looking slightly forward. Check from various points of view to assure the eyes are balanced. Take some Elmer’s Wood Filler and fill in around the eye so there are no deep socket cavities. Use a wet paintbrush to open the eye up to its proper size. This will start the eye ring you will complete in the next step. -
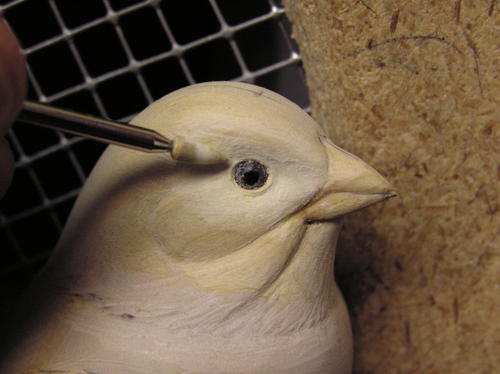
Eye Ring
Once the filler has dried, use a diamond flame bit to go around the outside of the eye and carefully create an eye ring by cutting down into the filler. You may find it easier to do this by hand rather than with a power tool. Once the eye ring is in place, sand around the filled area to blend it into the wood. -
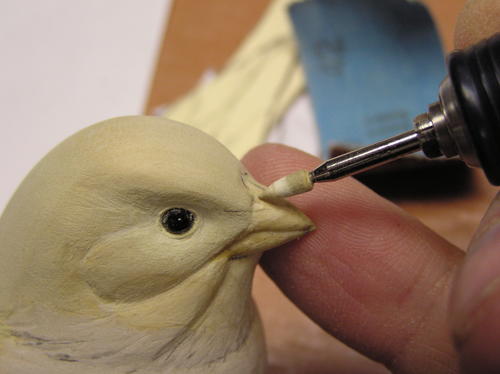
Nostril Definition
Create a slight indentation for the nostril holes on the upper mandible near the forehead feathers. -
Hard Feather Texturing
The primary and tail feathers are hard feathers. Burn them in with a fine burning tip. Burn each line so it is as fine and tight as possible. Shallow is better than deep. -
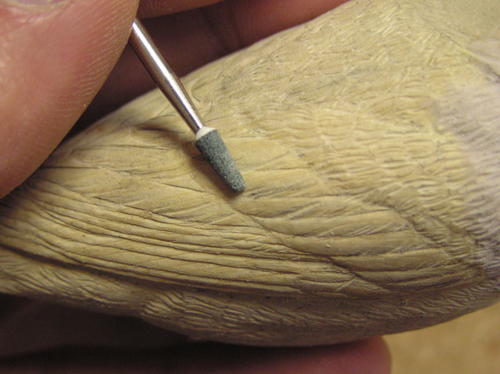
Semi-hard Feather Texturing
The tertials, secondaries, alula, and the various wing coverts, which we defined earlier, are semi-hard feathers. Use a hard stone or ceramic stick to texture these feathers. The stoning gives them a little softer look than burning and helps the transition from hard to soft feathers. Each line should be as fine and tight as possible. -
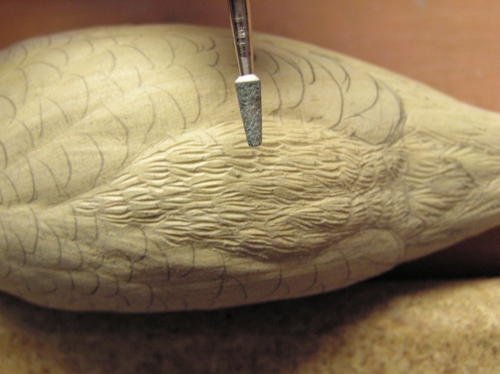
Establish Feathers and Splits
Start detailing the soft feathers. Draw in all the individual feathers in the soft feather groups (head, upper- and lower-tail coverts, back, cape, scapulars, flank, vent, belly, and breast). The key to creating soft feathers is the splits. You need a lot of them. Cut them in using random lengths, widths, and numbers per feather. Also, make sure to cut the splits in an arching motion rather than in straight lines. As you proceed through an area, it should begin to have a soft feather look even without fine texturing. -
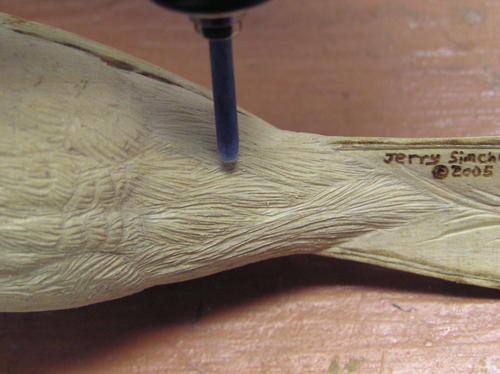
Soft Feather Texturing
The remaining feathers are now the soft feathers, in which we have already cut splits. Use a hard stone or ceramic stick as you did with the semi-hard feathers. Work from the back forward. Keep the soft feather effect by making arching cuts rather than straight lines. Each line should be as fine and tight as possible. -
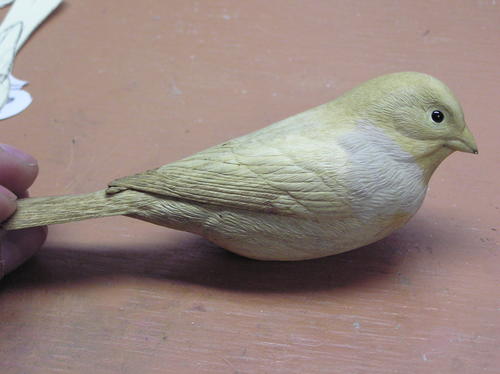
The Finished Look
This is the finished bird after completing the fine texturing. -
Establish Toe Lengths
For this project, I had to reference a museum skin to get my measurements for the feet. I measured each toe and marked the location of each knuckle/joint. These joints are important for proper bending later. -
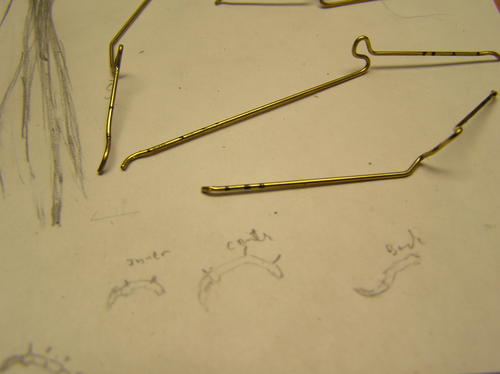
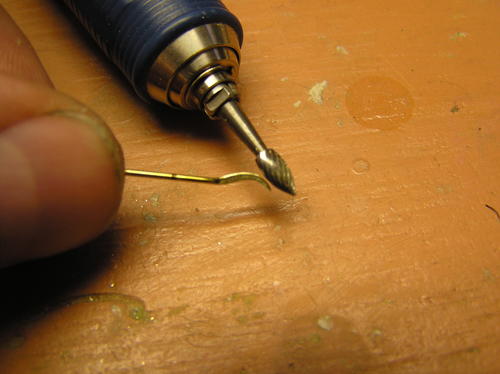
Identify the Joints
Use a brass rod for the core of each toe, and mark each joint on the rod for future reference. The ends will represent the talons. The size of the rod is based on the minimum thickness of the toes. I make sure to go smaller than the thinnest part of any toe so there is enough room for the epoxy buildup. -
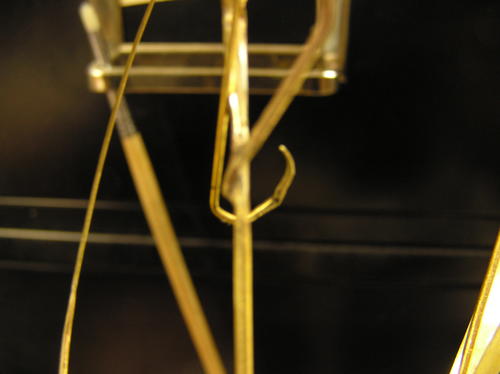
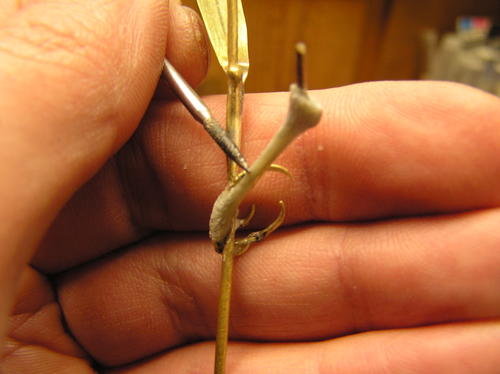
Shape the Talons
Use a hammer to flatten and thin the widths of the talons. This will provide plenty of height and depth for the talon to be cut and shaped with a carbide bit. Cut the talon profile based on the reference feet. After cutting the profile, round off the talon’s top edge. Don’t round the talon’s lower edge. -
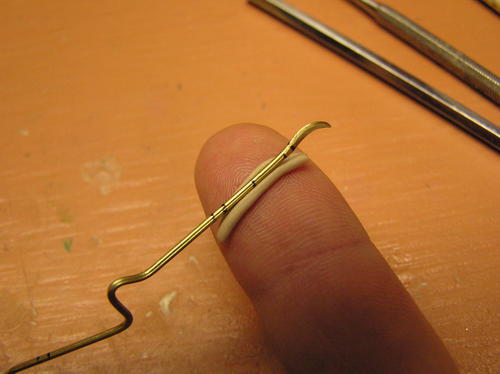
Shape Toes to Habitat
At this point, it’s important to begin looking at the bird’s placement on the habitat. When placing the legs to the habitat, make sure the bird is balanced when set on the legs. With the legs in place, form the toes around the habitat. Working from one toe to the next, bend each one at its joints so that it lays naturally around the habitat. Check reference photos if necessary. -
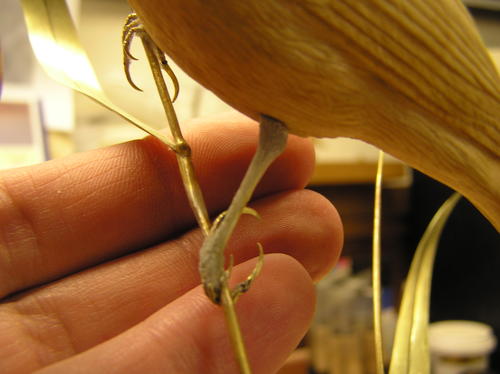
Build Up Toes and Legs
Using a two-part epoxy (Apoxie Sculpt), build up the flesh portion of each toe and leg. When working the toes, reference the thickness and shape. The top of the toe is thin with a scaly look while the bottom has pads and appears thicker. Use dental tools to form the epoxy around the toes and legs. While the epoxy is still workable, you can form the scales and texture of the toes and leg. -
Tie Toes into Legs
Once the epoxy has set up and hardened, secure the toes to the leg with super glue and/or two-part epoxy. Once you’ve applied the epoxy, shape and texture it using the dental tool in order to give it the scaly look, blending into the toes and leg. -
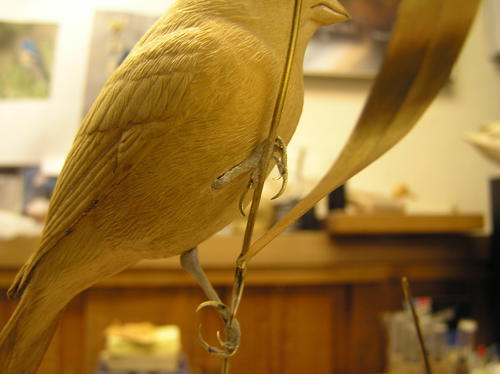
The Finishing Touches
This is the finished bird after completing the legs and feet. Notice the left leg is inset up into the belly flank feathers. You can do this by carefully cutting a channel the width of the leg so it appears as though the feathers are lying around both sides of it.