The Transformed Log

Having an arborist as a friend has distinct advantages, but you should be careful. If you ask whether he ever runs across a decent-sized American cherry tree he just might drop a 250-pound trunk piece in your front yard.
The cherry tree was 14 years old when Jamie removed it from a property down the road from my house. It was as green as green could be, but it seemed to be in reasonably good shape. The log was a little over four feet high with a 13-inch diameter on the bottom.The fork in the trunk was quite a bit wider and would present some interesting situations relating to the grain of the wood.
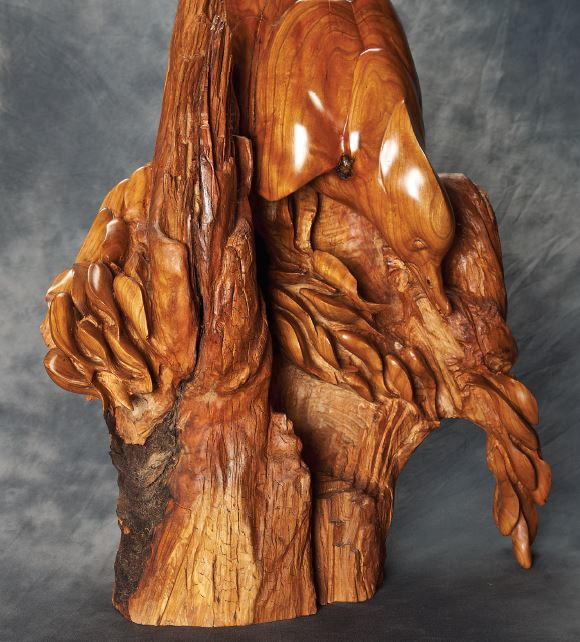
I decided to carve the trunk with the forked end as the base. I had a couple ideas of what to do. One was to carve a Roman soldier's battle helmet topped by an eagle. It was an interesting concept, but I realized I didn't have sufficient wood to adequately complete the helmet design. My second idea better fit the available wood. I decided to carve a hooded merganser chasing a small school of fish down and around a submerged tree stump.
I sketched out the design on paper to approximate the dimensions and made a small clay model to better understand the proposed carving's dynamics and to modify the respective volumes of form.
The tree was still extremely wet, and controlling the drying-out process was an interesting challenge by itself, as was moving the trunk to a shaded work area at the rear of the house.
After I removed the sap wood, the work fell into three basic phases. Roughing out took approximately four hours. At that point, the design was essentially complete. That design process—determining the subjects' perceived movements and the dynamic positioning of volumes within the carving—was the project's most critical aspect. At this point, the precise dimensions are not a major factor. The flow and the final measurements will be at the mercy of how the wood reacts to the drying process.
The second phase was totally devoted to carving. This was when I had to bring all my carving skills to the table.
The third phase was applying a suitable finish to the carving. If you don't proceed carefully here, you can nullify all your previous work. The finishing process is a personal choice largely based on experience. I strongly suggest that you try your various finishing processes on scrap wood before using them on your masterpiece.
This article deals primarily with the sequential steps in completing the carving, and not with the how-to functions and descriptions. I have made the assumption that your skill level will allow you to produce something similar.
This article is from the Fall 2011 issue. For more information on our issues, check out our issues page.


