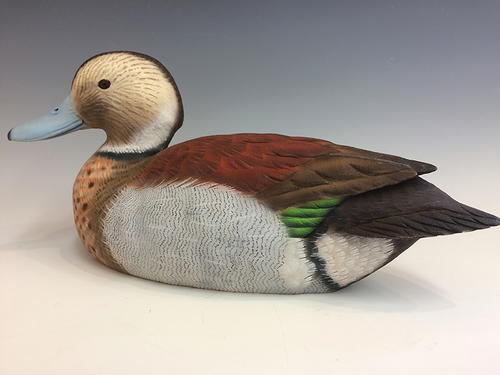
A Ringed Teal Drake - Part One: Carving
Think outside the pond.


Most novice carvers begin with modest goals. Initially we may hope to just complete a carving that looks something like the real bird. However, as you begin to master some of the nuances of this art form, your goals tend to evolve. You might find yourself following the twisting road of wildfowl carving, constantly amazed and challenged by the opportunities this art form presents.
I was introduced to waterfowling and the art of the wooden decoy by my father and grandfather while growing up in northern Minnesota. My grandfather was a cousin of one of the top decoy carvers from the Illinois River area, Hiram Hotze. His hunting rig consisted of birds carved by Schoenheider, Elliston and, of course, Hotze. My grandfather and I shot many a bird over that beautiful rig! There is no doubt this planted a seed when it came to wooden birds. While I have carved my share of raptors, songbirds, and shorebirds, I keep finding myself drawn back to the waterfowl that started me on this journey. Initially, I just wanted to carve a few decent decoys to hunt over. Once the hook was set, I decided I wanted to carve the hen and drake of each of the 41 species of waterfowl indigenous to North America. A little over 40 years later, I think I am about halfway there.
After I entered the world of competitive carving I began to see a different path. I saw some of the most incredible art known to man, but after a while I noticed a certain repetitiveness to the shows. One beautiful pintail followed another, followed by another beautiful mallard, wigeon, canvasback, and on down the line.
Following graduation from college, I went on a personal migration to Alaska where, for 37 years, I had the privilege of hunting and observing a variety of eiders, as well as harlequins and long-tailed ducks. I held in my hands, cleaned, and revived a variety of oil-soaked birds following the Exxon Valdez disaster. I fell in love with the sea ducks, but was fascinated by murres, puffins, and Arctic and red-throated loons as well, to name a few species. This background seemed to keep calling me to carve more and more “unusual” birds, such as grebes, loons, and gulls—just something different from the birds that dominate most of our competitions. There is absolutely nothing wrong with the traditional birds. I just felt myself drawn to a path less traveled.
While I have met several other accomplished carvers on this divergent path, they are few in number. The reasons are obvious. Most of us are familiar with North American species that frequent the lower 48, and we identify with them through memories forged in duck blinds on frosty mornings, or trips to the city park with the family, or as observers of the wonders of migration. If we are motivated to recreate one of those species, we can find a wealth of reference material. There are reliable pattern books, study skins, study bills, and painting instructions available.
My individual path has most recently led me to discover the multitude of amazing waterfowl that inhabit not just our continent, but the entire globe. My foray into this new arena came as the result of a commission for a paradise shelduck that I initially declined due to my unfamiliarity with the species. However, I decided to look the bird up online and when I saw how beautiful it was, I knew I had to carve it. Since then, the amazing array of the world’s incredible waterfowl keeps calling me further and further down this path.
The board of directors for the Pacific Flyway Decoy Association recently initiated a competition featuring international waterfowl to encourage exactly what I have been talking about. One of the birds featured this year is the ringed teal. When I found it online, I once again knew I had to carve it even though it is a species I have never actually seen in the wild or held in my hand.
Carving
-
I gather all the reference material I can find. In this case, I was able to locate a study bill and a study skin. Many taxidermy companies have a section of exotic study bills and can lead you to a study skin if you ask. Some businesses raise exotic birds and will sell a specimen that met an unfortunate demise.
I also assemble a variety of the best images I can find online. In some cases, I will have a hard copy printed for easy access. I may look at hundreds and will select those photos that show a specific part of the bird I need to see. I also gather information about the bird to enhance my understanding. In this case, I learned that the ringed teal is indigenous to South America, breeding primarily in Argentina, Paraguay, and Bolivia, and is also found in Brazil and Uruguay. It inhabits the marshlands near forested areas, as it perches and nests in trees. Its pink feet are well adapted for perching. Interestingly, neither sex goes into an eclipse plumage phase, remaining colorful throughout the year. It is a small bird, around 14 to 15 inches from bill to tail when stretched out, roughly the size of a cinnamon teal. It has striking plumage, from the iridescent green speculum to the spotted, almost pink, breast. I found the boldly colored, uniquely shaped scapulars, and the large tertials, which almost completely hide the primaries when the bird is at rest, particularly intriguing. -
I develop a pattern. I look for a good side image of the bird with a straight waterline. I am also looking for a picture that shows off the best features of the bird if possible.
-
Once I have found the image I need, I blow it up on my computer until the size of the bill matches my study bill. If the bill is the proper size and the distance to the center of the eye matches, I know that the rest of the image will be the right size.
-
Many carvers have little formal art training and struggle with the ability to draw a pattern. The good news is, if you can trace, you can draw a pattern. Here I’m tracing the profile of the ringed teal on transparent stencil film material I purchase through Amazon. Be sure to get the type that allows you to draw on one side. For this project, I am using the No Tack Stencil Film with the translucent matte finish made by Badger. I prefer the 11 x 17 size as many waterfowl patterns will be longer than the standard 81⁄2 x 11. I will also use this stencil material later in the painting process.
-
When I have the profile, I can easily develop a top pattern utilizing the measurements I have obtained from the side profile and the study skin. I do this on graph paper and then transfer measurements to the stencil material so I have a durable pattern that I can use again if I choose to. I check to make sure that the top and side patterns match and are symmetrical.
-
I begin with the head as I will place the completed head on the body block and shape the body to it. Using the stencil material, I place a traced copy of the head pattern on the head block. This shows me that the bill is properly positioned where it joins the face. Many carvers begin carving the bill at the tip on their head cutout and then carve the head to it, leaving the sloped forehead that is seen on so many novice and intermediate carvings.
-
Utilizing my stencil material, I trace a separate top pattern for the bill. I will transfer this to the head block.
-
I do the same for the side of the bill.
-
I use my top bill pattern to verify the width of the bottom of the bill. I double check this with my calipers to be sure that I am leaving enough wood. I don’t want to carve the bill too small at this point.
-
The top pattern for the bill is transferred to the block.
-
The top pattern for the bill is transferred to the block.
-
Using a smooth cutting, barrel-shaped bit available through Ram Corporation, I begin removing the wood with the hash marks. I am simply removing wood that I know will not be part of the final bill.
-
I am removing everything that doesn’t look like a bill. I am not actually carving the bill yet. It is like removing the skin of an orange to find the fruit inside.
-
Now I have something that closely resembles the size and shape of the actual bill. I will begin the final carving.
-
First, I establish the lower mandible and then shape the rest of the bill, utilizing my study bill to guide me as my final reference. There are no shortcuts at this stage. I now carve what my eye sees, so that in the end I have a bill that belongs to a ringed teal.
-
Next, I draw a circle on the bottom of the neck. I will not remove too much at this stage, but I know I can at least get rid of the irregular edges.
-
From my study bill, I get a measurement from the top of the culmen to the center of the eye. These two fixed points on the head, you may recall, are what I used to develop the pattern and are really what I build the entire bird around. They couldn’t be more important!
-
I take this measurement and transfer it to the head block and sketch it in with a pencil. The eyes are straight back from the top of the bill and at a distance approximately equal to the thickness of the bill from top to bottom where it joins the face. I draw one eye first with a pencil and then draw the other to match on the opposite side. Symmetry is of the utmost importance, so I will probably use push pins centered in the middle of each eye to verify my placement before I drill the holes. I drill the eyeholes with a small gold carbide bit from Ram Corporation, using a circular motion until the hole is just slightly larger than the eye I have selected for this bird. The eyes in this case are 9 mm brown. I like to give myself a little extra room on each side so I can adjust the eyes to assure symmetry. Volumes have been written on eye topography, so I will not go into detail here, other than to say the importance of this area cannot be overemphasized. We make eye contact with a carving just as we do with a person, and if the eyes are not correct, the battle is lost. If you fail here, the carving fails.
-
Using my calipers, I obtain a measurement for the thickness of the crown and sketch those lines onto the head block.
-
I cut straight down from the widest part of the crown into the bottom of the eye channel.
-
I round the crown and the cheek area into the eye channel. In general, everything on the head rolls into and out of the eye channel. I have also marked areas where I will deepen the eye channel on either end of the eye.
-
I round the crown and the cheek area into the eye channel. In general, everything on the head rolls into and out of the eye channel. I have also marked areas where I will deepen the eye channel on either end of the eye.
-
After pressing a ball of KwikWood into the eye socket, I use my fingernail to conform it into the general plane that I will want the eye to follow, in at the front and down at the bottom.
-
For me it works better to start with the left eye and then place the right. I push the eyes into the eye sockets and check them for symmetry, front to back and top to bottom. The plane of the eye should follow the plane of the crown. The focus point should be across the top of the bill to a point slightly in front of the bill. Be sure both pupils are even and facing slightly toward you when viewing from the front. When you look straight down from the top of the head, the eyes should not be visible, and when you look straight on from the back of the head, the eyes should not be visible until you turn the head slightly less than a third. They should appear the same from each side when the head is turned to the same angle.
-
I roll a snake of KwikWood and press it along the bottom of the eye, in the shape that I want the bottom lid to be. I will then press and smooth the lid away from the eye, leaving the inside edge of the lid undisturbed. I may wet the tool to aid in the smoothing process. When I am finished, I want the lid to essentially disappear, simply defining the shape of the eye. Waterfowl close their eyes from the bottom up, so the placement and shape of the lid will speak volumes about the mood of your bird. In a relaxed pose, the lid would be partially closed. In an alert bird, the eye would be open and closer to round. Waterfowl blink with a nictitating membrane that moves from front to back, but is insignificant in terms of what we are showing in a carving.
-
With another snake of KwikWood, I form the top lid, and once again press the outside of the KwikWood away from the eye and blend it into the crown.
-
When I am finished, I have the shape of the eye that matches the mood of my bird. I smooth the KwikWood until there are no lids, ripples, or edges showing. When this area is painted, I know from experience that paint will not cover imperfections, it will magnify them. This is critical to the final appearance of the piece. You can carefully sand away imperfections after the KwikWood dries, but that can be difficult around the eye. If I am unhappy with the final appearance of my eyes, I can do some additional shaping with my burner set on a low heat, but I seldom need to do this. As a side note, I usually do not place the eyes in the head until the piece is almost finished to avoid scratching them. I placed them earlier this time for this demonstration.
-
Now it’s time to move on to the body. I place the completed head on the body block and position it where it looks most pleasing to my eye. I can also use my transparent stencil film pattern at this point to get an idea of where the side pocket and other feather groups will lie on the block.
-
I follow the same process for the top pattern.
-
I establish a centerline on my body block. My eye will tell me where to sketch this, but if you are just starting out, a flexible ruler comes in handy.
-
I have sketched in a waterline and am using a monster carbide in my Master Carver to remove wood in this area. This is the tool that I will use for major wood removal throughout the body, as it cuts very smoothly and very efficiently.
-
Those of you who have difficulty sketching in the feather groups can do what I’m doing here. Use a push pin to poke holes through the stencil film to establish key points on the body block, and then simply connect the dots.
-
I have sketched the top pattern on the body block. I originally designed the pattern with the primaries crossed. However, as I progressed with the carving I decided to leave them uncrossed so that I could demonstrate more clearly how the body of the bird lies under the wing structure, a point that is so important but is so often misunderstood by many beginning carvers.
-
I am establishing a flat spot on the body block where the head will sit. The knife I am using for this step was designed by my friend and mentor Dennis Schroeder. I can rock this knife to establish a stop cut where the back of the neck will sit against the shoulders and then use the knife like a chisel to slide out the wood chips back to that point. This is one of two or three knives that I find essential. You can see that I have rounded the body up to the side pockets and down to the waterline, and have also begun the process of rounding the top of the body down to the side pockets. I stay away from the area where the tertials and primaries will lie to be sure that I will have enough wood left in the area.
-
The finished shelf is nice and smooth and has a surface that will join cleanly with the head.
-
I have spot glued the head on the body with hot glue. I am happy with the head placement, but if I was not, I could still make adjustments at this point.
-
I have spot glued the head on the body with hot glue. I am happy with the head placement, but if I was not, I could still make adjustments at this point.
-
I have opened the primaries so I can show the shape of the body under the overlying wing structure. This line begins at the upper-tail coverts and continues over the top of the rump and up the back until it disappears under the scapular feathers and connects to the back of the neck. This line does not disappear to some imaginary point out in space. You must visualize the football shape of the body lying under the wing structure if you want to create an accurate rendering of the actual bird. The bird’s body is very rigid and that shape alters very little. It provides a strong aerodynamic platform to support the stresses associated with the rapid and twisting flight of waterfowl.
-
After establishing the top of the tail, I am defining the top of the rump where it will curve up and become the top of the body. I have done no undercutting at this point, as I must establish the top of the primaries, tertials, and the rest of the wing structure before I undercut anything. If I undercut too soon I may run out of wood down the road.
-
I am now beginning the undercutting process with my other favorite knife, which allows me to reach well up under the primaries. Both knives are available through Sugar Pine.
-
When I start contouring or landscaping the body, I cut indentations that I will round over with a cushioned sanding drum. I am carving larger feather groups, not individual feathers. When I complete this process, I will have smooth contours that resemble waves, with no hard edges or heavy shadows. I am trying to fool the eye into believing that a very hard material (wood) is a very soft material (feathers).
-
The contouring process is so much fun it is easy to get carried away! If I overdo it I will end up with a bird that looks like it has the mumps, so I proceed with caution.
-
When I tried to remove the head, I found the hot glue had formed such a tight bond I risked damaging the neck seam. Thirty seconds in the microwave solves that problem.
-
I have drilled small holes in the body and the bottom of the head. I will use five-minute epoxy to glue them together. The holes allow columns of glue to travel up between the two pieces, forming a stronger bond.
-
The head is glued in place. I apply pressure to the top of the head until I am sure it is positioned where I want it and that a good bond is forming.
-
I rout out the neck seam with a carbide ball. I will be using Tuf-Carve to fill this area. I use Tuf-Carve on all my birds except for full decoratives. It sands well and takes light stoning, but does not respond well to a wood burner.
-
The neck seam is sanded smooth with a cushioned sanding drum.
-
I am doing some light stoning on the head and breast of this bird, simply because I feel it looks good. I will not enter this bird in competition. It will end up in a gallery or on my table at the Easton Waterfowl Festival. I love competitions and feel that they have done wonders to advance my skills and our art form in general. However, there are times when I simply like to free myself from all rules and create what I want to create. My favorite birds fall somewhere between full decoratives and well painted contemporary decoys, without all the hours required to burn and stone each feather.
-
The bird is ready to be sealed and painted, which I will demonstrate in the next article.
-
Patterns
Brad Snodgrass has been carving waterfowl for more than 40 years. He began by carving a hunting rig out of balsa wood from a life raft he found on an Alaskan beach. His carving has evolved considerably since that time, thanks in part to the mentoring of Dennis Schroeder. Brad has won many best of show ribbons in competitions nationwide and is a regular exhibitor at the Easton Waterfowl Festival.
Read NextBy Any Other Name - Part I