
Water, Water Everywhere
Part One: Carving and Texturing
Most carvers want to carve and paint water based on what they think it looks like rather than what they see. Take a good look at the water you want to represent before starting. Photos are a good starting point, but to really understand water movement you should look at actual water. An easy way to study water and create some of the conditions you want to represent is to simply fill up a sink or tub and start creating waves and ripples. Watch how a wave moves when you run your finger through the water, mimicking the way a bird’s leg moves. What does the wake behind your finger look like? How does the water surface change when you pull your hand out as though it were a bird’s foot coming out of the water?
ELEMENTS TO CONSIDER
When you have a project that requires the bird to be in and around water there are elements you want to think about and plan into your water composition. Some elements include the size and shape, surface type, and coloration of the water.
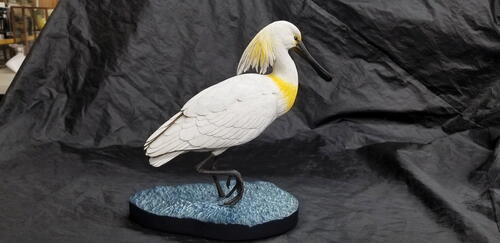
Size and shape are important to set the tone for your bird. There are times you want the bird to appear small in a vast ocean setting. In the case of this Eurasian spoonbill, I didn’t want the water to dominate the bird, so the water carving was sized in such a way to keep the bird appearing larger than its habitat. Even if the water is larger in length and width, positioning the bird past the edge of the water helps the bird look larger. The top-down shape I immediately think of is an irregular curve. A pleasing shape to our eye is an oval, and many have used this shape. Allow your artistic nature to kick in with a different shape. Think about the direction the bird is looking and turn your shape in that direction.
The surface can also set an important tone for your project. Portraying ocean birds in rough seas would require creating large-scale waves, while a great blue heron on the hunt in shallow, calm waters will call for a smooth-as-glass surface. With this project, I wanted to represent movement and a light wind. The type of surface you want will determine the technique used to create the finished look. Rougher waters will require a choppy cutting technique, whereas a smooth, slow, rolling wave will be much more gradual and require a smooth cutting technique.
Color selection also sets the tone and place for the water you are representing. Water isn’t as blue as one would think. Take a closer look at the body of water where your bird is found and you will likely see greens, browns, and yellows, as well as blues. The tone of blue will vary as well.
CONCEPTUALIZING THE COMPOSITION
Once the main elements of the water are determined you can transfer your idea down onto paper. Thumbnail sketches work great for me. Maybe you need physical objects to help, in which case you can create a clay model or paper model. Any tool that works for you in order to scale the water to your subject is a good tool.
Once the idea has been flushed out on paper you can enlarge it to actual size and hold your bird pattern next to it for additional adjustments if needed. Most of the time I will draw out the design on a block of wood so any adjustments will occur on the final block. When I cut the block of wood out on the band saw, sometimes I will make a final shape adjustment based on how it feels when I’m following the curves.

STAY LOOSE
In a previous habitat article, I mentioned that creating habitat is a loose and free activity without many set rules that you need to follow, unlike when you are carving a bird. This still holds true with water; however, you still need to follow some rules about how waves interact, and proper flow based on the movement you apply as a reaction to the bird. Even so, this should be a fun part of your project, and if you want a wave higher or lower, go for it.
-
Find a block of tupelo that will fit both the profile and top view of the water. Look for a piece that has the grain running in the direction of the waves you want to portray. The grain at times can help give you the natural look in a wave. The quality of the wood can matter if you are creating a smooth, calm look; with rough water however, it doesn’t matter as much.
-
Using the profile view of the bird pattern, place it on the block and draw the top view shape of the water.
Adjustments can be made as needed until you are happy with the overall look. -
Once you are happy with the shape, cut it out on the band saw. Minor adjustments to the shape can be made while cutting it out. If after you place the bird or pattern on the base and determine it’s not going to work, don’t hesitate to refine the block some more or even pull another block and start again.
-
Once you are happy with the basic size and shape of the block, draw some reference marks for leg placement, waves, ripples, and so on. This will be important to maintain proper directional movement of the water that will be created.
-
Take note how I indicate the movement of water around the standing leg and bubbles where the foot was pulled out of the water.
-
Before you get too far into the carving, be sure to drill holes where the bird’s legs/feet will be in the water. In this example, I have a main leg in the water and a toe dragging the surface of the water. It may require adjusting the holes a bit to get the bird to stand at the proper attitude and placement over the water to your liking. As you work the water make sure you draw or keep in mind the final leg thickness. There will be a depression for the leg to set down into the water.
-
Using a large Typhoon cylinder with your Foredom tool, start making bold wave cuts that follow your reference lines as best you can. When drawing the cylinder across the surface try to assure some variation of spacing from one wave to the next. Consistent and too uniform is not true to nature. Also, vary the depth of your cuts following a wave or S curve when going from shallow to deep cuts.
-
To create the smaller waves made by the legs and toes switch over to the smaller cylinder Typhoon bit.
-
Take note of the surface height of the waves, ripples, and
bubbles created by the legs. Make sure this area remains the highest point across the surface. This means you will continue to carve down the waves. -
Waves are made up of long and short S curves. Think about the primary or large wave as the largest S, and within that wave are smaller and smaller Ss. The calmer the waters, the more stretched or flattened out the S curve is. Rougher waters will have tighter and shorter S curves.
-
With the initial peaks and valleys created it’s time to soften these waves. I start rough and
gradually reduce until the desired look is achieved. As the waves are broken down, I can cross through the main wave to break it into smaller wave
segments. -
Within the main wave pattern, I go back with the carbide bit and create the smaller segmented waves within the waves. Draw the bit through and across each section you run into, following a similar flow pattern that already exists with each wave
section. This is something like applying the texture to a feather. We now need to texture the waves. -
Working around the smaller waves, ripples, and bubbles created by the leg and feet I make sure these elements of the water are more refined. Cut narrow grooves to create more depth. Cut in between bubbles to make them stand apart. Use the tip or point of the carbide bit to do this small work. It might help to draw and re-draw these elements in place to make sure you get them positioned as you want them to be.
-
With the main water texture/form in place switch over to a diamond flame or ball to continue to refine the detailed areas, such as the small waves, ripples, and bubbles around the legs and toes.
-
Using a stone ball, go back over all the surface area to soften any hard edges or texture lines that may remain from the carbide or diamond bit. This will take the place of sanding.
-
Every so often stand back and take a look at how the water surface is taking shape. It’s easy enough to make some flow adjustments by carving through sections. You can create more depth, soften the peaks, widen out the highs and lows, and so on as needed.
-
Run the block of wood on the belt sander for a nice, uniform, flat bottom. Here, I waited until I completed the top surface just in case I wanted to thin it down more after I had the wave texture in place. Many times, this process would be done before any
shaping begins. -
The initial water surface creation was done with just the
wire core leg/feet structure in place. As you work the water texture the final leg width/thickness needs to be kept in mind so you have plenty of wood to make the leg look like it’s surrounded by the water rather than simply sitting on the water. -
Some final tweaking of the carving may be required to assure the final legs set down and in the carved water. Sometimes to assure a tight snug fit I will use some two-part Apoxie Sculpt to fill any slight gaps that may exist.
We’ll cover painting the water in the next issue.
It’s important to study real water in motion in order to portray what it actually looks like, not just what you think it looks like.
Since entering his first competition in 1994, Jerry Simchuk has competed regularly at top-level bird carving shows around the country. A full-time artist since 2004, Jerry currently lives in Spokane Valley, Washington, where he continues to build his reputation as a wildlife artist, carver, judge, and instructor. You can reach him at Jerry@Simchuk.com.


Read NextLooking Up

