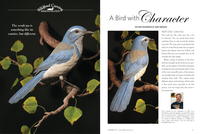
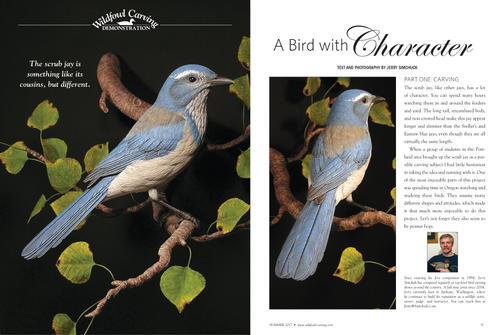
Carving the Scrub Jay: A Bird with Character
It's something like its cousins--but different.
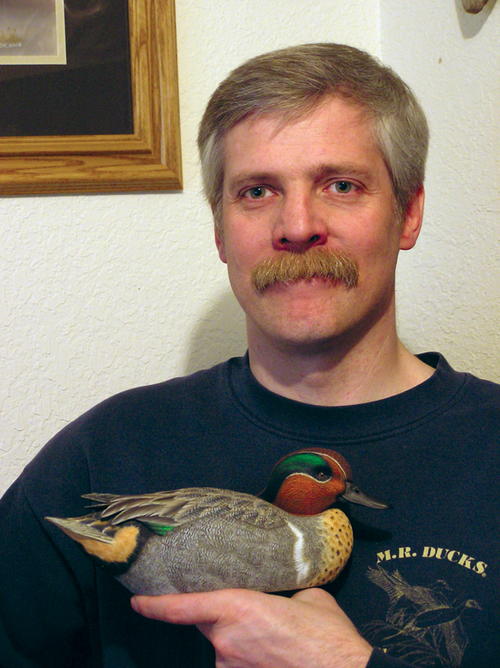
Since entering his first competition in 1994, Jerry Simchuk has competed regularly at top-level bird carving shows around the country. A full-time artist since 2004, Jerry currently lives in Spokane, Washington, where he continues to build his reputation as a wildlife artist, carver, judge, and instructor. You can reach him at Jerry@Simchuk.com.
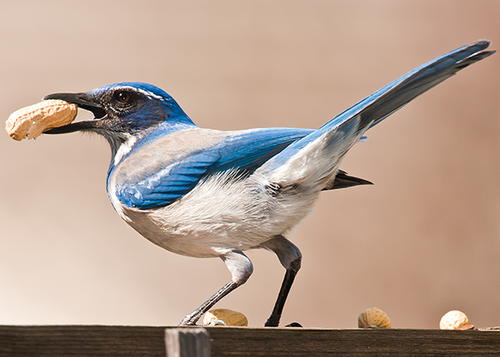
The scrub jay, like other jays, has a lot of character. You can spend many hours watching them in and around the feeders and yard. The long tail, streamlined body, and non-crested head make this jay appear longer and slimmer than the Steller’s and Eastern blue jays, even though they are all virtually the same length.
When a group of students in the Portland area brought up the scrub jay as a possible carving subject I had little hesitation in taking the idea and running with it. One of the most enjoyable parts of this project was spending time in Oregon watching and studying these birds. They assume many different shapes and attitudes, which made it that much more enjoyable to do this project. Let’s not forget they also seem to be peanut hogs.
Scrub Jay Demonstration
For a closer look at each step, please click on the image to enlarge.
Reference material
I always say you can never have enough reference. I surround my work area with as many photos, magazines, books, and study skins whenever possible. For an Internet-only bonus section of Lynda Goff’s scrub jay reference photos, click here.
Carving steps
-
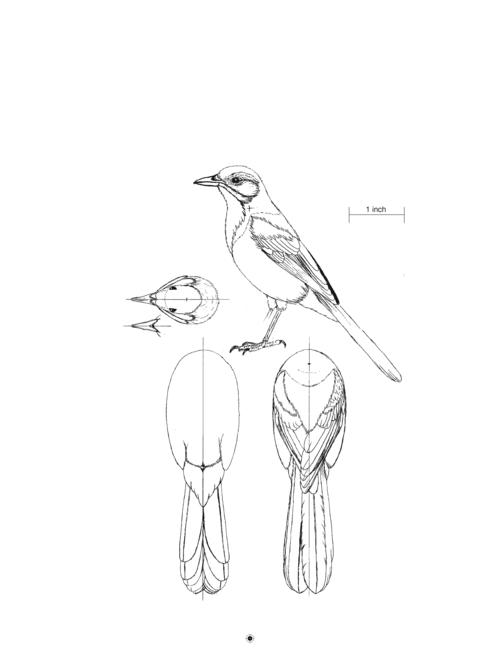
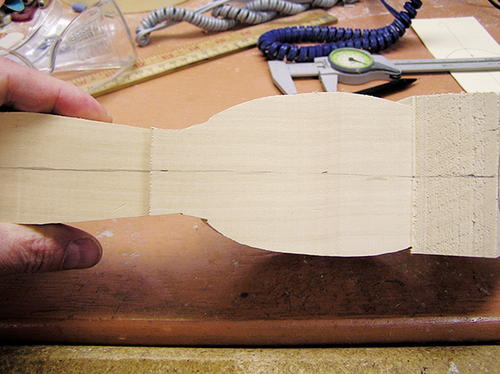
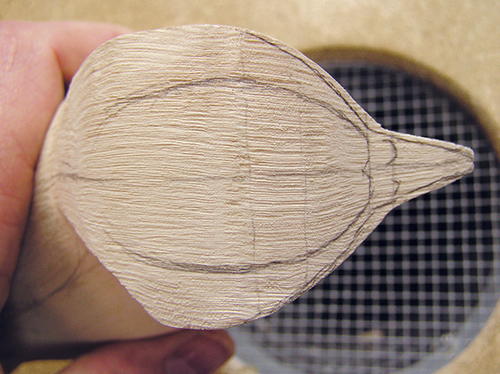
Cut the blank; find the centerline
Find a block of tupelo that will fit both the profile and top view patterns. You want the wood grain running in the direction of the tail and head. This will add strength to the primaries, tail, and beak. Cut the profile view on a band saw. Square up the head on the block so you can turn it without losing the proper plane. Draw the body centerline down the front and back of the cutout block. -
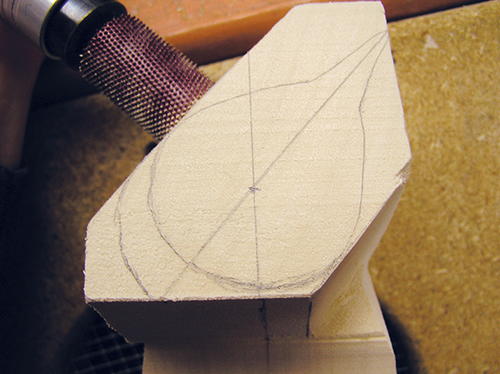
Identify head placement
With the top of the head plane square, draw the centerline for the head along with the outline of the head and body. Notice the pivot point I’ve identified by pencil. This represents the center of the neck and is the point at which you can turn the head left or right. I changed the body-to-head angle. When this angle changes you also have to change the angle of the band saw cut for the back of the head block. Two main lines represent the head. Notice how the one at the back of the head does not come around to the right side of the center line as it does on the left. -
Block in head
With the top view of the head drawn on the block, cut straight down from the top view to the lower edge of the head. Refer to the profile pattern. It is important to make these cuts straight rather than beveled in or out from the base of the head. -
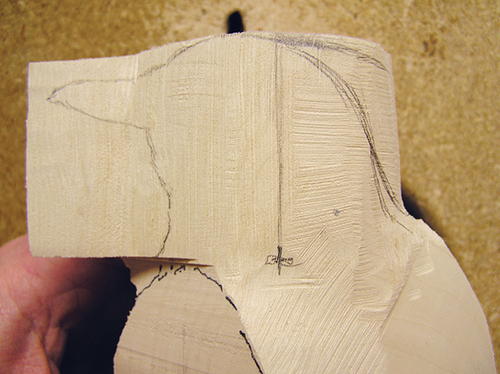
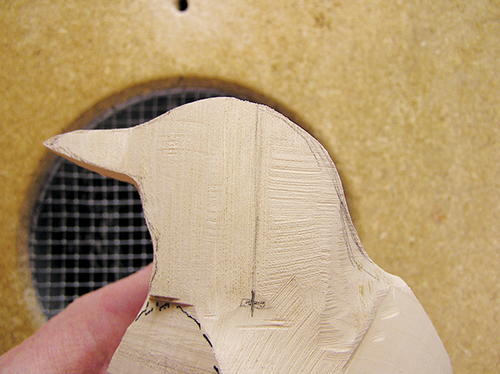
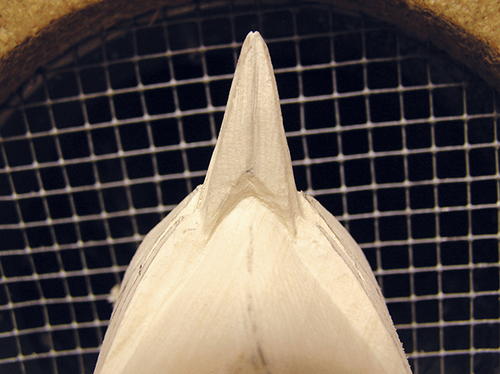
Block in forehead and beak
Cut away the excess wood from around the front of the head and around the beak. -
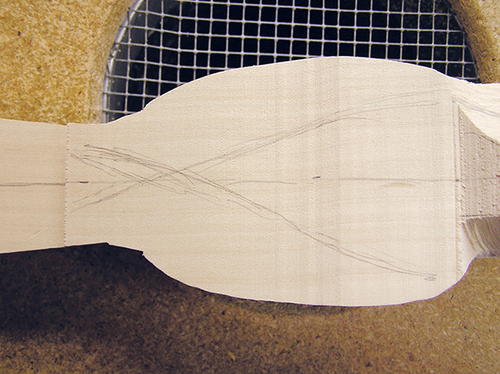
Identify the wide points
Identify the widest points on the bird’s body. This will be just above the lower edge of the wing as viewed on the profile pattern. Along the cape or back of the bird it will be down the centerline of the body and near the inner edge of the wing as viewed from the top. Draw in the placement of the under-tail coverts; you will round the lower belly region to the centerline of the under body. -
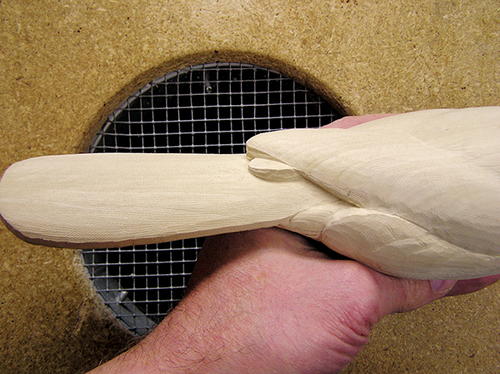
Round the body
Round into the reference lines from the previous step to create a smooth and rounded body. When cutting, keep a rounding motion going at all times so you don’t create flat areas. The body should appear round when you look down its length. -
Identify head anatomy
Draw in the profile anatomy of the head on both sides of the block, keeping it balanced from side to side. Also draw the location of the throat group and the top view and bottom view of the beak. -
Cut in the beak and throat
Begin cutting to the reference lines for the beak and throat. Starting with the top view, cut from the side straight into the line representing the outer edge of the beak. Don’t be afraid to cut into the line, otherwise the beak will be too wide or thick. Once the top view is complete, do the same thing for the profile to assure proper size and shape. Follow the same approach for the throat feather group as seen here. -
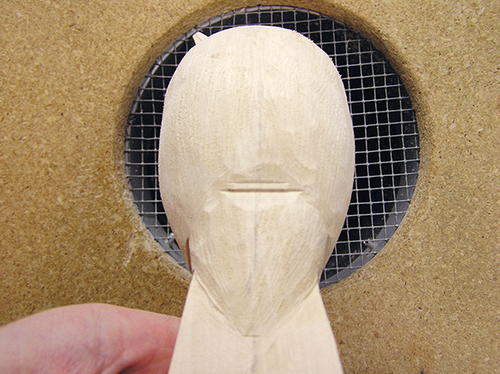
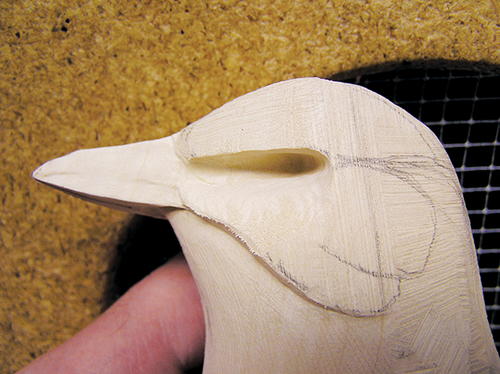
Establish the eye channels
Now cut in the eye channels. Determine the width from the top-view pattern. Cut from the back of the eye and move forward to the center edge of the upper mandible. Cut the eye channels on both sides evenly until you get the right width. Verify the balance from side to side as you view the head from the front. -
Block in the top of the head
Shaping the head feathers requires first establishing the proper widths. The top of the head is narrower than the cheeks. Refer to your pattern to draw the profile lines for the top of the head. Cut on the outside of the lines straight down to the top of the eye channel in front of and behind the eyes. There is a flow line behind the eye that is separate from the cheek—find it on the profile pattern. The cut should look straight and square. -
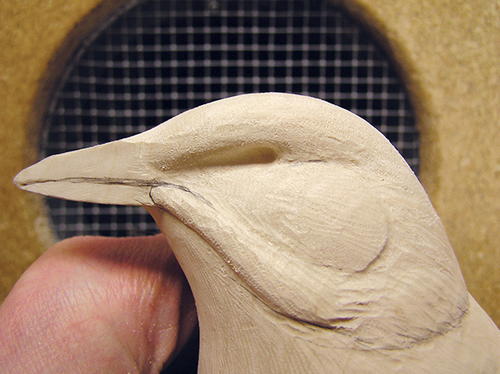
Shape the cheek patches
Use the pattern to establish the maximum width of each cheek patch. Taper the cheek into the eye channel gradually. This will create a natural look. Start shaping the feathers behind the cheek patch into the nape. -
Round the head
At this point all the head feather groups are in place, so round off all harsh
edges. Make sure there are no flat spots on the head. -
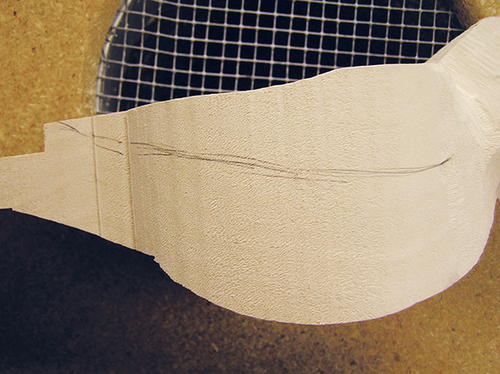
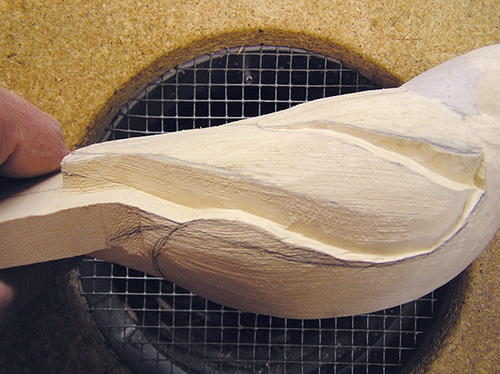
Establish the wing
Using the profile pattern, outline the wing as it will lie on the body. Also use the top view to outline the wing as it will appear looking straight down on the body. There are now two lines representing the cape-wing section. These two lines need to meet as one after the cut. Cut straight into the line from the top view and straight down to the line of the profile view. Use the same principle when cutting away the excess to represent the single line for the lower wing line. -
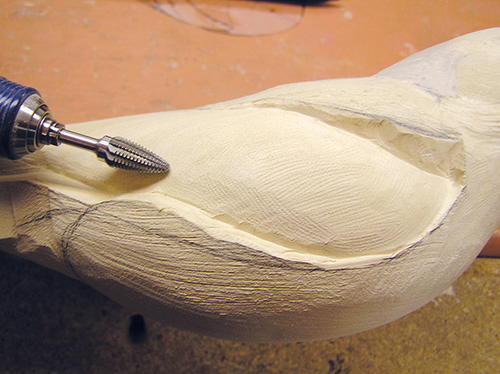
Cut the over wing
Now cut on the outside of the line that represents the over wing. Be sure not to cut too deeply into the lower wing. You want to leave enough wood to shape the lower wing. -
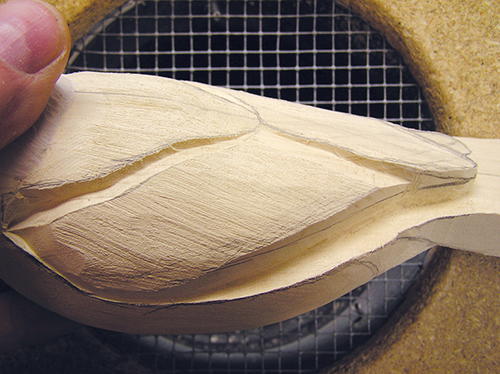
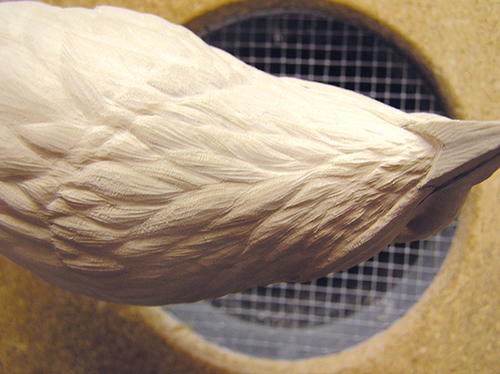
Shape the wings, cape, and side feathers
With the wings cut into place, smooth and round each wing. The wing should have a smooth flow from the top of the primaries all the way to the wrist. If you see lumps or bumps in this area, smooth them out. Smooth and round the soft feathers that flow up to the wing or over the wing at this time. Smooth and round the edges of the cape so it appears as though the cape feathers flow on top of the wing. -
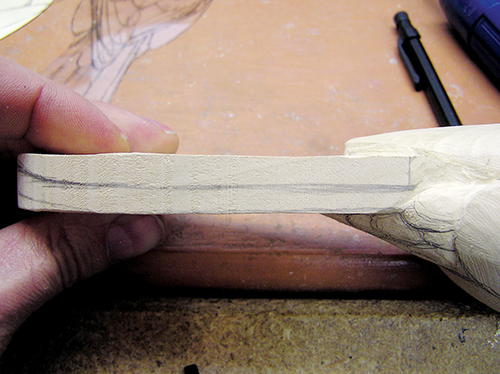
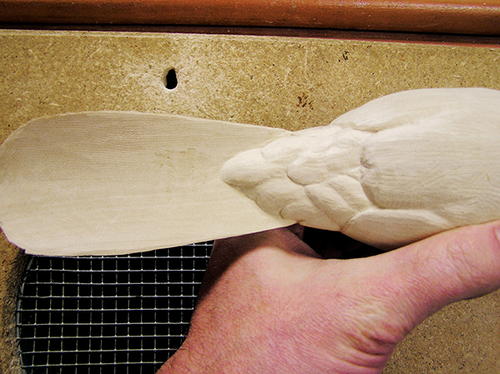
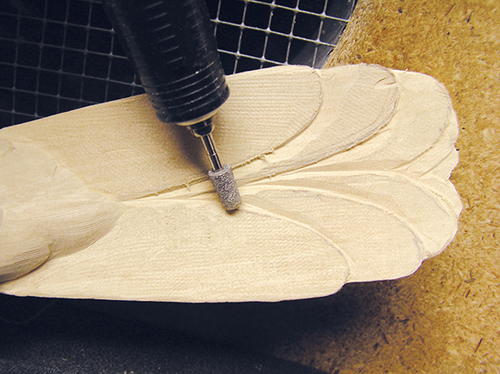
Define the tail
Rough in the tail by cutting up into the centerline on the underside to get an arched appearance. Notice how there is a slight uplift at the end of the tail. Taper the top slightly to the outside edge. Be sure to leave about 1⁄8 of an inch extra thickness on the outside of the tail for layering in the feathers during later steps.
-
Flank, vent, and under-tail coverts
With the tail and wings in place, refine the placement and shape of the flank, vent, and tail covert feathers. -
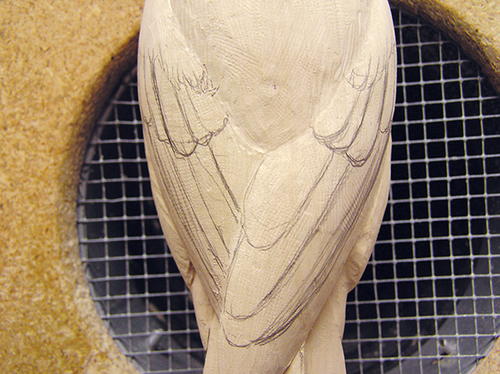
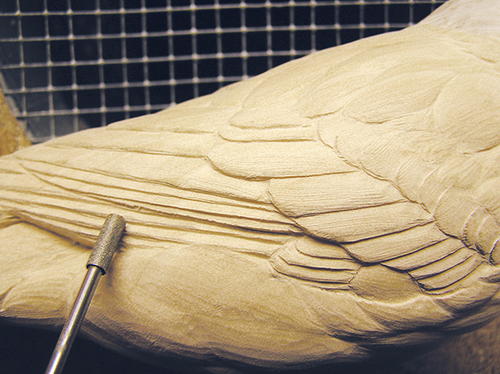
Define wing groups
Draw in the individual feather groups that make up the wing. Going from front to back, these groups are the scapulars, medium wing coverts, greater coverts, alula, primary coverts, tertials, secondaries, and primaries. -
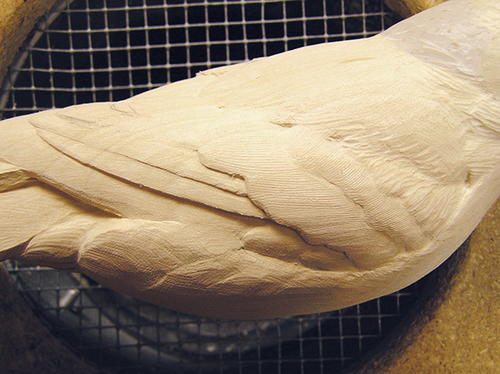
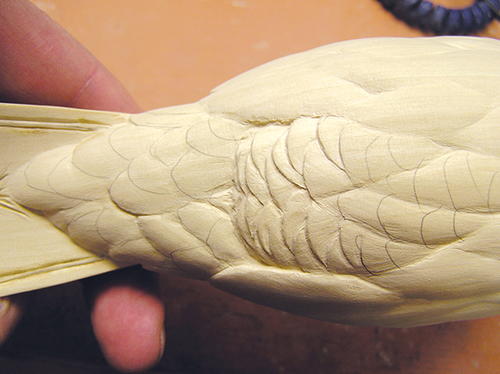
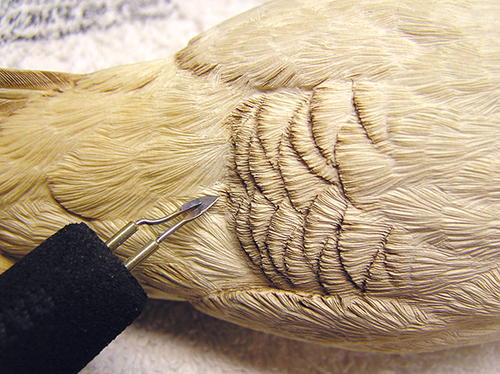
Establish the wing feather groups
Once you are happy with the layout for both sides, you can define these groups. Cut them in to create a definite drop off from one group to the next. For a looser feather group separation, make greater steps from one group to the next. Once you’ve created the steps, round the lower edges to soften the transition from one group to the next. -
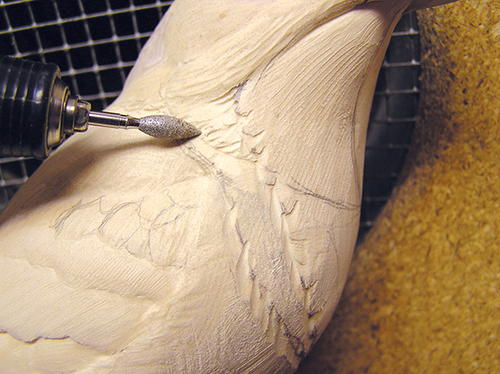
Blue and white breast feather groupings
Define the blue and white feathering on the throat and breast. Draw in the outer perimeter of these two color groups and then cut them in using the diamond flame, following a feathered edge pattern. -
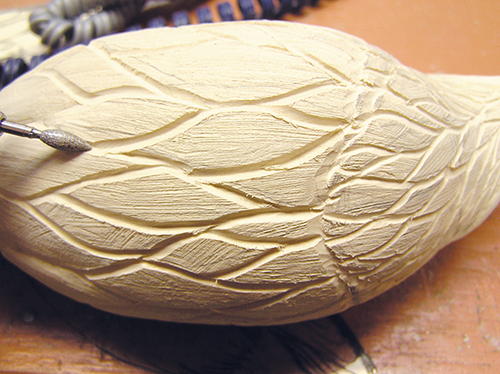
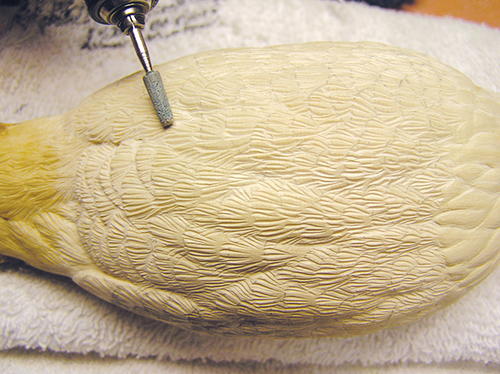
Soft feather groupings
On the breast, belly, under-tail coverts, and cape, create flow lines that radiate out to the tail from the centerline. Use S curves and arcs to randomly connect one flow line to another so it all appears graceful. Once you are pleased with the look and flow of these groups, cut them in with the diamond flame. Be sure to vary the depths of your cuts. You will typically have shallow cuts in the breast but deeper ones around the centerline and as you move to the back portion of the belly and flanks. Next, roll off the edges on both sides of each cut to represent a smooth transition, as shown here. -
Randomly go back through and deepen some of the groupings to get a looser look to the feather groups where you will see the white and blue feathering on the throat and breast.
-
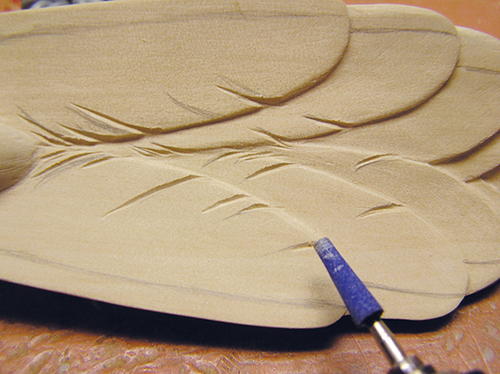
Wing and tail feather layout
Draw and cut the individual wing and tail group feathers with a safe end diamond cylinder. Make sure not to create a uniform layout. Mix things up by making some feathers more exposed and some less. -
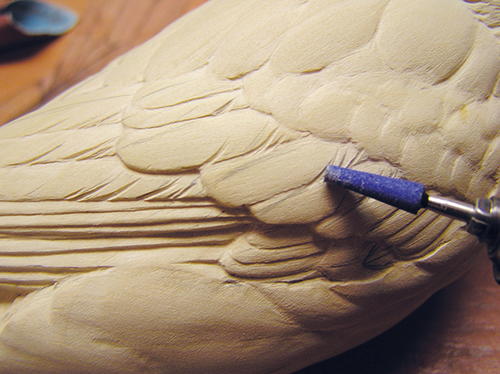
Feather shaping
Round the edges of these individual wing feathers so they appear to stack softly onto the feathers below. Where you want separation, don’t round the edge all the way down to the lower feather. Clean the feathering with sandpaper or an emery board. -
Adding splits
You can define both splits and quills with stones and burning tips. Start with a coarse stone to define the splits. Follow up the stone work with a flat-edged burning tip to refine the feather edges, clean up the splits, and burn in the quills. -
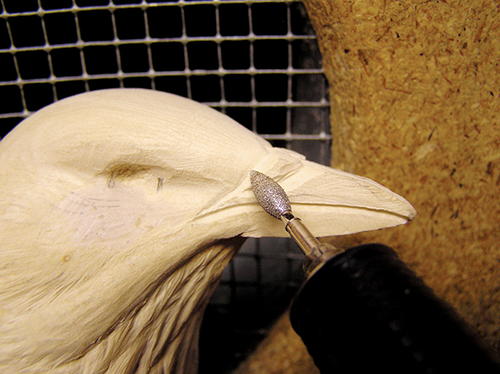
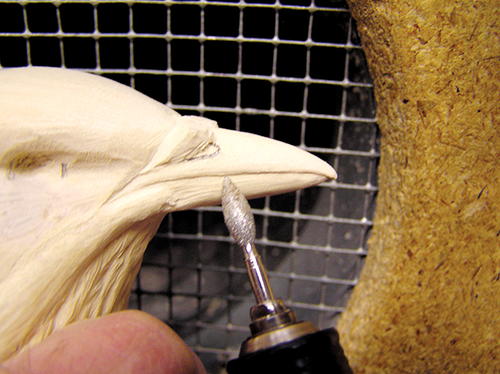
Define the mandibles
Establish the nostril whiskers by drawing in the top and profile views and then cut them in with a diamond flame. Cut around the front of the forehead from the top of the whiskers down to the sides. Also cut in front of the whiskers as they lie over the top of the upper mandible. Once you’ve rounded and shaped the nostril whiskers with some thickness retained, cut in the upper and lower mandible separation with a fine cylinder diamond bit. -
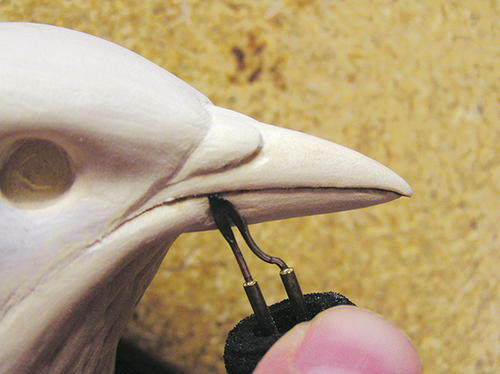
Finishing the mandibles
It becomes easier to give the upper and lower mandibles their proper shapes once you’ve established the proper widths. Round the upper mandible to the centerline, with the lower edge having a slight roll under (into the crease). The lower mandible has more of a flat bottom but still has a lower edge that rolls into the crease. Now create the inset appearance of the throat feathers as they
lie up under the lower mandible. There is a slight depression, or indentation, down the upper mandible on both sides forward of the nostrils. This creates a slightly pinched look for the upper ridge of the upper mandible. -
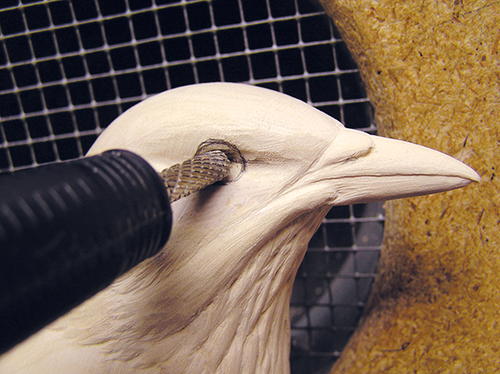
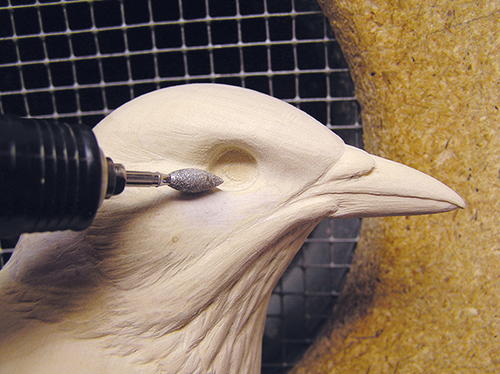
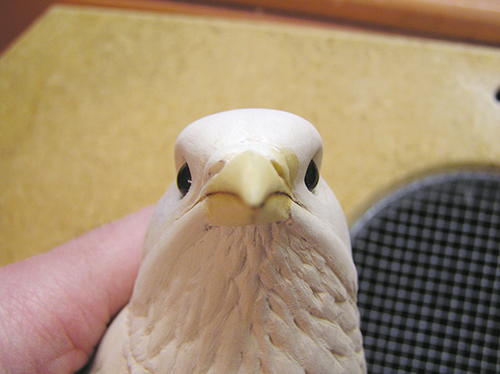
Define eye sockets
Verify the proper placement for the eyes, assuring balance from left to right and up and down. Draw a 7 mm circle for a guide before you cut the eye socket. With a carbide cylinder, cut straight into the head with a slight forward angle. Verify the eye will set down inside the cut without exposing the lower outer edge of the eye. Once you’ve established the depth, eliminate the harsh edges by rolling out of the eye socket into the feathers around the face. Sand the head smooth to prepare for setting the eye. -
Smooth the mandibles
Clean and refine the mandibles. Smooth the surface with either fine sandpaper or a fine white stone to polish the surface. -
Setting the eyes
With clay as the backing, set the eyes into the sockets until they are deep enough to match the pattern. The eyes should look slightly forward. Be sure the eyes appear straight up and down and are not angled down to the cheek or up into the head. Double-check from various angles to make sure the eyes are symmetrical. -
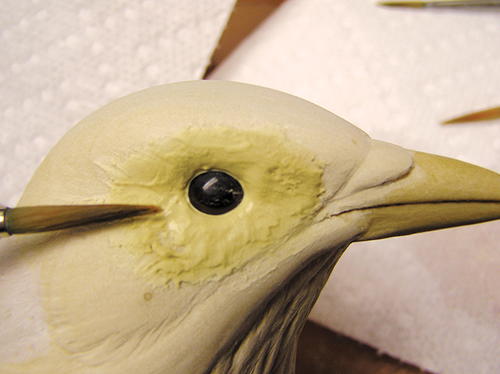
Lock in the eye
I use Elmer’s Wood Filler around the eyes. Use a paintbrush to remove excess filler until you get the look and attitude you want. Try to open the tips of the almond shape to around 7 mm wide. -
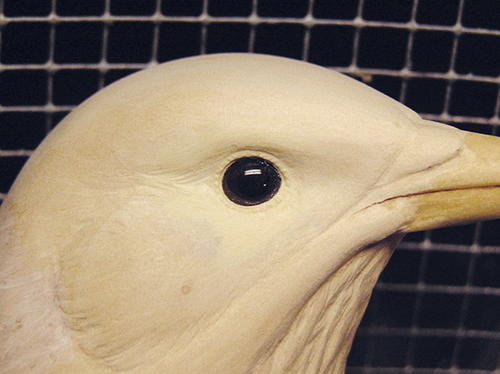
Shape the eye ring
After the filler dries, clean up around the eye with a fine diamond flame to get the filler flush with the face. Refine the eye ring and lids with a white stone. I hold the bit in my hand to assure better control. The final touch is to add dimples to the eye ring by going across the ring’s top ridge with the pointed white stone. Make these marks like spokes on a wheel, with the center of the eye as the reference point, drawing outward until you have gone around the eye ring. Use a light touch so you don’t knock a chunk out of the eye ring. -
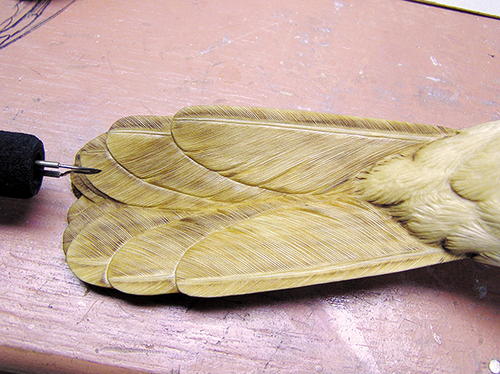
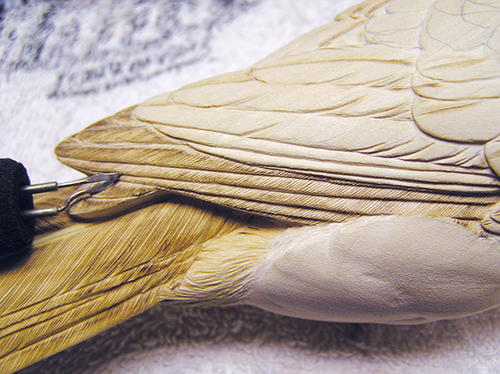
Primary and tail texturing
The primary and tail feathers are hard feathers and are the only ones I burn. Burn each line as fine and tight as possible. Shallow is better than deep. -
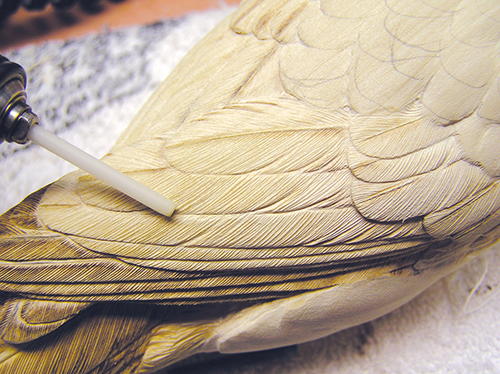
Medium firm feather texturing
Tertials, secondaries, and greater coverts are medium-firm feathers. Use a ceramic stick or sharp white stone to texture these feathers. This will give them a softer look than the burned feathers. They will also look firm because they will have fewer splits and a texture flow similar to the hard feathers. -
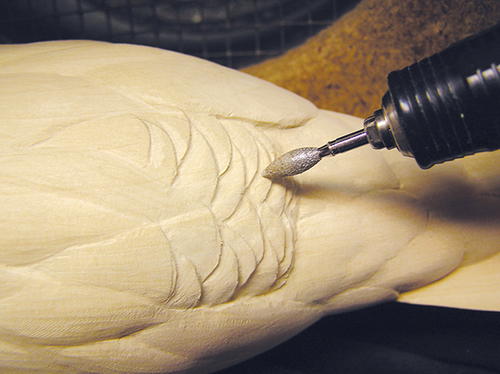
Vent feathering
The vent feathers are loose and fluffy. One way to create this effect is to make a number of random steps from one feather to the next. Use a cylinder bit to create loose, random, and deep cutting steps across this area. -
Lay out soft feathers
Draw in all the individual feathers in the various soft feather groups (tail coverts, cape, scapulars, remaining wing coverts, breast, belly, flank, vent, and head). -
Soft feather splits
The key to creating soft feathers is the splits. You need a lot of them. Cut them in using random lengths, widths, and spacing between splits. Also, make sure to cut the splits in an arching motion rather than in straight lines. Use the coarse stone (green or blue) for these splits. -
Soft feather fine texturing
Use the ceramic stick or sharp white stone to create the final fine texture to these soft feathers. As with the splits, keep the feathers looking soft with arching cuts. Tight and fine is key with this final texturing step. -
Lay in the lores
There are three or four layers of feathers known as the lores in front of the eye. Draw in their arcs and then cut them in using a safe end diamond cylinder. Make sure to vary the spacing of these arcs. Texture the nostril bristles as well. The nostril whiskers are stiff bristles so you will need to burn these in to create the stiff look. -
Refining depth
If you have any lifted feathers, this is the time to undercut them and create separation from one feather to the next. Use a fine pointed flame, undercut at an angle, and leave plenty of thickness to the upper feather. You don’t have to undercut very deeply to create the effect of separation. For shallow separation, you can use a burning tip instead. Reestablish any texture on these feathers using the burning tip to bring back the soft edges. -
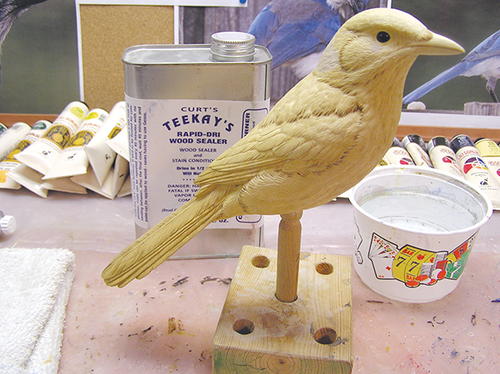
Carving completed
The finished scrub jay is now ready to seal and paint.


Scrub jay pattern
50% life-size pattern by Jerry Simchuk © 2017