wildfowl-carving.com

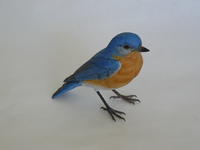
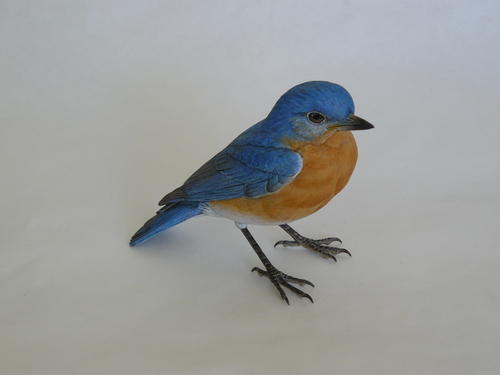
Eastern Bluebird, Part Two

Here's how to carve this much-loved ambassador of happiness.

By: Jeff Rechin

Jeff Rechin is recognized as an elite sculptor whose artistry and technique have garnered him two Best in World titles at the prestigious Ward World Championship. You can see more of Jeff’s work at http://jeffrechin.blogspot.com. 

Instead of priming the entire bluebird with straight white gesso, I use gesso to make various base colors. This gives me a jump start on the color layout while also creating a nice, flat color surface to build color washes that don’t contain gesso. Also, this lets me use fewer color washes, which helps reduce the sheen that can occur with some acrylic pigments. I want sheen only in those areas that should have it, such as bill, feet, eyes, and feather quills.

I use a 1/2" bristle brush to apply the base colors, just as I would with straight white gesso. For color washes, I use a 1/2" flat sable brush. To shade and build up feather edges, I use #2 and #4 sable rounds. For fine line work—as in the very end of the primary and secondary feathers and the eye rings, or any area that requires a fine line—a #0 sable round works well. I painted with Liquitex acrylics.

For Part One, click here

Read the rest of this article in Wildfowl Carving Magazine's Fall 2015 issue.

Painting the Eastern Bluebird

Step by Step

Click on any photo to enlarge it. 

  1. Paint Swatches

  2. At the end of Part One, I had carved, textured, and sealed the Eastern bluebird. I start the painting with straight white gesso in the white areas of the bluebird’s lower belly, under-tail covert group, and underside of the tail.

  3. Using a base color of burnt sienna, yellow oxide, and white gesso, I paint the bird’s breast. I later use a burnt sienna and yellow oxide mix to add color and definition to the ends of the breast feathers.

  4. For the bird’s blue upper parts, I start with a base color of ultramarine blue and white gesso and later build it up with blue washes of my final blue hue, a mix of ultramarine blue and a small amount of phthalo blue.

  5. This photo shows base colors of the bluebird in place. I find it important to move from light to dark, and the gesso in the mix gives me a good palette to achieve this.

  6. Using a base color of white gesso, black gesso, and some burnt umber, I start painting the bill and eyes. (As I explained last issue, I like to carve my eyes instead of using glass ones.) I will apply detail later.

  7. I take cadmium yellow and use it to add a yellow tone to the fleshy area at the back quarter of the mouth line closest to the eye.

  8. Here some washes of blue. I use ultramarine blue and a very small amount of phthalo blue, which is a very potent color, so you need only a touch of it in this mix. Some washes of a burnt sienna/yellow oxide mix applied to the breast deepen the rusty color in that area.

  9.  Here you can see how I pull the rusty orange tone up into the side of face. Again, this is burnt sienna and yellow oxide, which is the base color from step two, dotted in with the existing blue.

  10. Using the base color mix from step five, I start to darken feather edges of the secondaries, secondary coverts, and tail. I start lightly, and build the intensity slowly so these areas don’t become too dark too soon.

  11. Apply a little light blue “flecking” of color into the cheek area. This is the ultramarine blue and gesso mix. The idea is to break up any lines from one color to the next so it blends back into the blue of the head. 10

  12. I use a slightly darker blue hue to add some shading that will separate feather groups. This is a mix of ultramarine blue and a touch of burnt umber. I’ve also started some edges of flight feathers with a mix of burnt umber and black gesso.

  13. This top view shows flight feathers with feather edges being darkened, as well as secondary coverts, secondaries, primaries, and the ends of tail feathers. I also use white gesso to line the tip edges of these feathers.

  14. When I darken the flight feathers, I apply the darkest value of color at the ends, and the lightest value where one feather sits atop of the next. I want to blend this transition from light to dark with no abrupt transitions.

  15. Using gesso, I line the feather-end edges. This also creates separation of individual feathers, with the darkest value of color up against this white edge. A small brush #0 round works well to line edges like this.

  16. Here you can see the shadowing and highlights in the individual feather and the way they create definition and separation of coverts, primaries, and secondary feathers.

  17. The darkest value on the bill is at the end. When I make the transition from light to dark, I again try to make a smooth transition without a line. I have also added the eye’s pupil with black gesso and applied a burnt umber iris to the eye’s lower half.

  18. For the feet, I paint the scales of the leg and toes by first using a black gesso/burnt umber mix. I also use this on the tips of the nails. After this step, apply light washes of this mix over the entire foot and leg without covering up the light colored separations.

  19. You can see how the thin washes have not covered up the light separations of the scales. On the nails, I make a transition of light to dark, with the darkest hue at the tips. These washes are a mix of burnt umber and black gesso, mostly burnt umber.

  20. Once again, I am building up color to the edges of the flight feathers until I get them to their finished color.

  21. This profile photo shows the bluebird as it nears completion. All color values are in place. I still have to paint the left foot, using the completed right foot as my model. After I’m finished I will then permanently attach the feet. They are always easier to paint when unattached. I will also take a mix of gesso and yellow oxide and lighten the eye ring by dotting in the mix with small round #0.

  22. The underside of tail is a pale version of the upper side. The feather quills are usually very light, and the feathers are an overall light blue gray (a mix of ultramarine blue and white gesso) I apply shadowing with the white gesso, black gesso, and burnt umber mix from step five.

  23. For the final step, I use thinned gloss medium on the eyes, feet, and bill. The eyes require the most washes to achieve the greatest sheen. A lighter sheen is better for the other areas. It should be roughly equivalent to the sheen on our fingernails. I also darken some feather ends in the breast area to create depth and contrast. 

YOUR RECENTLY VIEWED ARTICLES

Free tutorials, expert tips, exclusive partner offers, and more straight to your inbox!

Reviews

I have not made this yet so I cannot rate it.

Include a Photo Include a Photo

Click the button above or drag and drop images onto the button. You can upload two images.

Cancel Reply to Comment

Thanks for your comment. Don't forget to share!

Close

Report Inappropriate Comment

Are you sure you would like to report this comment? It will be flagged for our moderators to take action.

Thank you for taking the time to improve the content on our site.

Sign In to Your Account

Close Window
Sign In with one of your Social Accounts
Facebook Twitter
OR
Sign In using Email and Password